Ubuntu LinuxにJoomlaをインストールする方法を学びたいですか? このチュートリアルでは、Ubuntu Linuxを実行しているコンピュータにJoomla CMSをインストール、設定、アクセスする方法を説明します。
•Ubuntu Linuxバージョン:18.04
ハードウェアリスト:
次のセクションでは、このJoomlaチュートリアルを作成するために使用された機器のリストを提示します。
上記のすべてのハードウェアは、AmazonのWebサイトにあります。
Joomla関連チュートリアル:
このページでは、Joomlaに関連したチュートリアルのリストに素早くアクセスします。
チュートリアル – Ubuntu Linux上のNTP
まず、NTPを使用して正しい日時を使用するようにシステムを構成します。
Linuxコンソールで、以下のコマンドを使用して正しいタイムゾーンを設定します。
# dpkg-reconfigure tzdata
Ntpdateパッケージをインストールして、正しい日付と時刻をすぐに設定してください。
# apt-get update
# apt-get install ntpdate
# ntpdate pool.ntp.br
サーバーを使用して正しい日付と時刻を設定するためにNtpdateコマンドが使用されました:pool.ntp.br
NTPサービスをインストールしましょう。
# apt-get install ntp
NTPは私達のサーバーを常に最新の状態に保つサービスです。
Ubuntu Linuxに設定されている日時を確認するには、dateコマンドを使用します。
# date
システムに正しい日時が表示されている場合は、すべての手順を正しく実行したことを意味します。
チュートリアル – Ubuntu LinuxへのMySQLのインストール
これで、データベースサービスのインストールに進むことができます。
Linuxコンソールで、以下のコマンドを使用して必要なパッケージをインストールします。
# apt-get update
# apt-get install mysql-server mysql-client
インストールが完了したら、次のコマンドを使用してMySQLデータベースサーバーにアクセスします。
# mysql -u root -p
次のSQLコマンドを使用して、Joomlaという名前のデータベースを作成します。
CREATE DATABASE joomla CHARACTER SET UTF8 COLLATE UTF8_BIN;
次のSQLコマンドを使用して、joomlaという名前のデータベースを作成します。
CREATE USER ‘joomla’@’%’ IDENTIFIED BY ‘kamisama123’;
joomlaという名前のデータベースに対して、joomlaという名前のsqlユーザーに権限を付与します。
GRANT ALL PRIVILEGES ON joomla.* TO ‘joomla’@’%’;
quit;
チュートリアル – LinuxにApacheをインストールする
それでは、Apache Webサーバーと必要なすべてのソフトウェアをインストールする必要があります。
Linuxコンソールで、以下のコマンドを使用して必要なパッケージをインストールします。
# apt-get install apache2 php7.2 php7.2-mysql libapache2-mod-php7.2
# apt-get install php7.2-mbstring php7.2-xml php7.2-zip
Apacheのmod_rewriteを有効にして、apache2.confファイルを編集します。
# a2enmod rewrite
# vi /etc/apache2/apache2.conf
これが私たちの設定の前の、元のファイルです。
DefaultRuntimeDir ${APACHE_RUN_DIR}
PidFile ${APACHE_PID_FILE}
Timeout 300
KeepAlive On
MaxKeepAliveRequests 100
KeepAliveTimeout 5
User ${APACHE_RUN_USER}
Group ${APACHE_RUN_GROUP}
HostnameLookups Off
ErrorLog ${APACHE_LOG_DIR}/error.log
LogLevel warn
IncludeOptional mods-enabled/*.load
IncludeOptional mods-enabled/*.conf
Include ports.conf
<Directory />
Options FollowSymLinks
AllowOverride None
Require all denied
</Directory>
<Directory /usr/share>
AllowOverride None
Require all granted
</Directory>
<Directory /var/www/>
Options Indexes FollowSymLinks
AllowOverride None
Require all granted
</Directory>
AccessFileName .htaccess
<FilesMatch “^.ht”>
Require all denied
</FilesMatch>
LogFormat “%v:%p %h %l %u %t “%r” %>s %O “%{Referer}i” “%{User-Agent}i”” vhost_combined
LogFormat “%h %l %u %t “%r” %>s %O “%{Referer}i” “%{User-Agent}i”” combined
LogFormat “%h %l %u %t “%r” %>s %O” common
LogFormat “%{Referer}i -> %U” referer
LogFormat “%{User-agent}i” agent
IncludeOptional conf-enabled/*.conf
IncludeOptional sites-enabled/*.conf
ファイルの末尾に次の行を追加します。
<Directory /var/www/html>
AllowOverride All
</Directory>
これが私たちの設定による新しいファイルです。
DefaultRuntimeDir ${APACHE_RUN_DIR}
PidFile ${APACHE_PID_FILE}
Timeout 300
KeepAlive On
MaxKeepAliveRequests 100
KeepAliveTimeout 5
User ${APACHE_RUN_USER}
Group ${APACHE_RUN_GROUP}
HostnameLookups Off
ErrorLog ${APACHE_LOG_DIR}/error.log
LogLevel warn
IncludeOptional mods-enabled/*.load
IncludeOptional mods-enabled/*.conf
Include ports.conf
<Directory />
Options FollowSymLinks
AllowOverride None
Require all denied
</Directory>
<Directory /usr/share>
AllowOverride None
Require all granted
</Directory>
<Directory /var/www/>
Options Indexes FollowSymLinks
AllowOverride None
Require all granted
</Directory>
AccessFileName .htaccess
<FilesMatch “^.ht”>
Require all denied
</FilesMatch>
LogFormat “%v:%p %h %l %u %t “%r” %>s %O “%{Referer}i” “%{User-Agent}i”” vhost_combined
LogFormat “%h %l %u %t “%r” %>s %O “%{Referer}i” “%{User-Agent}i”” combined
LogFormat “%h %l %u %t “%r” %>s %O” common
LogFormat “%{Referer}i -> %U” referer
LogFormat “%{User-agent}i” agent
IncludeOptional conf-enabled/*.conf
IncludeOptional sites-enabled/*.conf
<Directory /var/www/html>
AllowOverride All
</Directory>
これで、システム上のphp.iniファイルの場所がわかりました。
見つけたら、php.iniファイルを編集する必要があります。
# updatedb
# locate php.ini
# vi /etc/php/7.2/apache2/php.ini
あなたのPHPのバージョンとファイルの場所は私のと同じではないかもしれないことを覚えておいてください。
これが私たちの設定の前の、元のファイルです。
file_uploads = On
max_execution_time = 30
memory_limit = 128M
post_max_size = 8M
max_input_time = 60
; max_input_vars = 1000
output_buffering = 4096
これが私たちの設定による新しいファイルです。
file_uploads = On
max_execution_time = 300
memory_limit = 256M
post_max_size = 32M
max_input_time = 60
max_input_vars = 4440
output_buffering = off
また、Apacheを手動で再起動してサービスの状態を確認してください。
# service apache2 stop
# service apache2 start
# service apache2 status
これはAPacheサービスステータス出力の例です。
● apache2.service – LSB: Apache2 web server
Loaded: loaded (/etc/init.d/apache2; bad; vendor preset: enabled)
Drop-In: /lib/systemd/system/apache2.service.d
└─apache2-systemd.conf
Active: active (running) since Mon 2018-04-23 00:02:09 -03; 1min 4s ago
チュートリアル – UbuntuへのJoomlaのインストール
さて、Joomla CMSをUbuntu Linuxにインストールする必要があります。
Linuxコンソールで、以下のコマンドを使用してJoomlaパッケージをダウンロードします。
# mkdir /downloads/joomla
# cd /downloads/joomla
# wget -O joomla_3-9-1-stable-full_package-tar.gz https://downloads.joomla.org/cms/joomla3/3-9-1/joomla_3-9-1-stable-full_package-tar-gz?format=gz
# tar -zxvf joomla_3-9-1-stable-full_package-tar.gz
すべてのJoomlaファイルをApacheインストールのルートディレクトリに移動します。
移動したすべてのファイルに正しいファイル許可を設定します。
# mv /downloads/joomla /var/www/html/
# chown www-data.www-data /var/www/html/joomla/* -R
ブラウザを開き、WebサーバのIPアドレスと/ joomlaを入力します。
この例では、ブラウザに次のURLが入力されています。
•http://35.162.85.57/joomla
Joomlaウェブインターフェースインターフェースが表示されるはずです。
希望の言語を選択してください。
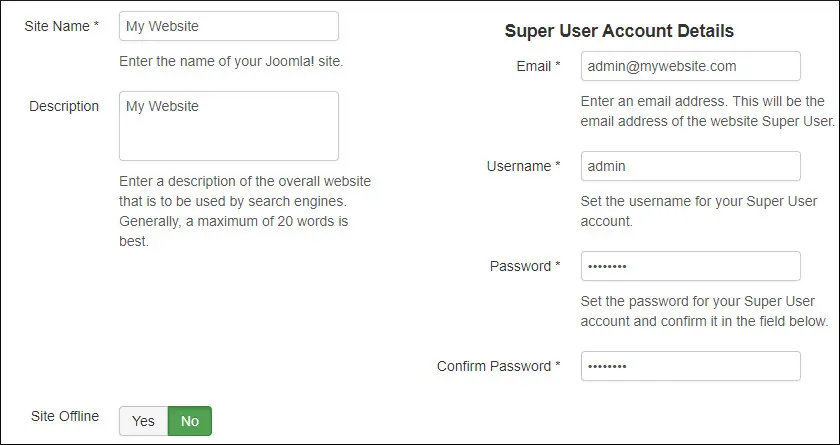
以下の情報を入力する必要があります。
•あなたのウェブサイトの名前。
•あなたのウェブサイトの説明。
•管理者のユーザー名。
•管理者パスワード。
•管理者の電子メールアカウント。
JoomlaデータベースへのMySQL接続情報を入力してください。
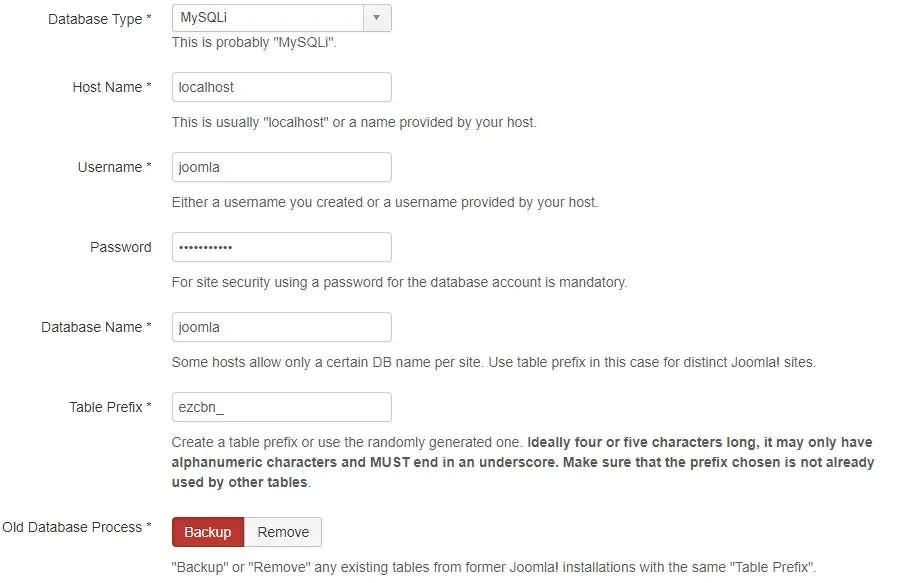
JoomlaのPHP要件がすべて正常に満たされているかどうかを確認します。

「なし」オプションを選択して、「インストール」ボタンをクリックしてください。
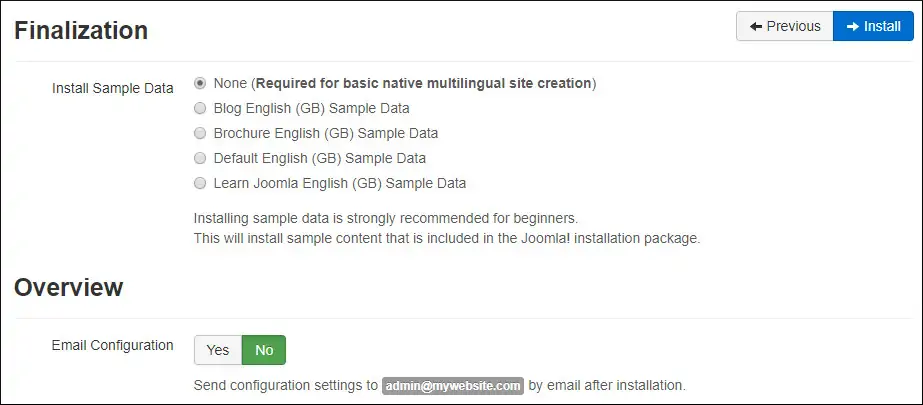
Joomlaのインストールが完了するのを待ちます。
インストールが完了したら、Joomlaのインストールフォルダを削除する必要があります。
Linuxコンソールで、次のコマンドを使用してインストールフォルダを削除します。
# rm /var/www/html/joomla/installation -rf
管理者ボタンをクリックします。
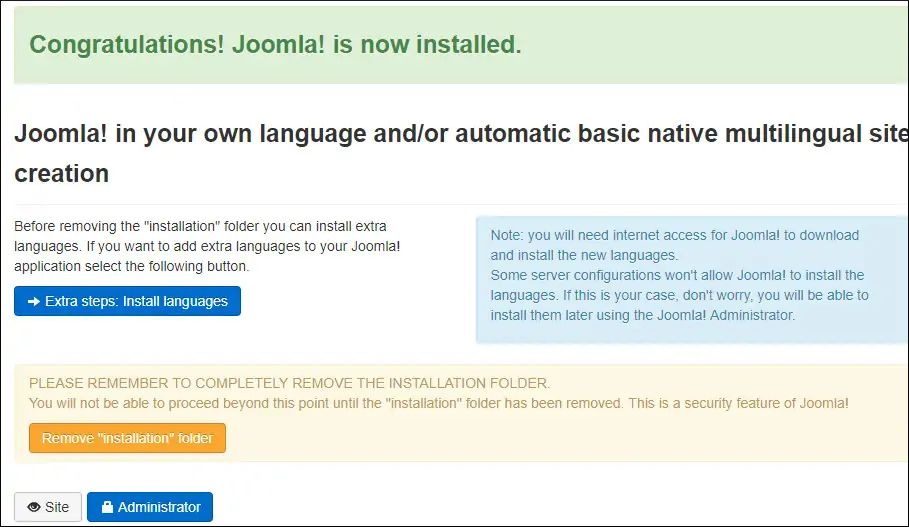
管理者ボタンをクリックすると、Joomlaのログイン画面に移動します。
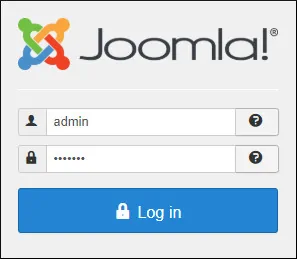
Joomlaのログイン画面で、管理者のユーザ名とパスワードを入力してください。
ログインが成功すると、あなたはJoomlaダッシュボードに送られます。
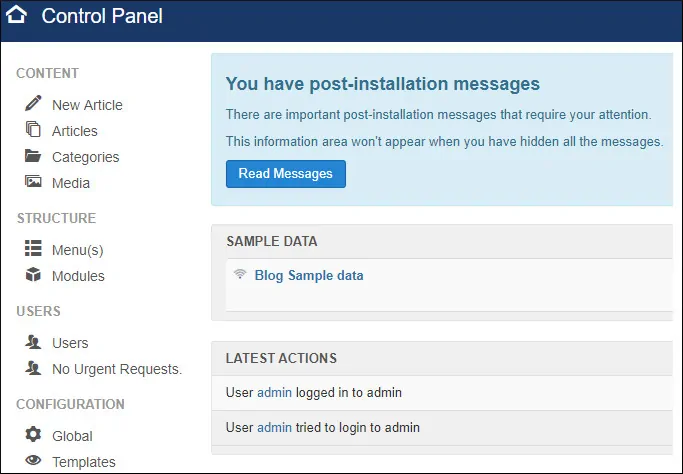
おめでとうございます。あなたはJoomlaをUbuntu Linuxにインストールしました。
