Ubuntu LinuxのコマンドラインからSMSメッセージを送信する方法を学びたいですか? このチュートリアルでは、Ubuntu Linuxを実行しているコンピュータのコマンドラインとUSB GSMモデムのみを使用してSMSメッセージを送信するために必要なすべての手順を説明します。
•Ubuntuのバージョン:18.04
•USB GSMモデム:DWM-221
このチュートリアルは、USB GSMモデムを使用している場合にのみ動作します。
いくつかのデバイスはUSBモデムのように見えますが、DWR-910のようなUSBルーターです。
ハードウェアリスト:
次のセクションでは、このUbuntuチュートリアルの作成に使用される機器のリストを示します。
上記の各ハードウェアは、AmazonのWebサイトにあります。
Ubuntu Playlist:
このページでは、Ubuntuのインストールに関連するビデオの一覧に素早くアクセスできます。
私たちのYouTubeチャンネルに登録することを忘れないでください FKIT.
Ubuntu関連チュートリアル:
このページでは、Ubuntuのインストールに関連するチュートリアルの一覧に素早くアクセスできます。
チュートリアル - Ubuntu LinuxコマンドラインからSMSを送信する
まず、Ubuntu Linuxを実行しているコンピュータにUSB GSMモデムを接続する必要があります。
USB GSMモデムを接続したら、システムがデバイスを検出したかどうかを確認する必要があります。
次のコマンドを使用して、システムがUSB GSMモデムを検出したかどうかを確認します。
# lsusb
Bus 002 Device 002: ID 8087:8001 Intel Corp.
Bus 002 Device 001: ID 1d6b:0002 Linux Foundation 2.0 root hub
Bus 003 Device 005: ID 2001:a406 D-Link Corp. ***HERE***
システムは、DlinkのUSBデバイスがコンピュータに接続されていることを検出しました。
ここで、Linuxカーネルがデバイスに割り当てたデバイスのタイプを確認する必要があります。
次のコマンドを使用して、システムによって割り当てられたデバイスのタイプを確認します。
# dmesg
[ 615.241221] usb 3-1: USB disconnect, device number 4
[ 643.023683] usb 3-1: new high-speed USB device number 5 using xhci_hcd
[ 643.173168] usb 3-1: New USB device found, idVendor=2001, idProduct=a406
[ 643.173169] usb 3-1: New USB device strings: Mfr=1, Product=2, SerialNumber=3
[ 643.173170] usb 3-1: Product: Mobile Connect
[ 643.173171] usb 3-1: Manufacturer: Mobile Connect
[ 643.173172] usb 3-1: SerialNumber: 0123456789ABCDEF
[ 643.173939] usb-storage 3-1:1.0: USB Mass Storage device detected
[ 643.174216] scsi host6: usb-storage 3-1:1.0
[ 644.188294] scsi 6:0:0:0: Direct-Access SD Storage 0000 PQ: 0 ANSI: 2
[ 644.188982] scsi 6:0:0:1: CD-ROM Mass Storage 0000 PQ: 0 ANSI: 2
[ 644.189313] sd 6:0:0:0: Attached scsi generic sg1 type 0
[ 644.190462] sd 6:0:0:0: [sdb] Unit Not Ready
[ 644.190465] sd 6:0:0:0: [sdb] Sense Key : Illegal Request [current] [ 644.190467] sd 6:0:0:0: [sdb] Add. Sense: Invalid command operation code
[ 644.190785] sr 6:0:0:1: [sr0] scsi-1 drive
[ 644.190915] sr 6:0:0:1: Attached scsi CD-ROM sr0 ***
システムはUSB GSMモデムをsr0という名前のCDRomユニテイとして検出しました。
次のコマンドを使用して、CDRom unit sr0を取り出します。
# eject sr0
偽のCDRomドライブを取り出したら、10秒待ってからdmesgコマンドを再度使用してください。
# dmesg
[ 1270.366092] usb 3-1: New USB device found, idVendor=2001, idProduct=7e19
[ 1270.366094] usb 3-1: New USB device strings: Mfr=1, Product=2, SerialNumber=3
[ 1270.366096] usb 3-1: Product: Mobile Connect
[ 1270.366098] usb 3-1: Manufacturer: Mobile Connect
[ 1270.366099] usb 3-1: SerialNumber: 0123456789ABCDEF
[ 1270.367882] option 3-1:1.0: GSM modem (1-port) converter detected
[ 1270.368033] usb 3-1: GSM modem (1-port) converter now attached to ttyUSB0 ***HERE***
[ 1270.368183] option 3-1:1.1: GSM modem (1-port) converter detected
[ 1270.368299] usb 3-1: GSM modem (1-port) converter now attached to ttyUSB1 ***HERE***
[ 1270.368437] option 3-1:1.2: GSM modem (1-port) converter detected
[ 1270.368541] usb 3-1: GSM modem (1-port) converter now attached to ttyUSB2 ***HERE***
[ 1270.368681] option 3-1:1.3: GSM modem (1-port) converter detected
[ 1270.368787] usb 3-1: GSM modem (1-port) converter now attached to ttyUSB3 ***HERE***
必要なソフトウェアをインストールするには、次のコマンドを使用します。
# apt-get update
# apt install wvdial
GSM通信を検出するには、wvdialconfコマンドを使用します。
# wvdialconf
Scanning your serial ports for a modem.
ttyS0<*1>: ATQ0 V1 E1 -- failed with 2400 baud, next try: 9600 baud
ttyS0<*1>: ATQ0 V1 E1 -- failed with 9600 baud, next try: 115200 baud
ttyS0<*1>: ATQ0 V1 E1 -- and failed too at 115200, giving up.
Modem Port Scan<*1>: S1 S2 S3 S4 S5 S6 S7 S8
Modem Port Scan<*1>: S9 S10 S11 S12 S13 S14 S15 S16
Modem Port Scan<*1>: S17 S18 S19 S20 S21 S22 S23 S24
Modem Port Scan<*1>: S25 S26 S27 S28 S29 S30 S31
ttyUSB0<*1>: ATQ0 V1 E1 -- failed with 2400 baud, next try: 9600 baud
ttyUSB0<*1>: ATQ0 V1 E1 -- failed with 9600 baud, next try: 9600 baud
ttyUSB0<*1>: ATQ0 V1 E1 -- and failed too at 115200, giving up.
ttyUSB1<*1>: ATQ0 V1 E1 -- OK
ttyUSB1<*1>: ATQ0 V1 E1 Z -- OK
ttyUSB1<*1>: ATQ0 V1 E1 S0=0 -- OK
ttyUSB1<*1>: ATQ0 V1 E1 S0=0 &C1 -- OK
ttyUSB1<*1>: ATQ0 V1 E1 S0=0 &C1 &D2 -- OK
ttyUSB1<*1>: ATQ0 V1 E1 S0=0 &C1 &D2 +FCLASS=0 -- OK
ttyUSB1<*1>: Modem Identifier: ATI -- Manufacturer:
ttyUSB1<*1>: Speed 9600: AT -- OK
ttyUSB1<*1>: Max speed is 9600; that should be safe.
ttyUSB1<*1>: ATQ0 V1 E1 S0=0 &C1 &D2 +FCLASS=0 -- OK
ttyUSB2<*1>: ATQ0 V1 E1 -- OK
ttyUSB2<*1>: ATQ0 V1 E1 Z -- OK
ttyUSB2<*1>: ATQ0 V1 E1 S0=0 -- OK
ttyUSB2<*1>: ATQ0 V1 E1 S0=0 &C1 -- OK
ttyUSB2<*1>: ATQ0 V1 E1 S0=0 &C1 &D2 -- OK
ttyUSB2<*1>: ATQ0 V1 E1 S0=0 &C1 &D2 +FCLASS=0 -- OK
ttyUSB2<*1>: Modem Identifier: ATI -- Manufacturer:
ttyUSB2<*1>: Speed 9600: AT -- OK
ttyUSB2<*1>: Max speed is 9600; that should be safe.
ttyUSB2<*1>: ATQ0 V1 E1 S0=0 &C1 &D2 +FCLASS=0 -- OK
ttyUSB3<*1>: ATQ0 V1 E1 -- failed with 2400 baud, next try: 9600 baud
ttyUSB3<*1>: ATQ0 V1 E1 -- failed with 9600 baud, next try: 9600 baud
ttyUSB3<*1>: ATQ0 V1 E1 -- and failed too at 115200, giving up.
Found a modem on /dev/ttyUSB1.
Modem configuration written to /etc/wvdial.conf.
ttyUSB1: Speed 9600; init "ATQ0 V1 E1 S0=0 &C1 &D2 +FCLASS=0" ***HERE***
ttyUSB2: Speed 9600; init "ATQ0 V1 E1 S0=0 &C1 &D2 +FCLASS=0" ***HERE***
wvdialconfコマンドで検出された内容の簡単な概要を以下に示します。
•ポートttyUSB1を9600の速度で使用し、AT通信はOKです
•9600の速度とAT通信を使用するポートttyUSB2はOKです
現在、次のインターフェイスのいずれかがSMSを送信することができることがわかっています。
?ポートttyUSB1
?ポートttyUSB2
Gammuソフトウェアをインストールするには、次のコマンドを使用します。
# apt-get install gammu
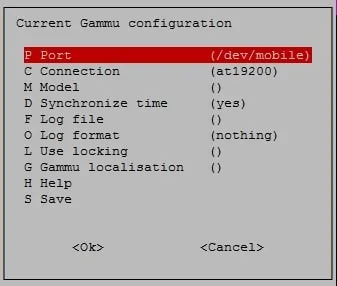
GSMモデムとの通信を設定するには、gammu-configコマンドを使用します。
# gammu-config
ここに元のGammu設定があります。

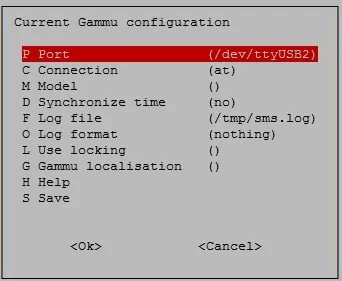
ここに新しいGammuの設定があります。

設定を終了するには、保存オプションをクリックします。
この例では、次の構成を使用しています。
•ポート - / dev / ttyUSB2
•接続 - at
•時間の同期 - いいえ
SMSメッセージを送信するには、次のコマンドを使用します。
# echo "Dragon Ball super is Awsome!" | gammu --sendsms TEXT 5521999998877
If you want break, press Ctrl+C...
Sending SMS 1/1....waiting for network answer..OK, message reference=233
テストが成功した場合、あなたは良いことです。
テストが失敗した場合は、gammu-configコマンドを使用してttyUSB2を別のttyUSBインターフェイスに変更する必要があります。
SMSメッセージを読むには、次のコマンドを使用します。
# gammu getallsms
Location 100009, folder "Inbox", phone memory, Inbox folder
SMS message
SMSC number : "+552183139914"
Sent : Wed 29 Aug 2018 10:04:46 AM -0300
Coding : Default GSM alphabet (no compression)
Remote number : "021999999999"
Status : UnRead
Yeah! Vegeto is the best
おめでとう! コマンドラインを使用してSMSを送信できるようになりました。
