¿Te gustaría aprender a enviar mensajes SMS desde la línea de comandos de Ubuntu Linux? En este tutorial, le mostraremos todos los pasos necesarios para enviar mensajes SMS utilizando solo la línea de comandos de una computadora con Ubuntu Linux y un módem USB GSM.
• Versión de Ubuntu: 18.04
• Módem USB GSM: DWM-221
Este tutorial solo funcionará si está utilizando un módem USB GSM.
Tenga cuidado, algunos dispositivos se parecen a un módem USB, pero son enrutadores USB como el DWR-910.
Lista de Hardware:
La siguiente sección presenta la lista de equipos utilizados para crear este tutorial de Ubuntu.
Cada pieza de hardware enumerada anteriormente se puede encontrar en el sitio web de Amazon.
Ubuntu Playlist:
En esta página, ofrecemos acceso rápido a una lista de videos relacionados con la instalación de Ubuntu.
No te olvides de suscribirte a nuestro canal de youtube llamado FKIT.
Tutoriales Relacionados con Ubuntu:
En esta página, ofrecemos acceso rápido a una lista de tutoriales relacionados con la instalación de Ubuntu.
Tutorial - Enviar SMS desde Ubuntu Linux Command-line
Primero, debemos conectar el módem USB GSM a la computadora con Ubuntu Linux.
Después de conectar el módem USB GSM, debe verificar si el sistema detectó el dispositivo.
Use el siguiente comando para verificar si el sistema detectó el módem USB GSM.
# lsusb
Bus 002 Device 002: ID 8087:8001 Intel Corp.
Bus 002 Device 001: ID 1d6b:0002 Linux Foundation 2.0 root hub
Bus 003 Device 005: ID 2001:a406 D-Link Corp. ***HERE***
El sistema detectó que un dispositivo USB de Dlink estaba conectado a la computadora.
Ahora, debemos verificar qué tipo de dispositivo el kernel de Linux asignó al dispositivo.
Use el siguiente comando para verificar el tipo de dispositivo asignado por el sistema.
# dmesg
[ 615.241221] usb 3-1: USB disconnect, device number 4
[ 643.023683] usb 3-1: new high-speed USB device number 5 using xhci_hcd
[ 643.173168] usb 3-1: New USB device found, idVendor=2001, idProduct=a406
[ 643.173169] usb 3-1: New USB device strings: Mfr=1, Product=2, SerialNumber=3
[ 643.173170] usb 3-1: Product: Mobile Connect
[ 643.173171] usb 3-1: Manufacturer: Mobile Connect
[ 643.173172] usb 3-1: SerialNumber: 0123456789ABCDEF
[ 643.173939] usb-storage 3-1:1.0: USB Mass Storage device detected
[ 643.174216] scsi host6: usb-storage 3-1:1.0
[ 644.188294] scsi 6:0:0:0: Direct-Access SD Storage 0000 PQ: 0 ANSI: 2
[ 644.188982] scsi 6:0:0:1: CD-ROM Mass Storage 0000 PQ: 0 ANSI: 2
[ 644.189313] sd 6:0:0:0: Attached scsi generic sg1 type 0
[ 644.190462] sd 6:0:0:0: [sdb] Unit Not Ready
[ 644.190465] sd 6:0:0:0: [sdb] Sense Key : Illegal Request [current] [ 644.190467] sd 6:0:0:0: [sdb] Add. Sense: Invalid command operation code
[ 644.190785] sr 6:0:0:1: [sr0] scsi-1 drive
[ 644.190915] sr 6:0:0:1: Attached scsi CD-ROM sr0 ***
El sistema detectó el módem USB GSM como una unidad CDRom llamada sr0.
Use el siguiente comando para expulsar el CDRom unity sr0.
# eject sr0
Después de expulsar la unidad de CD-ROM falsa, espere 10 segundos y vuelva a utilizar el comando dmesg.
# dmesg
[ 1270.366092] usb 3-1: New USB device found, idVendor=2001, idProduct=7e19
[ 1270.366094] usb 3-1: New USB device strings: Mfr=1, Product=2, SerialNumber=3
[ 1270.366096] usb 3-1: Product: Mobile Connect
[ 1270.366098] usb 3-1: Manufacturer: Mobile Connect
[ 1270.366099] usb 3-1: SerialNumber: 0123456789ABCDEF
[ 1270.367882] option 3-1:1.0: GSM modem (1-port) converter detected
[ 1270.368033] usb 3-1: GSM modem (1-port) converter now attached to ttyUSB0 ***HERE***
[ 1270.368183] option 3-1:1.1: GSM modem (1-port) converter detected
[ 1270.368299] usb 3-1: GSM modem (1-port) converter now attached to ttyUSB1 ***HERE***
[ 1270.368437] option 3-1:1.2: GSM modem (1-port) converter detected
[ 1270.368541] usb 3-1: GSM modem (1-port) converter now attached to ttyUSB2 ***HERE***
[ 1270.368681] option 3-1:1.3: GSM modem (1-port) converter detected
[ 1270.368787] usb 3-1: GSM modem (1-port) converter now attached to ttyUSB3 ***HERE***
Use los siguientes comandos para instalar el software requerido.
# apt-get update
# apt install wvdial
Use el comando wvdialconf para detectar la comunicación GSM.
# wvdialconf
Scanning your serial ports for a modem.
ttyS0<*1>: ATQ0 V1 E1 -- failed with 2400 baud, next try: 9600 baud
ttyS0<*1>: ATQ0 V1 E1 -- failed with 9600 baud, next try: 115200 baud
ttyS0<*1>: ATQ0 V1 E1 -- and failed too at 115200, giving up.
Modem Port Scan<*1>: S1 S2 S3 S4 S5 S6 S7 S8
Modem Port Scan<*1>: S9 S10 S11 S12 S13 S14 S15 S16
Modem Port Scan<*1>: S17 S18 S19 S20 S21 S22 S23 S24
Modem Port Scan<*1>: S25 S26 S27 S28 S29 S30 S31
ttyUSB0<*1>: ATQ0 V1 E1 -- failed with 2400 baud, next try: 9600 baud
ttyUSB0<*1>: ATQ0 V1 E1 -- failed with 9600 baud, next try: 9600 baud
ttyUSB0<*1>: ATQ0 V1 E1 -- and failed too at 115200, giving up.
ttyUSB1<*1>: ATQ0 V1 E1 -- OK
ttyUSB1<*1>: ATQ0 V1 E1 Z -- OK
ttyUSB1<*1>: ATQ0 V1 E1 S0=0 -- OK
ttyUSB1<*1>: ATQ0 V1 E1 S0=0 &C1 -- OK
ttyUSB1<*1>: ATQ0 V1 E1 S0=0 &C1 &D2 -- OK
ttyUSB1<*1>: ATQ0 V1 E1 S0=0 &C1 &D2 +FCLASS=0 -- OK
ttyUSB1<*1>: Modem Identifier: ATI -- Manufacturer:
ttyUSB1<*1>: Speed 9600: AT -- OK
ttyUSB1<*1>: Max speed is 9600; that should be safe.
ttyUSB1<*1>: ATQ0 V1 E1 S0=0 &C1 &D2 +FCLASS=0 -- OK
ttyUSB2<*1>: ATQ0 V1 E1 -- OK
ttyUSB2<*1>: ATQ0 V1 E1 Z -- OK
ttyUSB2<*1>: ATQ0 V1 E1 S0=0 -- OK
ttyUSB2<*1>: ATQ0 V1 E1 S0=0 &C1 -- OK
ttyUSB2<*1>: ATQ0 V1 E1 S0=0 &C1 &D2 -- OK
ttyUSB2<*1>: ATQ0 V1 E1 S0=0 &C1 &D2 +FCLASS=0 -- OK
ttyUSB2<*1>: Modem Identifier: ATI -- Manufacturer:
ttyUSB2<*1>: Speed 9600: AT -- OK
ttyUSB2<*1>: Max speed is 9600; that should be safe.
ttyUSB2<*1>: ATQ0 V1 E1 S0=0 &C1 &D2 +FCLASS=0 -- OK
ttyUSB3<*1>: ATQ0 V1 E1 -- failed with 2400 baud, next try: 9600 baud
ttyUSB3<*1>: ATQ0 V1 E1 -- failed with 9600 baud, next try: 9600 baud
ttyUSB3<*1>: ATQ0 V1 E1 -- and failed too at 115200, giving up.
Found a modem on /dev/ttyUSB1.
Modem configuration written to /etc/wvdial.conf.
ttyUSB1: Speed 9600; init "ATQ0 V1 E1 S0=0 &C1 &D2 +FCLASS=0" ***HERE***
ttyUSB2: Speed 9600; init "ATQ0 V1 E1 S0=0 &C1 &D2 +FCLASS=0" ***HERE***
Aquí hay un resumen rápido de lo que detectó el comando wvdialconf:
• Port ttyUSB1 usando la velocidad 9600 y la comunicación AT está OK
• Port ttyUSB2 usando la velocidad 9600 y la comunicación AT está OK
Ahora, sabemos que una de las siguientes interfaces puede funcionar para enviar SMS:
• Puerto ttyUSB1
• Puerto ttyUSB2
Use el siguiente comando para instalar el software Gammu.
# apt-get install gammu
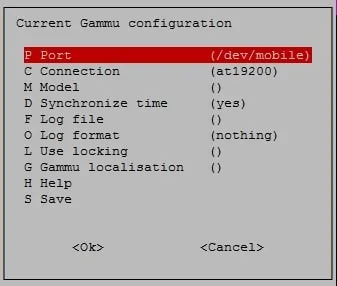
Use el comando gammu-config para configurar la comunicación con el módem GSM.
# gammu-config
Aquí está la configuración original de Gammu.

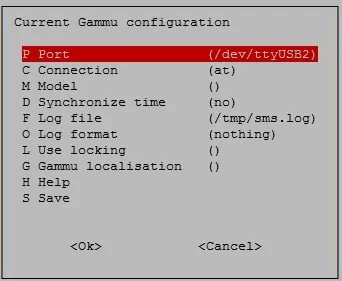
Aquí está la nueva configuración de Gammu.

Haga clic en la opción de guardar para finalizar su configuración.
En nuestro ejemplo, estamos usando la siguiente configuración:
• Puerto - / dev / ttyUSB2
• Conexión - en
• Sincronizar tiempo: no
Use el siguiente comando para enviar un mensaje SMS:
# echo "Dragon Ball super is Awsome!" | gammu --sendsms TEXT 5521999998877
If you want break, press Ctrl+C...
Sending SMS 1/1....waiting for network answer..OK, message reference=233
Si la prueba fue exitosa, es bueno que vayas.
Si la prueba no fue exitosa, debe usar el comando gammu-config y cambiar el ttyUSB2 a otra interfaz ttyUSB.
Use el siguiente comando para leer mensajes SMS:
# gammu getallsms
Location 100009, folder "Inbox", phone memory, Inbox folder
SMS message
SMSC number : "+552183139914"
Sent : Wed 29 Aug 2018 10:04:46 AM -0300
Coding : Default GSM alphabet (no compression)
Remote number : "021999999999"
Status : UnRead
Yeah! Vegeto is the best
¡Felicidades! Ahora puede enviar SMS usando la línea de comando.
