您想学习如何从Ubuntu Linux命令行发送SMS消息吗? 在本教程中,我们将向您展示仅使用运行Ubuntu Linux和USB GSM调制解调器的计算机的命令行发送SMS消息所需的所有步骤。
•Ubuntu版本:18.04
•USB GSM调制解调器:DWM-221
本教程仅在您使用USB GSM调制解调器时才有效。
小心,有些设备看起来像USB调制解调器,但是像DWR-910这样的USB路由器。
硬件清单:
以下部分介绍了用于创建此Ubuntu教程的设备列表。
上面列出的每一件硬件都可以在亚马逊网站上找到。
Ubuntu相关教程:
在此页面上,我们提供了与Ubuntu安装相关的教程列表的快速访问。
教程 – 从Ubuntu Linux命令行发送短信
首先,我们需要将USB GSM调制解调器连接到运行Ubuntu Linux的计算机。
连接USB GSM调制解调器后,您需要验证系统是否检测到设备。
使用以下命令验证系统是否检测到USB GSM调制解调器。
# lsusb
Bus 002 Device 002: ID 8087:8001 Intel Corp.
Bus 002 Device 001: ID 1d6b:0002 Linux Foundation 2.0 root hub
Bus 003 Device 005: ID 2001:a406 D-Link Corp. ***HERE***
系统检测到Dlink的USB设备已连接到计算机。
现在,我们需要验证Linux内核分配给设备的设备类型。
使用以下命令验证系统分配的设备类型。
# dmesg
[ 615.241221] usb 3-1: USB disconnect, device number 4
[ 643.023683] usb 3-1: new high-speed USB device number 5 using xhci_hcd
[ 643.173168] usb 3-1: New USB device found, idVendor=2001, idProduct=a406
[ 643.173169] usb 3-1: New USB device strings: Mfr=1, Product=2, SerialNumber=3
[ 643.173170] usb 3-1: Product: Mobile Connect
[ 643.173171] usb 3-1: Manufacturer: Mobile Connect
[ 643.173172] usb 3-1: SerialNumber: 0123456789ABCDEF
[ 643.173939] usb-storage 3-1:1.0: USB Mass Storage device detected
[ 643.174216] scsi host6: usb-storage 3-1:1.0
[ 644.188294] scsi 6:0:0:0: Direct-Access SD Storage 0000 PQ: 0 ANSI: 2
[ 644.188982] scsi 6:0:0:1: CD-ROM Mass Storage 0000 PQ: 0 ANSI: 2
[ 644.189313] sd 6:0:0:0: Attached scsi generic sg1 type 0
[ 644.190462] sd 6:0:0:0: [sdb] Unit Not Ready
[ 644.190465] sd 6:0:0:0: [sdb] Sense Key : Illegal Request [current] [ 644.190467] sd 6:0:0:0: [sdb] Add. Sense: Invalid command operation code
[ 644.190785] sr 6:0:0:1: [sr0] scsi-1 drive
[ 644.190915] sr 6:0:0:1: Attached scsi CD-ROM sr0 ***
系统将USB GSM调制解调器检测为名为sr0的CDRom统一。
使用以下命令弹出CDRom unity sr0。
# eject sr0
弹出伪CDRom驱动器后,等待10秒再次使用dmesg命令。
# dmesg
[ 1270.366092] usb 3-1: New USB device found, idVendor=2001, idProduct=7e19
[ 1270.366094] usb 3-1: New USB device strings: Mfr=1, Product=2, SerialNumber=3
[ 1270.366096] usb 3-1: Product: Mobile Connect
[ 1270.366098] usb 3-1: Manufacturer: Mobile Connect
[ 1270.366099] usb 3-1: SerialNumber: 0123456789ABCDEF
[ 1270.367882] option 3-1:1.0: GSM modem (1-port) converter detected
[ 1270.368033] usb 3-1: GSM modem (1-port) converter now attached to ttyUSB0 ***HERE***
[ 1270.368183] option 3-1:1.1: GSM modem (1-port) converter detected
[ 1270.368299] usb 3-1: GSM modem (1-port) converter now attached to ttyUSB1 ***HERE***
[ 1270.368437] option 3-1:1.2: GSM modem (1-port) converter detected
[ 1270.368541] usb 3-1: GSM modem (1-port) converter now attached to ttyUSB2 ***HERE***
[ 1270.368681] option 3-1:1.3: GSM modem (1-port) converter detected
[ 1270.368787] usb 3-1: GSM modem (1-port) converter now attached to ttyUSB3 ***HERE***
使用以下命令安装所需的软件。
# apt-get update
# apt install wvdial
使用wvdialconf命令检测GSM通信。
# wvdialconf
Scanning your serial ports for a modem.
ttyS0<*1>: ATQ0 V1 E1 — failed with 2400 baud, next try: 9600 baud
ttyS0<*1>: ATQ0 V1 E1 — failed with 9600 baud, next try: 115200 baud
ttyS0<*1>: ATQ0 V1 E1 — and failed too at 115200, giving up.
Modem Port Scan<*1>: S1 S2 S3 S4 S5 S6 S7 S8
Modem Port Scan<*1>: S9 S10 S11 S12 S13 S14 S15 S16
Modem Port Scan<*1>: S17 S18 S19 S20 S21 S22 S23 S24
Modem Port Scan<*1>: S25 S26 S27 S28 S29 S30 S31
ttyUSB0<*1>: ATQ0 V1 E1 — failed with 2400 baud, next try: 9600 baud
ttyUSB0<*1>: ATQ0 V1 E1 — failed with 9600 baud, next try: 9600 baud
ttyUSB0<*1>: ATQ0 V1 E1 — and failed too at 115200, giving up.
ttyUSB1<*1>: ATQ0 V1 E1 — OK
ttyUSB1<*1>: ATQ0 V1 E1 Z — OK
ttyUSB1<*1>: ATQ0 V1 E1 S0=0 — OK
ttyUSB1<*1>: ATQ0 V1 E1 S0=0 &C1 — OK
ttyUSB1<*1>: ATQ0 V1 E1 S0=0 &C1 &D2 — OK
ttyUSB1<*1>: ATQ0 V1 E1 S0=0 &C1 &D2 +FCLASS=0 — OK
ttyUSB1<*1>: Modem Identifier: ATI — Manufacturer:
ttyUSB1<*1>: Speed 9600: AT — OK
ttyUSB1<*1>: Max speed is 9600; that should be safe.
ttyUSB1<*1>: ATQ0 V1 E1 S0=0 &C1 &D2 +FCLASS=0 — OK
ttyUSB2<*1>: ATQ0 V1 E1 — OK
ttyUSB2<*1>: ATQ0 V1 E1 Z — OK
ttyUSB2<*1>: ATQ0 V1 E1 S0=0 — OK
ttyUSB2<*1>: ATQ0 V1 E1 S0=0 &C1 — OK
ttyUSB2<*1>: ATQ0 V1 E1 S0=0 &C1 &D2 — OK
ttyUSB2<*1>: ATQ0 V1 E1 S0=0 &C1 &D2 +FCLASS=0 — OK
ttyUSB2<*1>: Modem Identifier: ATI — Manufacturer:
ttyUSB2<*1>: Speed 9600: AT — OK
ttyUSB2<*1>: Max speed is 9600; that should be safe.
ttyUSB2<*1>: ATQ0 V1 E1 S0=0 &C1 &D2 +FCLASS=0 — OK
ttyUSB3<*1>: ATQ0 V1 E1 — failed with 2400 baud, next try: 9600 baud
ttyUSB3<*1>: ATQ0 V1 E1 — failed with 9600 baud, next try: 9600 baud
ttyUSB3<*1>: ATQ0 V1 E1 — and failed too at 115200, giving up.
Found a modem on /dev/ttyUSB1.
Modem configuration written to /etc/wvdial.conf.
ttyUSB1: Speed 9600; init “ATQ0 V1 E1 S0=0 &C1 &D2 +FCLASS=0” ***HERE***
ttyUSB2: Speed 9600; init “ATQ0 V1 E1 S0=0 &C1 &D2 +FCLASS=0” ***HERE***
以下是wvdialconf命令检测到的快速摘要:
•端口ttyUSB1使用9600速度和AT通信正常
•端口ttyUSB2使用9600速度和AT通信正常
现在,我们知道以下接口之一可能用于发送SMS:
•端口ttyUSB1
•端口ttyUSB2
使用以下命令安装Gammu软件。
# apt-get install gammu
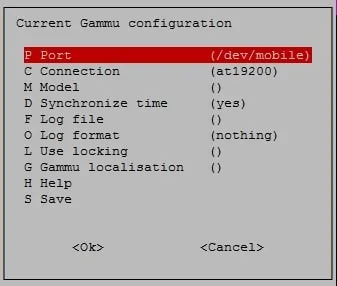
gammu-config命令用来配置与GSM modem的通信。
# gammu-config
这是原始的Gammu配置。

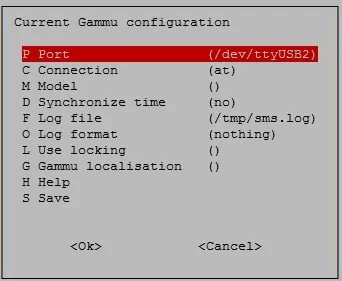
这是新的Gammu配置。

单击保存选项以完成配置。
在我们的示例中,我们使用以下配置:
•端口 – / dev / ttyUSB2
•连接 – 在
•同步时间 – 没有
使用以下命令发送SMS消息:
# echo “Dragon Ball super is Awsome!” | gammu –sendsms TEXT 5521999998877
If you want break, press Ctrl+C…
Sending SMS 1/1….waiting for network answer..OK, message reference=233
如果测试成功,你很高兴。
如果测试不成功,则需要使用gammu-config命令并将ttyUSB2更改为另一个ttyUSB接口。
使用以下命令读取SMS消息:
# gammu getallsms
Location 100009, folder “Inbox”, phone memory, Inbox folder
SMS message
SMSC number : “+552183139914”
Sent : Wed 29 Aug 2018 10:04:46 AM -0300
Coding : Default GSM alphabet (no compression)
Remote number : “021999999999”
Status : UnRead
Yeah! Vegeto is the best
恭喜! 您现在可以使用命令行发送SMS。
