Would you like to learn how to use the Icinga2 web monitoring feature? In this tutorial, we are going to show you how to monitor a website using Icinga2
• Ubuntu version: 18
• Ubuntu version: 19
• Icinga2 version: 2.11.0-2
Hardware List:
The following section presents the list of equipment used to create this Icinga2 tutorial.
Every piece of hardware listed above can be found at Amazon website.
Icinga2 - Related Tutorial:
On this page, we offer quick access to a list of tutorials related to Icinga2 installation.
Tutorial Icinga2 - Monitoring a Website
On the Linux console, use the following commands to find the location of the Icinga2's hosts.conf file.
In our example the hosts.conf file was located under /etc/icinga2/conf.d directory.
After finding, you need to edit the hosts.conf.
At the end of the hosts.conf file, enter an Icinga2 web monitoring configuration.
You will have to specify the following configuration:
• Object Host - Enter a Host identification.
• Import - generic-host template information.
• Address - Enter the IP address of the webserver.
• vars.http_vhosts - The website that should be verified.
• http_ssl - True for HTTPS websites.
• http_string - Search for the string "welcome" on the body of the website
As an example, here is our configuration.
In our example, we created a new host entry named MyWebServer with the IP address 154.189.219.43.
On this web server we have multiple websitees also known as virtual hosts.
From all the virtual hosts, we only want to monitor the website https://techexpert.tips.
Generic-host is group of default configurations that is set on the templates.conf file.
Here is the definition of generic-host specified on the templates.conf file.
To enable Icinga2's web monitoring on the host named MyWebServer, you need to restart the Icinga service.
Congratulations! You have finished the Icinga2 web monitoring configuration.
Tutorial Icinga2 - Website Monitoring
Now, we need to access the ICinga2 server dashboard.
Open your browser and enter the IP address of your web server plus /icingaweb2.
In our example, the following URL was entered in the Browser:
• http://192.168.15.5/icingaweb2
On the login screen, use the default username and default password.
• Default Username: Username set during the Installation
• Default Password: Password set during the Installation

After a successful login, you will be sent to the Icinga2 Dashboard.

On the Icinga2 dashboard, access the Overview menu and select the Hosts option.

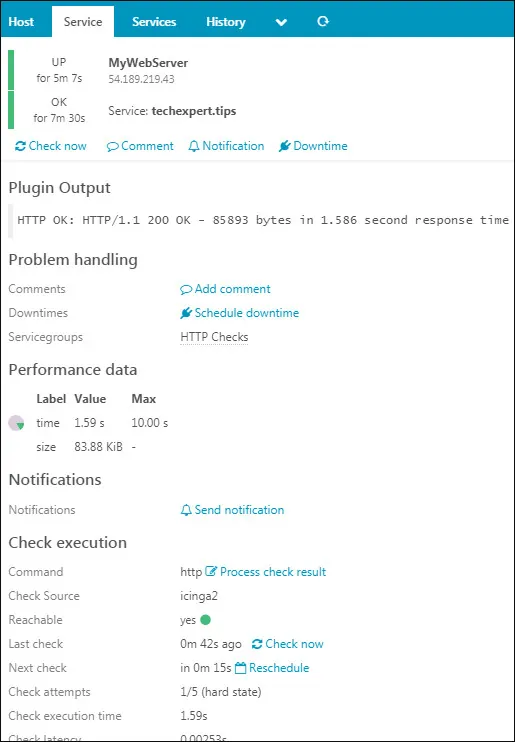
Click on the hostname to have detailed information about the website monitoring.

Congratulations! You have configured the Icinga2 website monitoring fature.
