Você gostaria de aprender como enviar mensagens SMS a partir da linha de comando do Ubuntu Linux? Neste tutorial, mostraremos todas as etapas necessárias para enviar mensagens SMS usando apenas a linha de comando de um computador que executa o Ubuntu Linux e um modem GSM USB.
• Versão do Ubuntu: 18.04
• Modem GSM USB: DWM-221
Este tutorial funcionará apenas se você estiver usando um Modem GSM USB.
Tenha cuidado, alguns dispositivos se parecem com um modem USB, mas são roteadores USB como o DWR-910.
Lista de Hardware:
A seção a seguir apresenta a lista de equipamentos usados para criar este tutorial do Ubuntu.
Cada peça de hardware listada acima pode ser encontrada no site da Amazon.
Ubuntu Playlist:
Nesta página, oferecemos acesso rápido a uma lista de vídeos relacionados à instalação do Ubuntu.
Não se esqueça de se inscrever em nosso canal do youtube chamado FKIT.
Tutoriais Relacionados ao Ubuntu:
Nesta página, oferecemos acesso rápido a uma lista de tutoriais relacionados à instalação do Ubuntu.
Tutorial - Enviar SMS pelo Ubuntu Linux via Linha de Comando
Primeiro, precisamos conectar o modem GSM USB ao computador que executa o Ubuntu Linux.
Depois de conectar o modem GSM USB, você precisa verificar se o sistema detectou o dispositivo.
Use o seguinte comando para verificar se o sistema detectou o modem GSM USB.
# lsusb
Bus 002 Device 002: ID 8087:8001 Intel Corp.
Bus 002 Device 001: ID 1d6b:0002 Linux Foundation 2.0 root hub
Bus 003 Device 005: ID 2001:a406 D-Link Corp. ***HERE***
O sistema detectou que um dispositivo USB da Dlink estava conectado ao computador.
Agora, precisamos verificar qual tipo de dispositivo o kernel do Linux atribuiu ao dispositivo.
Use o seguinte comando para verificar o tipo de dispositivo atribuído pelo sistema.
# dmesg
[ 615.241221] usb 3-1: USB disconnect, device number 4
[ 643.023683] usb 3-1: new high-speed USB device number 5 using xhci_hcd
[ 643.173168] usb 3-1: New USB device found, idVendor=2001, idProduct=a406
[ 643.173169] usb 3-1: New USB device strings: Mfr=1, Product=2, SerialNumber=3
[ 643.173170] usb 3-1: Product: Mobile Connect
[ 643.173171] usb 3-1: Manufacturer: Mobile Connect
[ 643.173172] usb 3-1: SerialNumber: 0123456789ABCDEF
[ 643.173939] usb-storage 3-1:1.0: USB Mass Storage device detected
[ 643.174216] scsi host6: usb-storage 3-1:1.0
[ 644.188294] scsi 6:0:0:0: Direct-Access SD Storage 0000 PQ: 0 ANSI: 2
[ 644.188982] scsi 6:0:0:1: CD-ROM Mass Storage 0000 PQ: 0 ANSI: 2
[ 644.189313] sd 6:0:0:0: Attached scsi generic sg1 type 0
[ 644.190462] sd 6:0:0:0: [sdb] Unit Not Ready
[ 644.190465] sd 6:0:0:0: [sdb] Sense Key : Illegal Request [current] [ 644.190467] sd 6:0:0:0: [sdb] Add. Sense: Invalid command operation code
[ 644.190785] sr 6:0:0:1: [sr0] scsi-1 drive
[ 644.190915] sr 6:0:0:1: Attached scsi CD-ROM sr0 ***
O sistema detectou o modem GSM USB como uma unidade CDRom denominada sr0.
Use o seguinte comando para ejetar a unidade sr0 do CDRom.
# eject sr0
Depois de ejetar a unidade de CDRom falsa, aguarde 10 segundos e use novamente o comando dmesg.
# dmesg
[ 1270.366092] usb 3-1: New USB device found, idVendor=2001, idProduct=7e19
[ 1270.366094] usb 3-1: New USB device strings: Mfr=1, Product=2, SerialNumber=3
[ 1270.366096] usb 3-1: Product: Mobile Connect
[ 1270.366098] usb 3-1: Manufacturer: Mobile Connect
[ 1270.366099] usb 3-1: SerialNumber: 0123456789ABCDEF
[ 1270.367882] option 3-1:1.0: GSM modem (1-port) converter detected
[ 1270.368033] usb 3-1: GSM modem (1-port) converter now attached to ttyUSB0 ***HERE***
[ 1270.368183] option 3-1:1.1: GSM modem (1-port) converter detected
[ 1270.368299] usb 3-1: GSM modem (1-port) converter now attached to ttyUSB1 ***HERE***
[ 1270.368437] option 3-1:1.2: GSM modem (1-port) converter detected
[ 1270.368541] usb 3-1: GSM modem (1-port) converter now attached to ttyUSB2 ***HERE***
[ 1270.368681] option 3-1:1.3: GSM modem (1-port) converter detected
[ 1270.368787] usb 3-1: GSM modem (1-port) converter now attached to ttyUSB3 ***HERE***
Use os seguintes comandos para instalar o software necessário.
# apt-get update
# apt install wvdial
Use o comando wvdialconf para detectar a comunicação GSM.
# wvdialconf
Scanning your serial ports for a modem.
ttyS0<*1>: ATQ0 V1 E1 -- failed with 2400 baud, next try: 9600 baud
ttyS0<*1>: ATQ0 V1 E1 -- failed with 9600 baud, next try: 115200 baud
ttyS0<*1>: ATQ0 V1 E1 -- and failed too at 115200, giving up.
Modem Port Scan<*1>: S1 S2 S3 S4 S5 S6 S7 S8
Modem Port Scan<*1>: S9 S10 S11 S12 S13 S14 S15 S16
Modem Port Scan<*1>: S17 S18 S19 S20 S21 S22 S23 S24
Modem Port Scan<*1>: S25 S26 S27 S28 S29 S30 S31
ttyUSB0<*1>: ATQ0 V1 E1 -- failed with 2400 baud, next try: 9600 baud
ttyUSB0<*1>: ATQ0 V1 E1 -- failed with 9600 baud, next try: 9600 baud
ttyUSB0<*1>: ATQ0 V1 E1 -- and failed too at 115200, giving up.
ttyUSB1<*1>: ATQ0 V1 E1 -- OK
ttyUSB1<*1>: ATQ0 V1 E1 Z -- OK
ttyUSB1<*1>: ATQ0 V1 E1 S0=0 -- OK
ttyUSB1<*1>: ATQ0 V1 E1 S0=0 &C1 -- OK
ttyUSB1<*1>: ATQ0 V1 E1 S0=0 &C1 &D2 -- OK
ttyUSB1<*1>: ATQ0 V1 E1 S0=0 &C1 &D2 +FCLASS=0 -- OK
ttyUSB1<*1>: Modem Identifier: ATI -- Manufacturer:
ttyUSB1<*1>: Speed 9600: AT -- OK
ttyUSB1<*1>: Max speed is 9600; that should be safe.
ttyUSB1<*1>: ATQ0 V1 E1 S0=0 &C1 &D2 +FCLASS=0 -- OK
ttyUSB2<*1>: ATQ0 V1 E1 -- OK
ttyUSB2<*1>: ATQ0 V1 E1 Z -- OK
ttyUSB2<*1>: ATQ0 V1 E1 S0=0 -- OK
ttyUSB2<*1>: ATQ0 V1 E1 S0=0 &C1 -- OK
ttyUSB2<*1>: ATQ0 V1 E1 S0=0 &C1 &D2 -- OK
ttyUSB2<*1>: ATQ0 V1 E1 S0=0 &C1 &D2 +FCLASS=0 -- OK
ttyUSB2<*1>: Modem Identifier: ATI -- Manufacturer:
ttyUSB2<*1>: Speed 9600: AT -- OK
ttyUSB2<*1>: Max speed is 9600; that should be safe.
ttyUSB2<*1>: ATQ0 V1 E1 S0=0 &C1 &D2 +FCLASS=0 -- OK
ttyUSB3<*1>: ATQ0 V1 E1 -- failed with 2400 baud, next try: 9600 baud
ttyUSB3<*1>: ATQ0 V1 E1 -- failed with 9600 baud, next try: 9600 baud
ttyUSB3<*1>: ATQ0 V1 E1 -- and failed too at 115200, giving up.
Found a modem on /dev/ttyUSB1.
Modem configuration written to /etc/wvdial.conf.
ttyUSB1: Speed 9600; init "ATQ0 V1 E1 S0=0 &C1 &D2 +FCLASS=0" ***HERE***
ttyUSB2: Speed 9600; init "ATQ0 V1 E1 S0=0 &C1 &D2 +FCLASS=0" ***HERE***
Aqui está um breve resumo do que o comando wvdialconf detectou:
• Porta ttyUSB1 usando a velocidade 9600 e a comunicação AT está OK
• Porta ttyUSB2 usando a velocidade 9600 e a comunicação AT está OK
Agora, sabemos que uma das seguintes interfaces pode funcionar para enviar SMS:
• Porta ttyUSB1
• Porta ttyUSB2
Use o seguinte comando para instalar o software Gammu.
# apt-get install gammu
Use o comando gammu-config para configurar a comunicação com o modem GSM.
# gammu-config
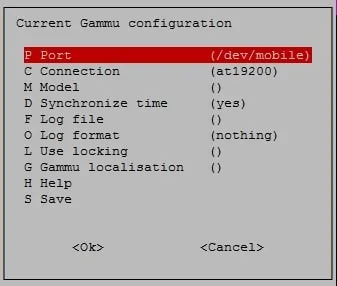
Aqui está a configuração original do Gammu.

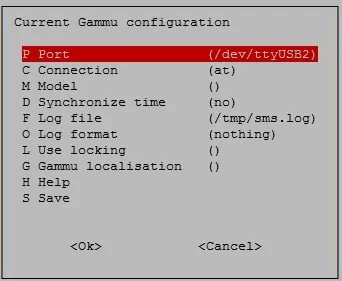
Aqui está a nova configuração do Gammu.

Clique na opção salvar para finalizar sua configuração.
No nosso exemplo, estamos usando a seguinte configuração:
• Port - / dev / ttyUSB2
• Conexão - em
• Sincronizar hora - Não
Use o seguinte comando para enviar uma mensagem SMS:
# echo "Dragon Ball super is Awsome!" | gammu --sendsms TEXT 5521999998877
If you want break, press Ctrl+C...
Sending SMS 1/1....waiting for network answer..OK, message reference=233
Se o teste foi bem sucedido você está pronto para ir.
Se o teste não foi bem sucedido, você precisa usar o comando gammu-config e mudar o ttyUSB2 para outra interface ttyUSB.
Use o seguinte comando para ler mensagens SMS:
# gammu getallsms
Location 100009, folder "Inbox", phone memory, Inbox folder
SMS message
SMSC number : "+552183139914"
Sent : Wed 29 Aug 2018 10:04:46 AM -0300
Coding : Default GSM alphabet (no compression)
Remote number : "021999999999"
Status : UnRead
Yeah! Vegeto is the best
Parabéns! Agora você pode enviar SMS usando a linha de comando.
