هل ترغب في معرفة كيفية تثبيت Squid باستخدام HTTPS على Ubuntu Linux؟ في هذا البرنامج التعليمي ، سنوضح لك كيفية تثبيت وتكوين Squid server Squid على Ubuntu Linux.
تم اختبار هذا البرنامج التعليمي على Ubuntu 18.04.
تم اختبار هذا البرنامج التعليمي على Squid 4.5.
قائمة الأجهزة:
يعرض القسم التالي قائمة المعدات المستخدمة لإنشاء هذا البرنامج التعليمي Squid.
كل قطعة من الأجهزة المذكورة أعلاه يمكن العثور عليها في موقع أمازون.
الحبار دروس ذات الصلة:
في هذه الصفحة ، نقدم وصولاً سريعًا إلى قائمة من البرامج التعليمية المتعلقة بالحبار.
قم بتثبيت Squid على Ubuntu Linux
نحتاج إلى تهيئة التاريخ والوقت الصحيحين لأننا سوف نعمل مع الشهادات.
في وحدة تحكم Linux ، استخدم الأوامر التالية لتعيين المنطقة الزمنية الصحيحة.
# dpkg-reconfigure tzdata
قم بتثبيت حزمة Ntpdate وقم بتعيين التاريخ والوقت الصحيحين على الفور.
# apt-get install ntpdate
# ntpdate pool.ntp.br
في المثال الخاص بنا ، تم استخدام الأمر Ntpdate لضبط التاريخ والوقت الصحيحين باستخدام الخادم البرازيلي pool.ntp.br
دعونا تثبيت خدمة NTP.
# timedatectl set-ntp 0
# apt-get install ntp
NTP هي الخدمة التي سوف تحافظ على تحديث خادمنا.
استخدم تاريخ الأمر للتحقق من التاريخ والوقت اللذين تم تكوينهما على نظام التشغيل Ubuntu Linux الخاص بك.
# date
إذا أظهر النظام التاريخ والوقت الصحيح ، فهذا يعني أنك اتبعت جميع الخطوات بشكل صحيح.
استخدم الأوامر التالية لتثبيت الحزم المطلوبة.
# apt-get update
# apt-get install build-essential openssl libssl-dev pkg-config
قم بتنزيل وتجميع وتثبيت حزمة Squid.
# mkdir /downloads
# cd /downloads
# wget http://www.squid-cache.org/Versions/v4/squid-4.5.tar.gz
# tar -zxvf squid-4.5.tar.gz
# cd squid-4.5
# ./configure --with-default-user=proxy --with-openssl --enable-ssl-crtd
# make
# make install
تكوين الحوت HTTPS / SSL البيئة
الآن ، يجب أن تجد موقع ملف openssl.cnf على نظامك.
بعد العثور على ، تحتاج إلى تحرير الملف openssl.cnf.
# updatedb
# vi /etc/ssl/openssl.cnf
هنا هو الملف الأصلي ، قبل التكوين لدينا وبدون التعليقات.
HOME = .
RANDFILE = $ENV::HOME/.rnd
oid_section = new_oids[ new_oids ]
tsa_policy1 = 1.2.3.4.1
tsa_policy2 = 1.2.3.4.5.6
tsa_policy3 = 1.2.3.4.5.7
[ ca ]
default_ca = CA_default # The default ca section
[ CA_default ]
dir = ./demoCA # Where everything is kept
certs = $dir/certs # Where the issued certs are kept
crl_dir = $dir/crl # Where the issued crl are kept
database = $dir/index.txt # database index file.
# several certs with same subject.
new_certs_dir = $dir/newcerts # default place for new certs.
certificate = $dir/cacert.pem # The CA certificate
serial = $dir/serial # The current serial number
crlnumber = $dir/crlnumber # the current crl number
# must be commented out to leave a V1 CRL
crl = $dir/crl.pem # The current CRL
private_key = $dir/private/cakey.pem# The private key
RANDFILE = $dir/private/.rand # private random number file
x509_extensions = usr_cert # The extensions to add to the cert
name_opt = ca_default # Subject Name options
cert_opt = ca_default # Certificate field options
default_days = 365 # how long to certify for
default_crl_days= 30 # how long before next CRL
default_md = default # use public key default MD
preserve = no # keep passed DN ordering
policy = policy_match
[ policy_match ]
countryName = match
stateOrProvinceName = match
organizationName = match
organizationalUnitName = optional
commonName = supplied
emailAddress = optional[ policy_anything ]
countryName = optional
stateOrProvinceName = optional
localityName = optional
organizationName = optional
organizationalUnitName = optional
commonName = supplied
emailAddress = optional
[ req ]
default_bits = 2048
default_keyfile = privkey.pem
distinguished_name = req_distinguished_name
attributes = req_attributes
x509_extensions = v3_ca # The extensions to add to the self signed cert
string_mask = utf8only
[ req_distinguished_name ]
countryName = Country Name (2 letter code)
countryName_default = AU
countryName_min = 2
countryName_max = 2
stateOrProvinceName = State or Province Name (full name)
stateOrProvinceName_default = Some-State
localityName = Locality Name (eg, city)
0.organizationName = Organization Name (eg, company)
0.organizationName_default = Internet Widgits Pty Ltd
organizationalUnitName = Organizational Unit Name (eg, section)
commonName = Common Name (e.g. server FQDN or YOUR name)
commonName_max = 64
emailAddress = Email Address
emailAddress_max = 64
[ req_attributes ]
challengePassword = A challenge password
challengePassword_min = 4
challengePassword_max = 20
unstructuredName = An optional company name[ usr_cert ]
basicConstraints=CA:FALSE
nsComment = "OpenSSL Generated Certificate"
subjectKeyIdentifier=hash
authorityKeyIdentifier=keyid,issuer
[ v3_req ]
basicConstraints = CA:FALSE
keyUsage = nonRepudiation, digitalSignature, keyEncipherment
[ v3_ca ]
subjectKeyIdentifier=hash
authorityKeyIdentifier=keyid:always,issuer
basicConstraints = critical,CA:true
[ crl_ext ]
authorityKeyIdentifier=keyid:always
[ proxy_cert_ext ]
basicConstraints=CA:FALSE
nsComment = "OpenSSL Generated Certificate"
subjectKeyIdentifier=hash
authorityKeyIdentifier=keyid,issuer
proxyCertInfo=critical,language:id-ppl-anyLanguage,pathlen:3,policy:foo
[ tsa ]
default_tsa = tsa_config1 # the default TSA section
[ tsa_config1 ]
dir = ./demoCA # TSA root directory
serial = $dir/tsaserial # The current serial number (mandatory)
crypto_device = builtin # OpenSSL engine to use for signing
signer_cert = $dir/tsacert.pem # The TSA signing certificate
# (optional)
certs = $dir/cacert.pem # Certificate chain to include in reply
# (optional)
signer_key = $dir/private/tsakey.pem # The TSA private key (optional)
signer_digest = sha256 # Signing digest to use. (Optional)
default_policy = tsa_policy1 # Policy if request did not specify it
# (optional)
other_policies = tsa_policy2, tsa_policy3 # acceptable policies (optional)
digests = sha1, sha256, sha384, sha512 # Acceptable message digests (mandatory)
accuracy = secs:1, millisecs:500, microsecs:100 # (optional)
clock_precision_digits = 0 # number of digits after dot. (optional)
ordering = yes # Is ordering defined for timestamps?
# (optional, default: no)
tsa_name = yes # Must the TSA name be included in the reply?
# (optional, default: no)
ess_cert_id_chain = no # Must the ESS cert id chain be included?
# (optional, default: no)
أضف تهيئة KeyUsage إلى منطقة V3_CA.
[ v3_ca ]
keyUsage = cRLSign, keyCertSign
إنشاء البنية الأساسية لمجلد SSL المطلوب.
# mkdir /usr/local/squid/etc/ssl_cert -p
# chown proxy:proxy /usr/local/squid/etc/ssl_cert -R
# chmod 700 /usr/local/squid/etc/ssl_cert -R
# cd /usr/local/squid/etc/ssl_cert
قم بإنشاء مرجع مصدق ذاتيًا.
# openssl req -new -newkey rsa:2048 -sha256 -days 365 -nodes -x509 -extensions v3_ca -keyout myCA.pem -out myCA.pem
......................................................................+++
......................................+++
writing new private key to 'myCA.pem'
-----
You are about to be asked to enter information that will be incorporated
into your certificate request.
What you are about to enter is what is called a Distinguished Name or a DN.
There are quite a few fields but you can leave some blank
For some fields there will be a default value,
If you enter '.', the field will be left blank.
-----
Country Name (2 letter code) [AU]:BR
State or Province Name (full name) [Some-State]:Rio de Janeiro
Locality Name (eg, city) []:
Organization Name (eg, company) [Internet Widgits Pty Ltd]:TECHEXPERT
Organizational Unit Name (eg, section) []:
Common Name (e.g. server FQDN or YOUR name) []: firewall.techexpert.tips
Email Address []:
تصدير شهادة المرجع المصدق ذاتية التوقيع باستخدام تنسيق DER.
# openssl x509 -in myCA.pem -outform DER -out myCA.der
مهم! تحتاج إلى استيراد MyCA.DER إلى جهاز الكمبيوتر العميل.
إنشاء قاعدة بيانات SSL الأولية.
# /usr/local/squid/libexec/security_file_certgen -c -s /usr/local/squid/var/logs/ssl_db -M 4MB
# chown proxy:proxy /usr/local/squid/var/logs/ssl_db -R
قم باستيراد شهادة المرجع المصدق
تحتاج إلى نسخ ملف MyCA.DER إلى جهاز كمبيوتر يعمل بنظام التشغيل windows.
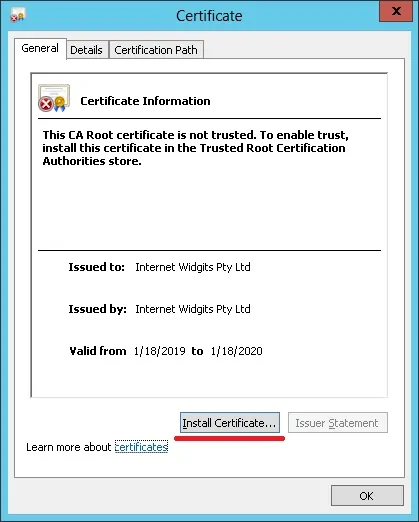
على جهاز كمبيوتر عميل يقوم بتشغيل Windows ، انقر نقرًا مزدوجًا فوق ملف MyCA.DER.
انقر على زر تثبيت Certificat.
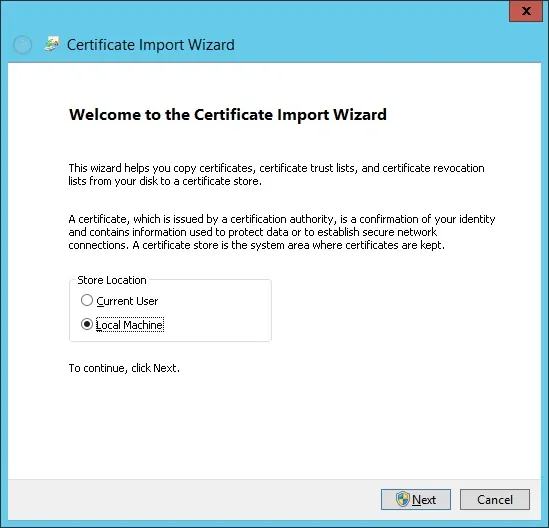
حدد الخيار: الجهاز المحلي.
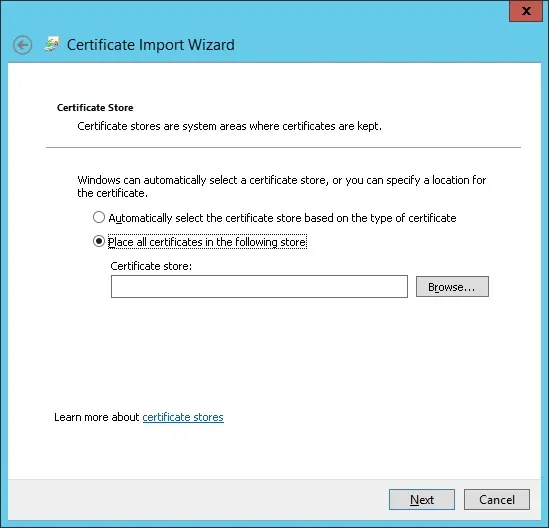
حدد الخيار: ضع جميع الشهادات في المتجر التالي.
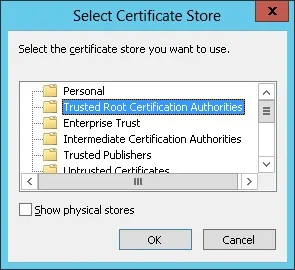
حدد المجلد المسمى "المراجع المصدقة لشهادات الجذر".
لقد انتهيت من تثبيت الشهادة.
تكوين Squid لـ HTTPS
هنا هو ملف التكوين الحبار الأصلي المثبتة بواسطة الحبار الحزمة.
# vi /usr/local/squid/etc/squid.conf
acl localnet src 0.0.0.1-0.255.255.255
acl localnet src 10.0.0.0/8
acl localnet src 100.64.0.0/10
acl localnet src 169.254.0.0/16
acl localnet src 172.16.0.0/12
acl localnet src 192.168.0.0/16
acl localnet src fc00::/7
acl localnet src fe80::/10
acl SSL_ports port 443
acl Safe_ports port 80
acl Safe_ports port 21
acl Safe_ports port 443
acl Safe_ports port 70
acl Safe_ports port 210
acl Safe_ports port 1025-65535
acl Safe_ports port 280
acl Safe_ports port 488
acl Safe_ports port 591
acl Safe_ports port 777
acl CONNECT method CONNECT
http_access deny !Safe_ports
http_access deny CONNECT !SSL_ports
http_access allow localhost manager
http_access deny manager
http_access allow localnet
http_access allow localhost
http_access deny all
http_port 3128
coredump_dir /usr/local/squid/var/cache/squid
refresh_pattern ^ftp: 1440 20% 10080
refresh_pattern ^gopher: 1440 0% 1440
refresh_pattern -i (/cgi-bin/|\?) 0 0% 0
refresh_pattern . 0 20% 4320
هنا هو الملف الجديد مع التكوين لدينا.
# vi /usr/local/squid/etc/squid.conf
acl localnet src 192.168.0.0/24
acl step1 at_step SslBump1
ssl_bump peek step1
ssl_bump bump all
acl SSL_ports port 443
acl Safe_ports port 80 # http
acl Safe_ports port 21 # ftp
acl Safe_ports port 443 # https
acl Safe_ports port 70 # gopher
acl Safe_ports port 210 # wais
acl Safe_ports port 1025-65535 # unregistered ports
acl Safe_ports port 280 # http-mgmt
acl Safe_ports port 488 # gss-http
acl Safe_ports port 591 # filemaker
acl Safe_ports port 777 # multiling http
acl CONNECT method CONNECT
http_access deny !Safe_ports
http_access deny CONNECT !SSL_ports
http_access allow localhost manager
http_access deny manager
http_access allow localnet
http_access allow localhost
http_access deny all
http_port 3128 ssl-bump cert=/usr/local/squid/etc/ssl_cert/myCA.pem generate-host-certificates=on dynamic_cert_mem_cache_size=4MB
sslcrtd_program /usr/local/squid/libexec/security_file_certgen -s /usr/local/squid/var/logs/ssl_db -M 4MB
coredump_dir /usr/local/squid/var/cache/squid
cache_dir ufs /usr/local/squid/var/cache/squid 1000 16 256 # 1GB as Cache
refresh_pattern ^ftp: 1440 20% 10080
refresh_pattern ^gopher: 1440 0% 1440
refresh_pattern -i (/cgi-bin/|\?) 0 0% 0
refresh_pattern . 0 20% 4320
تهيئتي بسيطة فقط.
يوصى بشدة بدراسة ملف التكوين هذا لتحسين التكوين الخاص بك.
استخدم الأمر التالي لإنشاء مجلدات التخزين المؤقت الضرورية.
# chown -R proxy:proxy /usr/local/squid -R
# /usr/local/squid/sbin/squid -z
استخدم الأمر التالي لبدء خدمة Squid.
# /usr/local/squid/sbin/squid -d 10
إذا كان كل شيء يعمل بشكل صحيح ، يجب أن تشاهد الرسائل التالية على الشاشة:
Created PID file (https://d1ny9casiyy5u5.cloudfront.net/usr/local/squid/var/run/squid.pid)
Set Current Directory to /usr/local/squid/var/cache/squid
Starting Squid Cache version 4.5 for x86_64-pc-linux-gnu...
Service Name: squid
Process ID 20605
Process Roles: worker
With 1024 file descriptors available
Initializing IP Cache...
DNS Socket created at [::], FD 5
DNS Socket created at 0.0.0.0, FD 9
Adding nameserver 127.0.0.53 from /etc/resolv.conf
Adding domain us-west-2.compute.internal from /etc/resolv.conf
helperOpenServers: Starting 5/32 'security_file_certgen' processes
Logfile: opening log daemon:/usr/local/squid/var/logs/access.log
Logfile Daemon: opening log /usr/local/squid/var/logs/access.log
Store logging disabled
Swap maxSize 0 + 262144 KB, estimated 20164 objects
Target number of buckets: 1008
Using 8192 Store buckets
Max Mem size: 262144 KB
Max Swap size: 0 KB
Using Least Load store dir selection
Set Current Directory to /usr/local/squid/var/cache/squid
Finished loading MIME types and icons.
HTCP Disabled.
Squid plugin modules loaded: 0
Adaptation support is off.
Accepting SSL bumped HTTP Socket connections at local=[::]:3128 remote=[::] FD 22 flags=9
2019/01/18 15:33:59 kid1| storeLateRelease: released 0 objects
لاختبار التثبيت ، انتقل إلى كمبيوتر موجود على شبكتك الداخلية وقم بتكوين متصفحه لاستخدام عنوان IP الخاص بخادم Squid ومنفذ TCP 3128 كخادم وكيل.
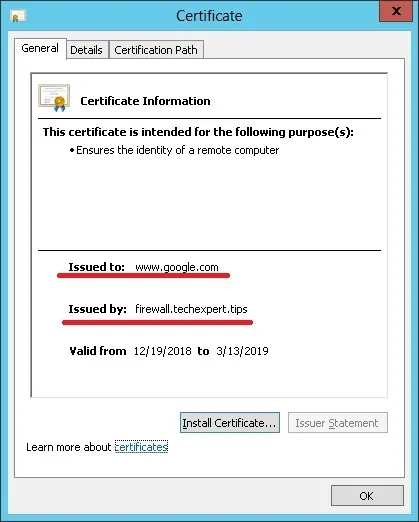
حاول الوصول إلى موقع HTTPS وتحقق من شهادتك.
في مثالنا ، نحن ندخل إلى موقع Google.com على الويب.
سيقوم Squid Proxy تلقائيًا بإنشاء شهادات HTTPS مزيفة لجميع العملاء.

Leave A Comment
You must be logged in to post a comment.