Would you like to learn how to install Squid with HTTPS on Ubuntu Linux? In this tutorial, we are going to show you how to install and configure the Proxy server Squid on Ubuntu Linux.
This tutorial was tested on Ubuntu 18.04.
This tutorial was tested on Squid 4.5.
Hardware List:
The following section presents the list of equipment used to create this Squid tutorial.
Every piece of hardware listed above can be found at Amazon website.
Squid Related Tutorial:
On this page, we offer quick access to a list of tutorials related to Squid.
Install Squid on Ubuntu Linux
We need to configure the correct date and time because we are going to work with certificates.
On the Linux console, use the following commands to set the correct timezone.
# dpkg-reconfigure tzdata
Install the Ntpdate package and set the correct date and time immediately.
# apt-get install ntpdate
# ntpdate pool.ntp.br
In our example, the Ntpdate command was used to set the correct date and time using the Brazilian server pool.ntp.br
Let's install the NTP service.
# timedatectl set-ntp 0
# apt-get install ntp
NTP is the service that will keep our server updated.
Use the command date to check the date and time configured on your Ubuntu Linux.
# date
If the system shown the correct date and time, this means that you followed all the steps correctly.
Use the following commands to install the required packages.
# apt-get update
# apt-get install build-essential openssl libssl-dev pkg-config
Download, compile and install the Squid package.
# mkdir /downloads
# cd /downloads
# wget http://www.squid-cache.org/Versions/v4/squid-4.5.tar.gz
# tar -zxvf squid-4.5.tar.gz
# cd squid-4.5
# ./configure --with-default-user=proxy --with-openssl --enable-ssl-crtd
# make
# make install
Configure the Squid HTTPS/SSL Environment
Now, you should find the location of the openssl.cnf file on your system.
After finding, you need to edit the openssl.cnf file.
# updatedb
# vi /etc/ssl/openssl.cnf
Here is the original file, before our configuration and without the comments.
HOME = .
RANDFILE = $ENV::HOME/.rnd
oid_section = new_oids[ new_oids ]
tsa_policy1 = 1.2.3.4.1
tsa_policy2 = 1.2.3.4.5.6
tsa_policy3 = 1.2.3.4.5.7
[ ca ]
default_ca = CA_default # The default ca section
[ CA_default ]
dir = ./demoCA # Where everything is kept
certs = $dir/certs # Where the issued certs are kept
crl_dir = $dir/crl # Where the issued crl are kept
database = $dir/index.txt # database index file.
# several certs with same subject.
new_certs_dir = $dir/newcerts # default place for new certs.
certificate = $dir/cacert.pem # The CA certificate
serial = $dir/serial # The current serial number
crlnumber = $dir/crlnumber # the current crl number
# must be commented out to leave a V1 CRL
crl = $dir/crl.pem # The current CRL
private_key = $dir/private/cakey.pem# The private key
RANDFILE = $dir/private/.rand # private random number file
x509_extensions = usr_cert # The extensions to add to the cert
name_opt = ca_default # Subject Name options
cert_opt = ca_default # Certificate field options
default_days = 365 # how long to certify for
default_crl_days= 30 # how long before next CRL
default_md = default # use public key default MD
preserve = no # keep passed DN ordering
policy = policy_match
[ policy_match ]
countryName = match
stateOrProvinceName = match
organizationName = match
organizationalUnitName = optional
commonName = supplied
emailAddress = optional[ policy_anything ]
countryName = optional
stateOrProvinceName = optional
localityName = optional
organizationName = optional
organizationalUnitName = optional
commonName = supplied
emailAddress = optional
[ req ]
default_bits = 2048
default_keyfile = privkey.pem
distinguished_name = req_distinguished_name
attributes = req_attributes
x509_extensions = v3_ca # The extensions to add to the self signed cert
string_mask = utf8only
[ req_distinguished_name ]
countryName = Country Name (2 letter code)
countryName_default = AU
countryName_min = 2
countryName_max = 2
stateOrProvinceName = State or Province Name (full name)
stateOrProvinceName_default = Some-State
localityName = Locality Name (eg, city)
0.organizationName = Organization Name (eg, company)
0.organizationName_default = Internet Widgits Pty Ltd
organizationalUnitName = Organizational Unit Name (eg, section)
commonName = Common Name (e.g. server FQDN or YOUR name)
commonName_max = 64
emailAddress = Email Address
emailAddress_max = 64
[ req_attributes ]
challengePassword = A challenge password
challengePassword_min = 4
challengePassword_max = 20
unstructuredName = An optional company name[ usr_cert ]
basicConstraints=CA:FALSE
nsComment = "OpenSSL Generated Certificate"
subjectKeyIdentifier=hash
authorityKeyIdentifier=keyid,issuer
[ v3_req ]
basicConstraints = CA:FALSE
keyUsage = nonRepudiation, digitalSignature, keyEncipherment
[ v3_ca ]
subjectKeyIdentifier=hash
authorityKeyIdentifier=keyid:always,issuer
basicConstraints = critical,CA:true
[ crl_ext ]
authorityKeyIdentifier=keyid:always
[ proxy_cert_ext ]
basicConstraints=CA:FALSE
nsComment = "OpenSSL Generated Certificate"
subjectKeyIdentifier=hash
authorityKeyIdentifier=keyid,issuer
proxyCertInfo=critical,language:id-ppl-anyLanguage,pathlen:3,policy:foo
[ tsa ]
default_tsa = tsa_config1 # the default TSA section
[ tsa_config1 ]
dir = ./demoCA # TSA root directory
serial = $dir/tsaserial # The current serial number (mandatory)
crypto_device = builtin # OpenSSL engine to use for signing
signer_cert = $dir/tsacert.pem # The TSA signing certificate
# (optional)
certs = $dir/cacert.pem # Certificate chain to include in reply
# (optional)
signer_key = $dir/private/tsakey.pem # The TSA private key (optional)
signer_digest = sha256 # Signing digest to use. (Optional)
default_policy = tsa_policy1 # Policy if request did not specify it
# (optional)
other_policies = tsa_policy2, tsa_policy3 # acceptable policies (optional)
digests = sha1, sha256, sha384, sha512 # Acceptable message digests (mandatory)
accuracy = secs:1, millisecs:500, microsecs:100 # (optional)
clock_precision_digits = 0 # number of digits after dot. (optional)
ordering = yes # Is ordering defined for timestamps?
# (optional, default: no)
tsa_name = yes # Must the TSA name be included in the reply?
# (optional, default: no)
ess_cert_id_chain = no # Must the ESS cert id chain be included?
# (optional, default: no)
Add the KeyUsage configuration to the V3_CA area.
[ v3_ca ]
keyUsage = cRLSign, keyCertSign
Create the required SSL folder infrastructure.
# mkdir /usr/local/squid/etc/ssl_cert -p
# chown proxy:proxy /usr/local/squid/etc/ssl_cert -R
# chmod 700 /usr/local/squid/etc/ssl_cert -R
# cd /usr/local/squid/etc/ssl_cert
Create a Self-signed Certification authority.
# openssl req -new -newkey rsa:2048 -sha256 -days 365 -nodes -x509 -extensions v3_ca -keyout myCA.pem -out myCA.pem
......................................................................+++
......................................+++
writing new private key to 'myCA.pem'
-----
You are about to be asked to enter information that will be incorporated
into your certificate request.
What you are about to enter is what is called a Distinguished Name or a DN.
There are quite a few fields but you can leave some blank
For some fields there will be a default value,
If you enter '.', the field will be left blank.
-----
Country Name (2 letter code) [AU]:BR
State or Province Name (full name) [Some-State]:Rio de Janeiro
Locality Name (eg, city) []:
Organization Name (eg, company) [Internet Widgits Pty Ltd]:TECHEXPERT
Organizational Unit Name (eg, section) []:
Common Name (e.g. server FQDN or YOUR name) []: firewall.techexpert.tips
Email Address []:
Export the Self-signed Certification authority certificate using the DER format.
# openssl x509 -in myCA.pem -outform DER -out myCA.der
Important! You need to import the MyCA.DER to the client computer.
Create the initial SSL database.
# /usr/local/squid/libexec/security_file_certgen -c -s /usr/local/squid/var/logs/ssl_db -M 4MB
# chown proxy:proxy /usr/local/squid/var/logs/ssl_db -R
Import the Certificate Authority Certificate
You need to copy the MyCA.DER file to a computer running windows.
On a client computer running Windows, double click on the MyCA.DER file.
Click on the Install Certificat button.
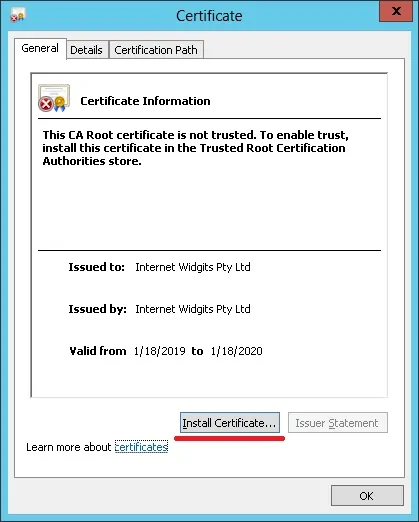
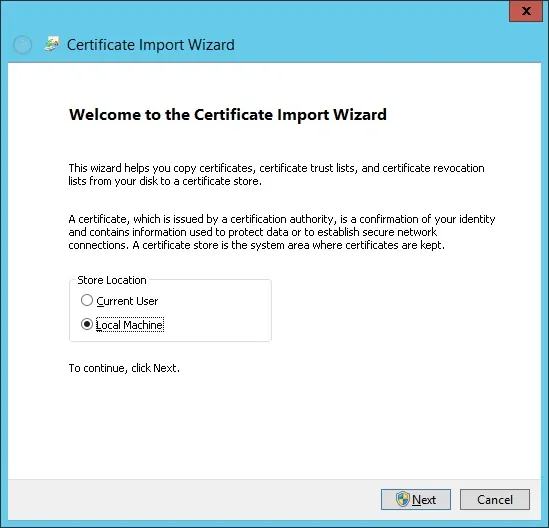
Select the option: Local machine.
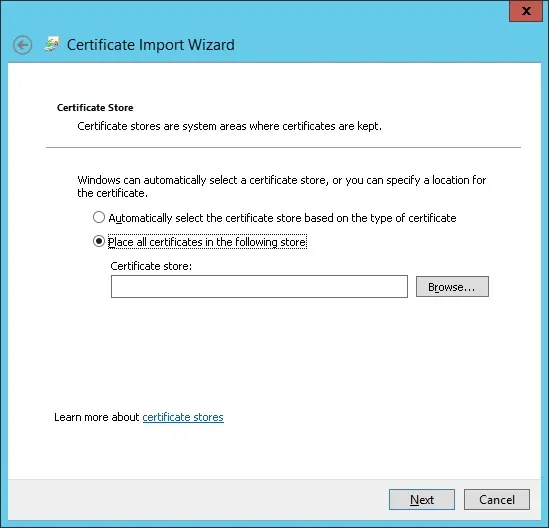
Select the option: Place all certificates in the following store.
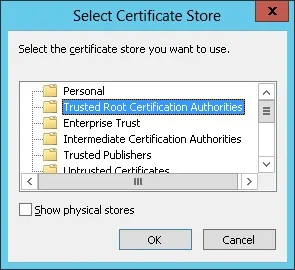
Select the folder named Trusted Root Certification Authorities.
You have finished the Certificate installation.
Configure Squid for HTTPS
Here is the original squid configuration file installed by the Squid Package.
# vi /usr/local/squid/etc/squid.conf
acl localnet src 0.0.0.1-0.255.255.255
acl localnet src 10.0.0.0/8
acl localnet src 100.64.0.0/10
acl localnet src 169.254.0.0/16
acl localnet src 172.16.0.0/12
acl localnet src 192.168.0.0/16
acl localnet src fc00::/7
acl localnet src fe80::/10
acl SSL_ports port 443
acl Safe_ports port 80
acl Safe_ports port 21
acl Safe_ports port 443
acl Safe_ports port 70
acl Safe_ports port 210
acl Safe_ports port 1025-65535
acl Safe_ports port 280
acl Safe_ports port 488
acl Safe_ports port 591
acl Safe_ports port 777
acl CONNECT method CONNECT
http_access deny !Safe_ports
http_access deny CONNECT !SSL_ports
http_access allow localhost manager
http_access deny manager
http_access allow localnet
http_access allow localhost
http_access deny all
http_port 3128
coredump_dir /usr/local/squid/var/cache/squid
refresh_pattern ^ftp: 1440 20% 10080
refresh_pattern ^gopher: 1440 0% 1440
refresh_pattern -i (/cgi-bin/|\?) 0 0% 0
refresh_pattern . 0 20% 4320
Here is the new file with our configuration.
# vi /usr/local/squid/etc/squid.conf
acl localnet src 192.168.0.0/24
acl step1 at_step SslBump1
ssl_bump peek step1
ssl_bump bump all
acl SSL_ports port 443
acl Safe_ports port 80 # http
acl Safe_ports port 21 # ftp
acl Safe_ports port 443 # https
acl Safe_ports port 70 # gopher
acl Safe_ports port 210 # wais
acl Safe_ports port 1025-65535 # unregistered ports
acl Safe_ports port 280 # http-mgmt
acl Safe_ports port 488 # gss-http
acl Safe_ports port 591 # filemaker
acl Safe_ports port 777 # multiling http
acl CONNECT method CONNECT
http_access deny !Safe_ports
http_access deny CONNECT !SSL_ports
http_access allow localhost manager
http_access deny manager
http_access allow localnet
http_access allow localhost
http_access deny all
http_port 3128 ssl-bump cert=/usr/local/squid/etc/ssl_cert/myCA.pem generate-host-certificates=on dynamic_cert_mem_cache_size=4MB
sslcrtd_program /usr/local/squid/libexec/security_file_certgen -s /usr/local/squid/var/logs/ssl_db -M 4MB
coredump_dir /usr/local/squid/var/cache/squid
cache_dir ufs /usr/local/squid/var/cache/squid 1000 16 256 # 1GB as Cache
refresh_pattern ^ftp: 1440 20% 10080
refresh_pattern ^gopher: 1440 0% 1440
refresh_pattern -i (/cgi-bin/|\?) 0 0% 0
refresh_pattern . 0 20% 4320
My configuration is just basic.
It is highly recommended that you study this configuration file to improve your configuration.
Use the following command to Create the necessary cache folders.
# chown -R proxy:proxy /usr/local/squid -R
# /usr/local/squid/sbin/squid -z
Use the following command to start the Squid service.
# /usr/local/squid/sbin/squid -d 10
If everything worked correctly, you should see the following messages on the screen:
Created PID file (https://d1ny9casiyy5u5.cloudfront.net/usr/local/squid/var/run/squid.pid)
Set Current Directory to /usr/local/squid/var/cache/squid
Starting Squid Cache version 4.5 for x86_64-pc-linux-gnu...
Service Name: squid
Process ID 20605
Process Roles: worker
With 1024 file descriptors available
Initializing IP Cache...
DNS Socket created at [::], FD 5
DNS Socket created at 0.0.0.0, FD 9
Adding nameserver 127.0.0.53 from /etc/resolv.conf
Adding domain us-west-2.compute.internal from /etc/resolv.conf
helperOpenServers: Starting 5/32 'security_file_certgen' processes
Logfile: opening log daemon:/usr/local/squid/var/logs/access.log
Logfile Daemon: opening log /usr/local/squid/var/logs/access.log
Store logging disabled
Swap maxSize 0 + 262144 KB, estimated 20164 objects
Target number of buckets: 1008
Using 8192 Store buckets
Max Mem size: 262144 KB
Max Swap size: 0 KB
Using Least Load store dir selection
Set Current Directory to /usr/local/squid/var/cache/squid
Finished loading MIME types and icons.
HTCP Disabled.
Squid plugin modules loaded: 0
Adaptation support is off.
Accepting SSL bumped HTTP Socket connections at local=[::]:3128 remote=[::] FD 22 flags=9
2019/01/18 15:33:59 kid1| storeLateRelease: released 0 objects
To test the installation, go to a computer located on your internal network and configure its browser to use the IP address of the Squid server and the TCP port 3128 as a proxy server.
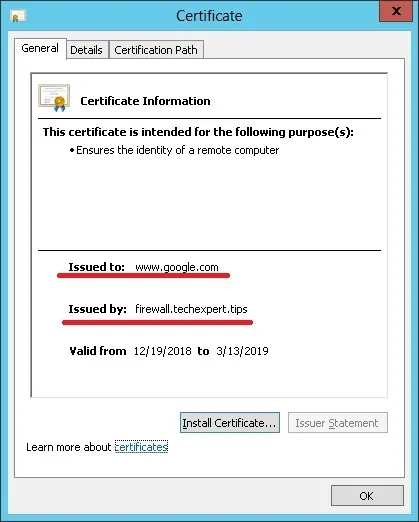
Try to access an HTTPS website and verify your certificate.
In our example, we are accessing the Google.com website.
The Squid Proxy will automatically create fake HTTPS certificates to all the clients.

Leave A Comment
You must be logged in to post a comment.