¿Te gustaría aprender cómo instalar Squid con HTTPS en Ubuntu Linux? En este tutorial, le mostraremos cómo instalar y configurar el servidor proxy Squid en Ubuntu Linux.
Este tutorial fue probado en Ubuntu 18.04.
Este tutorial fue probado en Squid 4.5.
Lista de Hardware:
La siguiente sección presenta la lista de equipos utilizados para crear este tutorial de Squid.
Todas las piezas de hardware mencionadas anteriormente se pueden encontrar en el sitio web de Amazon.
Tutoriales Relacionados con Squid:
En esta página, ofrecemos acceso rápido a una lista de tutoriales relacionados con Squid.
Instala Squid en Ubuntu Linux
Necesitamos configurar la fecha y hora correctas porque vamos a trabajar con certificados.
En la consola de Linux, use los siguientes comandos para establecer la zona horaria correcta.
# dpkg-reconfigure tzdata
Instale el paquete Ntpdate y establezca la fecha y hora correctas inmediatamente.
# apt-get install ntpdate
# ntpdate pool.ntp.br
En nuestro ejemplo, el comando Ntpdate se usó para establecer la fecha y la hora correctas usando el servidor brasileño pool.ntp.br
Instalemos el servicio NTP.
# timedatectl set-ntp 0
# apt-get install ntp
NTP es el servicio que mantendrá actualizado nuestro servidor.
Use la fecha del comando para verificar la fecha y la hora configuradas en su Ubuntu Linux.
# date
Si el sistema muestra la fecha y la hora correctas, esto significa que siguió todos los pasos correctamente.
Use los siguientes comandos para instalar los paquetes requeridos.
# apt-get update
# apt-get install build-essential openssl libssl-dev pkg-config
Descarga, compila e instala el paquete Squid.
# mkdir /downloads
# cd /downloads
# wget http://www.squid-cache.org/Versions/v4/squid-4.5.tar.gz
# tar -zxvf squid-4.5.tar.gz
# cd squid-4.5
# ./configure --with-default-user=proxy --with-openssl --enable-ssl-crtd
# make
# make install
Configurar el Entorno HTTPS / SSL de Squid
Ahora, debe encontrar la ubicación del archivo openssl.cnf en su sistema.
Después de encontrarlo, necesita editar el archivo openssl.cnf.
# updatedb
# vi /etc/ssl/openssl.cnf
Aquí está el archivo original, antes de nuestra configuración y sin los comentarios.
HOME = .
RANDFILE = $ENV::HOME/.rnd
oid_section = new_oids[ new_oids ]
tsa_policy1 = 1.2.3.4.1
tsa_policy2 = 1.2.3.4.5.6
tsa_policy3 = 1.2.3.4.5.7
[ ca ]
default_ca = CA_default # The default ca section
[ CA_default ]
dir = ./demoCA # Where everything is kept
certs = $dir/certs # Where the issued certs are kept
crl_dir = $dir/crl # Where the issued crl are kept
database = $dir/index.txt # database index file.
# several certs with same subject.
new_certs_dir = $dir/newcerts # default place for new certs.
certificate = $dir/cacert.pem # The CA certificate
serial = $dir/serial # The current serial number
crlnumber = $dir/crlnumber # the current crl number
# must be commented out to leave a V1 CRL
crl = $dir/crl.pem # The current CRL
private_key = $dir/private/cakey.pem# The private key
RANDFILE = $dir/private/.rand # private random number file
x509_extensions = usr_cert # The extensions to add to the cert
name_opt = ca_default # Subject Name options
cert_opt = ca_default # Certificate field options
default_days = 365 # how long to certify for
default_crl_days= 30 # how long before next CRL
default_md = default # use public key default MD
preserve = no # keep passed DN ordering
policy = policy_match
[ policy_match ]
countryName = match
stateOrProvinceName = match
organizationName = match
organizationalUnitName = optional
commonName = supplied
emailAddress = optional[ policy_anything ]
countryName = optional
stateOrProvinceName = optional
localityName = optional
organizationName = optional
organizationalUnitName = optional
commonName = supplied
emailAddress = optional
[ req ]
default_bits = 2048
default_keyfile = privkey.pem
distinguished_name = req_distinguished_name
attributes = req_attributes
x509_extensions = v3_ca # The extensions to add to the self signed cert
string_mask = utf8only
[ req_distinguished_name ]
countryName = Country Name (2 letter code)
countryName_default = AU
countryName_min = 2
countryName_max = 2
stateOrProvinceName = State or Province Name (full name)
stateOrProvinceName_default = Some-State
localityName = Locality Name (eg, city)
0.organizationName = Organization Name (eg, company)
0.organizationName_default = Internet Widgits Pty Ltd
organizationalUnitName = Organizational Unit Name (eg, section)
commonName = Common Name (e.g. server FQDN or YOUR name)
commonName_max = 64
emailAddress = Email Address
emailAddress_max = 64
[ req_attributes ]
challengePassword = A challenge password
challengePassword_min = 4
challengePassword_max = 20
unstructuredName = An optional company name[ usr_cert ]
basicConstraints=CA:FALSE
nsComment = "OpenSSL Generated Certificate"
subjectKeyIdentifier=hash
authorityKeyIdentifier=keyid,issuer
[ v3_req ]
basicConstraints = CA:FALSE
keyUsage = nonRepudiation, digitalSignature, keyEncipherment
[ v3_ca ]
subjectKeyIdentifier=hash
authorityKeyIdentifier=keyid:always,issuer
basicConstraints = critical,CA:true
[ crl_ext ]
authorityKeyIdentifier=keyid:always
[ proxy_cert_ext ]
basicConstraints=CA:FALSE
nsComment = "OpenSSL Generated Certificate"
subjectKeyIdentifier=hash
authorityKeyIdentifier=keyid,issuer
proxyCertInfo=critical,language:id-ppl-anyLanguage,pathlen:3,policy:foo
[ tsa ]
default_tsa = tsa_config1 # the default TSA section
[ tsa_config1 ]
dir = ./demoCA # TSA root directory
serial = $dir/tsaserial # The current serial number (mandatory)
crypto_device = builtin # OpenSSL engine to use for signing
signer_cert = $dir/tsacert.pem # The TSA signing certificate
# (optional)
certs = $dir/cacert.pem # Certificate chain to include in reply
# (optional)
signer_key = $dir/private/tsakey.pem # The TSA private key (optional)
signer_digest = sha256 # Signing digest to use. (Optional)
default_policy = tsa_policy1 # Policy if request did not specify it
# (optional)
other_policies = tsa_policy2, tsa_policy3 # acceptable policies (optional)
digests = sha1, sha256, sha384, sha512 # Acceptable message digests (mandatory)
accuracy = secs:1, millisecs:500, microsecs:100 # (optional)
clock_precision_digits = 0 # number of digits after dot. (optional)
ordering = yes # Is ordering defined for timestamps?
# (optional, default: no)
tsa_name = yes # Must the TSA name be included in the reply?
# (optional, default: no)
ess_cert_id_chain = no # Must the ESS cert id chain be included?
# (optional, default: no)
Agregue la configuración de KeyUsage al área V3_CA.
[ v3_ca ]
keyUsage = cRLSign, keyCertSign
Cree la infraestructura de carpeta SSL requerida.
# mkdir /usr/local/squid/etc/ssl_cert -p
# chown proxy:proxy /usr/local/squid/etc/ssl_cert -R
# chmod 700 /usr/local/squid/etc/ssl_cert -R
# cd /usr/local/squid/etc/ssl_cert
Crear una autoridad de certificación autofirmada.
# openssl req -new -newkey rsa:2048 -sha256 -days 365 -nodes -x509 -extensions v3_ca -keyout myCA.pem -out myCA.pem
......................................................................+++
......................................+++
writing new private key to 'myCA.pem'
-----
You are about to be asked to enter information that will be incorporated
into your certificate request.
What you are about to enter is what is called a Distinguished Name or a DN.
There are quite a few fields but you can leave some blank
For some fields there will be a default value,
If you enter '.', the field will be left blank.
-----
Country Name (2 letter code) [AU]:BR
State or Province Name (full name) [Some-State]:Rio de Janeiro
Locality Name (eg, city) []:
Organization Name (eg, company) [Internet Widgits Pty Ltd]:TECHEXPERT
Organizational Unit Name (eg, section) []:
Common Name (e.g. server FQDN or YOUR name) []: firewall.techexpert.tips
Email Address []:
Exporte el certificado de autoridad de certificación autofirmada utilizando el formato DER.
# openssl x509 -in myCA.pem -outform DER -out myCA.der
¡Importante! Debe importar MyCA.DER al equipo cliente.
Crear la base de datos SSL inicial.
# /usr/local/squid/libexec/security_file_certgen -c -s /usr/local/squid/var/logs/ssl_db -M 4MB
# chown proxy:proxy /usr/local/squid/var/logs/ssl_db -R
Importar el Certificado de Autoridad de Certificación
Debe copiar el archivo MyCA.DER en una computadora que ejecuta Windows.
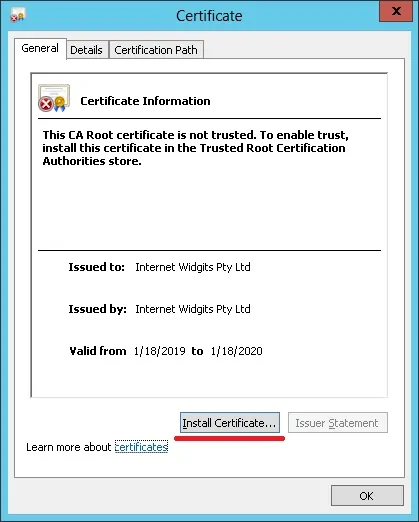
En una computadora cliente que ejecute Windows, haga doble clic en el archivo MyCA.DER.
Haga clic en el botón Instalar certificado.
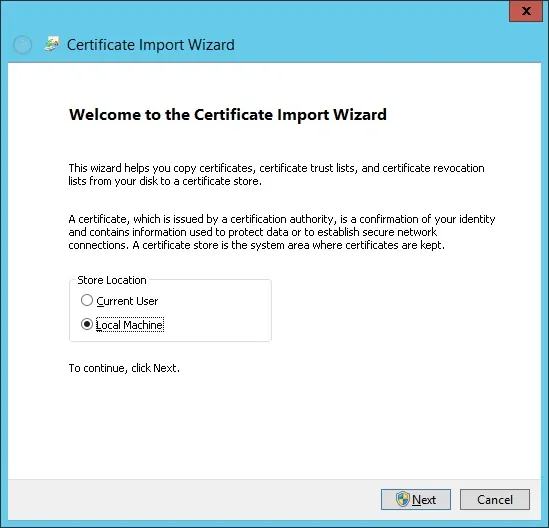
Selecciona la opción: Máquina local.
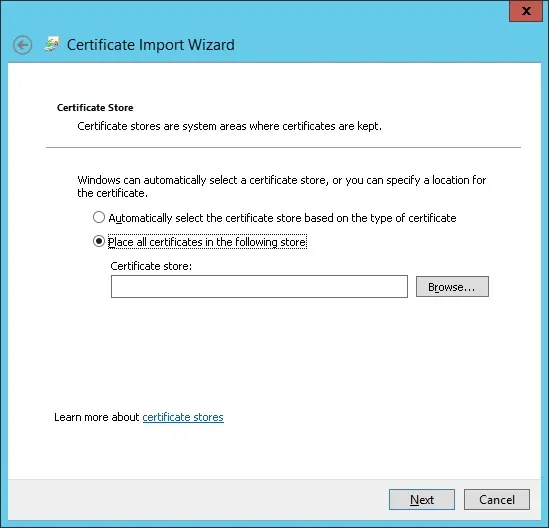
Seleccione la opción: Coloque todos los certificados en el siguiente almacén.
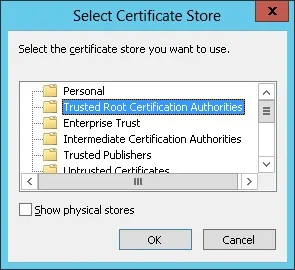
Seleccione la carpeta llamada Trusted Root Certification Authorities.
Ha finalizado la instalación del Certificado.
Configurar Squid para HTTPS
Aquí está el archivo de configuración de Squid original instalado por el paquete de Squid.
# vi /usr/local/squid/etc/squid.conf
acl localnet src 0.0.0.1-0.255.255.255
acl localnet src 10.0.0.0/8
acl localnet src 100.64.0.0/10
acl localnet src 169.254.0.0/16
acl localnet src 172.16.0.0/12
acl localnet src 192.168.0.0/16
acl localnet src fc00::/7
acl localnet src fe80::/10
acl SSL_ports port 443
acl Safe_ports port 80
acl Safe_ports port 21
acl Safe_ports port 443
acl Safe_ports port 70
acl Safe_ports port 210
acl Safe_ports port 1025-65535
acl Safe_ports port 280
acl Safe_ports port 488
acl Safe_ports port 591
acl Safe_ports port 777
acl CONNECT method CONNECT
http_access deny !Safe_ports
http_access deny CONNECT !SSL_ports
http_access allow localhost manager
http_access deny manager
http_access allow localnet
http_access allow localhost
http_access deny all
http_port 3128
coredump_dir /usr/local/squid/var/cache/squid
refresh_pattern ^ftp: 1440 20% 10080
refresh_pattern ^gopher: 1440 0% 1440
refresh_pattern -i (/cgi-bin/|\?) 0 0% 0
refresh_pattern . 0 20% 4320
Aquí está el nuevo archivo con nuestra configuración.
# vi /usr/local/squid/etc/squid.conf
acl localnet src 192.168.0.0/24
acl step1 at_step SslBump1
ssl_bump peek step1
ssl_bump bump all
acl SSL_ports port 443
acl Safe_ports port 80 # http
acl Safe_ports port 21 # ftp
acl Safe_ports port 443 # https
acl Safe_ports port 70 # gopher
acl Safe_ports port 210 # wais
acl Safe_ports port 1025-65535 # unregistered ports
acl Safe_ports port 280 # http-mgmt
acl Safe_ports port 488 # gss-http
acl Safe_ports port 591 # filemaker
acl Safe_ports port 777 # multiling http
acl CONNECT method CONNECT
http_access deny !Safe_ports
http_access deny CONNECT !SSL_ports
http_access allow localhost manager
http_access deny manager
http_access allow localnet
http_access allow localhost
http_access deny all
http_port 3128 ssl-bump cert=/usr/local/squid/etc/ssl_cert/myCA.pem generate-host-certificates=on dynamic_cert_mem_cache_size=4MB
sslcrtd_program /usr/local/squid/libexec/security_file_certgen -s /usr/local/squid/var/logs/ssl_db -M 4MB
coredump_dir /usr/local/squid/var/cache/squid
cache_dir ufs /usr/local/squid/var/cache/squid 1000 16 256 # 1GB as Cache
refresh_pattern ^ftp: 1440 20% 10080
refresh_pattern ^gopher: 1440 0% 1440
refresh_pattern -i (/cgi-bin/|\?) 0 0% 0
refresh_pattern . 0 20% 4320
Mi configuración es sencillamente básica.
Se recomienda encarecidamente que estudie este archivo de configuración para mejorar su configuración.
Utilice el siguiente comando para crear las carpetas de caché necesarias.
# chown -R proxy:proxy /usr/local/squid -R
# /usr/local/squid/sbin/squid -z
Usa el siguiente comando para iniciar el servicio Squid.
# /usr/local/squid/sbin/squid -d 10
Si todo funcionó correctamente, debería ver los siguientes mensajes en la pantalla:
Created PID file (https://d1ny9casiyy5u5.cloudfront.net/usr/local/squid/var/run/squid.pid)
Set Current Directory to /usr/local/squid/var/cache/squid
Starting Squid Cache version 4.5 for x86_64-pc-linux-gnu...
Service Name: squid
Process ID 20605
Process Roles: worker
With 1024 file descriptors available
Initializing IP Cache...
DNS Socket created at [::], FD 5
DNS Socket created at 0.0.0.0, FD 9
Adding nameserver 127.0.0.53 from /etc/resolv.conf
Adding domain us-west-2.compute.internal from /etc/resolv.conf
helperOpenServers: Starting 5/32 'security_file_certgen' processes
Logfile: opening log daemon:/usr/local/squid/var/logs/access.log
Logfile Daemon: opening log /usr/local/squid/var/logs/access.log
Store logging disabled
Swap maxSize 0 + 262144 KB, estimated 20164 objects
Target number of buckets: 1008
Using 8192 Store buckets
Max Mem size: 262144 KB
Max Swap size: 0 KB
Using Least Load store dir selection
Set Current Directory to /usr/local/squid/var/cache/squid
Finished loading MIME types and icons.
HTCP Disabled.
Squid plugin modules loaded: 0
Adaptation support is off.
Accepting SSL bumped HTTP Socket connections at local=[::]:3128 remote=[::] FD 22 flags=9
2019/01/18 15:33:59 kid1| storeLateRelease: released 0 objects
Para probar la instalación, vaya a una computadora ubicada en su red interna y configure su navegador para usar la dirección IP del servidor Squid y el puerto TCP 3128 como un servidor proxy.
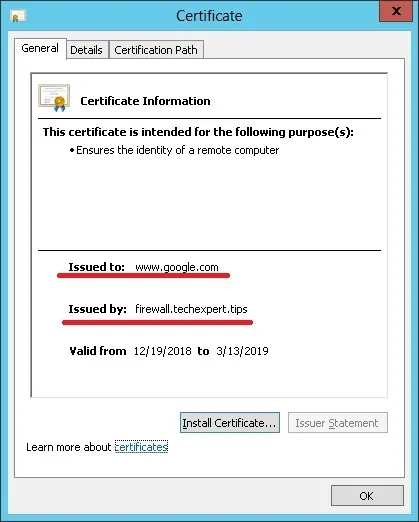
Intente acceder a un sitio web de HTTPS y verifique su certificado.
En nuestro ejemplo, estamos accediendo al sitio web Google.com.
Squid Proxy creará automáticamente certificados HTTPS falsos para todos los clientes.

Leave A Comment
You must be logged in to post a comment.