Möchten Sie erfahren, wie Squid mit HTTPS unter Ubuntu Linux installiert wird? In diesem Tutorial zeigen wir Ihnen, wie Sie den Proxy-Server Squid unter Ubuntu Linux installieren und konfigurieren.
Dieses Tutorial wurde auf Ubuntu 18.04 getestet.
Dieses Tutorial wurde auf Squid 4.5 getestet.
Hardware-Liste:
Der folgende Abschnitt enthält eine Liste der Geräte, die zur Erstellung dieses Squid-Lernprogramms verwendet wurden.
Alle oben aufgeführten Hardwarekomponenten finden Sie auf der Amazon-Website.
Squid-bezogenes Tutorial:
Auf dieser Seite bieten wir schnellen Zugriff auf eine Liste von Tutorials zu Squid.
Installieren Sie Squid unter Ubuntu Linux
Wir müssen das korrekte Datum und die korrekte Uhrzeit einstellen, da wir mit Zertifikaten arbeiten werden.
Verwenden Sie in der Linux-Konsole die folgenden Befehle, um die korrekte Zeitzone festzulegen.
# dpkg-reconfigure tzdata
Installieren Sie das Ntpdate-Paket und stellen Sie sofort das richtige Datum und die richtige Uhrzeit ein.
# apt-get install ntpdate
# ntpdate pool.ntp.br
In unserem Beispiel wurde der Befehl Ntpdate verwendet, um das korrekte Datum und die korrekte Uhrzeit unter Verwendung des brasilianischen Serverpools.ntp.br festzulegen
Lassen Sie uns den NTP-Dienst installieren.
# timedatectl set-ntp 0
# apt-get install ntp
NTP ist der Dienst, der unseren Server auf dem neuesten Stand hält.
Verwenden Sie den Befehl date, um das Datum und die Uhrzeit zu überprüfen, die in Ubuntu Linux konfiguriert sind.
# date
Wenn das System Datum und Uhrzeit korrekt anzeigt, haben Sie alle Schritte korrekt ausgeführt.
Verwenden Sie die folgenden Befehle, um die erforderlichen Pakete zu installieren.
# apt-get update
# apt-get install build-essential openssl libssl-dev pkg-config
Laden Sie das Squid-Paket herunter, kompilieren Sie und installieren Sie es.
# mkdir /downloads
# cd /downloads
# wget http://www.squid-cache.org/Versions/v4/squid-4.5.tar.gz
# tar -zxvf squid-4.5.tar.gz
# cd squid-4.5
# ./configure --with-default-user=proxy --with-openssl --enable-ssl-crtd
# make
# make install
Konfigurieren Sie die Squid HTTPS / SSL-Umgebung
Jetzt sollten Sie den Speicherort der openssl.cnf-Datei auf Ihrem System finden.
Nach dem Finden müssen Sie die Datei openssl.cnf bearbeiten.
# updatedb
# vi /etc/ssl/openssl.cnf
Hier ist die Originaldatei, vor unserer Konfiguration und ohne die Kommentare.
HOME = .
RANDFILE = $ENV::HOME/.rnd
oid_section = new_oids[ new_oids ]
tsa_policy1 = 1.2.3.4.1
tsa_policy2 = 1.2.3.4.5.6
tsa_policy3 = 1.2.3.4.5.7
[ ca ]
default_ca = CA_default # The default ca section
[ CA_default ]
dir = ./demoCA # Where everything is kept
certs = $dir/certs # Where the issued certs are kept
crl_dir = $dir/crl # Where the issued crl are kept
database = $dir/index.txt # database index file.
# several certs with same subject.
new_certs_dir = $dir/newcerts # default place for new certs.
certificate = $dir/cacert.pem # The CA certificate
serial = $dir/serial # The current serial number
crlnumber = $dir/crlnumber # the current crl number
# must be commented out to leave a V1 CRL
crl = $dir/crl.pem # The current CRL
private_key = $dir/private/cakey.pem# The private key
RANDFILE = $dir/private/.rand # private random number file
x509_extensions = usr_cert # The extensions to add to the cert
name_opt = ca_default # Subject Name options
cert_opt = ca_default # Certificate field options
default_days = 365 # how long to certify for
default_crl_days= 30 # how long before next CRL
default_md = default # use public key default MD
preserve = no # keep passed DN ordering
policy = policy_match
[ policy_match ]
countryName = match
stateOrProvinceName = match
organizationName = match
organizationalUnitName = optional
commonName = supplied
emailAddress = optional[ policy_anything ]
countryName = optional
stateOrProvinceName = optional
localityName = optional
organizationName = optional
organizationalUnitName = optional
commonName = supplied
emailAddress = optional
[ req ]
default_bits = 2048
default_keyfile = privkey.pem
distinguished_name = req_distinguished_name
attributes = req_attributes
x509_extensions = v3_ca # The extensions to add to the self signed cert
string_mask = utf8only
[ req_distinguished_name ]
countryName = Country Name (2 letter code)
countryName_default = AU
countryName_min = 2
countryName_max = 2
stateOrProvinceName = State or Province Name (full name)
stateOrProvinceName_default = Some-State
localityName = Locality Name (eg, city)
0.organizationName = Organization Name (eg, company)
0.organizationName_default = Internet Widgits Pty Ltd
organizationalUnitName = Organizational Unit Name (eg, section)
commonName = Common Name (e.g. server FQDN or YOUR name)
commonName_max = 64
emailAddress = Email Address
emailAddress_max = 64
[ req_attributes ]
challengePassword = A challenge password
challengePassword_min = 4
challengePassword_max = 20
unstructuredName = An optional company name[ usr_cert ]
basicConstraints=CA:FALSE
nsComment = "OpenSSL Generated Certificate"
subjectKeyIdentifier=hash
authorityKeyIdentifier=keyid,issuer
[ v3_req ]
basicConstraints = CA:FALSE
keyUsage = nonRepudiation, digitalSignature, keyEncipherment
[ v3_ca ]
subjectKeyIdentifier=hash
authorityKeyIdentifier=keyid:always,issuer
basicConstraints = critical,CA:true
[ crl_ext ]
authorityKeyIdentifier=keyid:always
[ proxy_cert_ext ]
basicConstraints=CA:FALSE
nsComment = "OpenSSL Generated Certificate"
subjectKeyIdentifier=hash
authorityKeyIdentifier=keyid,issuer
proxyCertInfo=critical,language:id-ppl-anyLanguage,pathlen:3,policy:foo
[ tsa ]
default_tsa = tsa_config1 # the default TSA section
[ tsa_config1 ]
dir = ./demoCA # TSA root directory
serial = $dir/tsaserial # The current serial number (mandatory)
crypto_device = builtin # OpenSSL engine to use for signing
signer_cert = $dir/tsacert.pem # The TSA signing certificate
# (optional)
certs = $dir/cacert.pem # Certificate chain to include in reply
# (optional)
signer_key = $dir/private/tsakey.pem # The TSA private key (optional)
signer_digest = sha256 # Signing digest to use. (Optional)
default_policy = tsa_policy1 # Policy if request did not specify it
# (optional)
other_policies = tsa_policy2, tsa_policy3 # acceptable policies (optional)
digests = sha1, sha256, sha384, sha512 # Acceptable message digests (mandatory)
accuracy = secs:1, millisecs:500, microsecs:100 # (optional)
clock_precision_digits = 0 # number of digits after dot. (optional)
ordering = yes # Is ordering defined for timestamps?
# (optional, default: no)
tsa_name = yes # Must the TSA name be included in the reply?
# (optional, default: no)
ess_cert_id_chain = no # Must the ESS cert id chain be included?
# (optional, default: no)
Fügen Sie die KeyUsage-Konfiguration zum Bereich V3_CA hinzu.
[ v3_ca ]
keyUsage = cRLSign, keyCertSign
Erstellen Sie die erforderliche SSL-Ordnerinfrastruktur.
# mkdir /usr/local/squid/etc/ssl_cert -p
# chown proxy:proxy /usr/local/squid/etc/ssl_cert -R
# chmod 700 /usr/local/squid/etc/ssl_cert -R
# cd /usr/local/squid/etc/ssl_cert
Erstellen Sie eine selbstsignierte Zertifizierungsstelle.
# openssl req -new -newkey rsa:2048 -sha256 -days 365 -nodes -x509 -extensions v3_ca -keyout myCA.pem -out myCA.pem
......................................................................+++
......................................+++
writing new private key to 'myCA.pem'
-----
You are about to be asked to enter information that will be incorporated
into your certificate request.
What you are about to enter is what is called a Distinguished Name or a DN.
There are quite a few fields but you can leave some blank
For some fields there will be a default value,
If you enter '.', the field will be left blank.
-----
Country Name (2 letter code) [AU]:BR
State or Province Name (full name) [Some-State]:Rio de Janeiro
Locality Name (eg, city) []:
Organization Name (eg, company) [Internet Widgits Pty Ltd]:TECHEXPERT
Organizational Unit Name (eg, section) []:
Common Name (e.g. server FQDN or YOUR name) []: firewall.techexpert.tips
Email Address []:
Exportieren Sie das selbstsignierte Zertifizierungsstellenzertifikat im DER-Format.
# openssl x509 -in myCA.pem -outform DER -out myCA.der
Wichtig! Sie müssen MyCA.DER auf den Clientcomputer importieren.
Erstellen Sie die anfängliche SSL-Datenbank.
# /usr/local/squid/libexec/security_file_certgen -c -s /usr/local/squid/var/logs/ssl_db -M 4MB
# chown proxy:proxy /usr/local/squid/var/logs/ssl_db -R
Importieren Sie das Certificate Authority-Zertifikat
Sie müssen die MyCA.DER-Datei auf einen Computer kopieren, auf dem Windows ausgeführt wird.
Doppelklicken Sie auf einem Clientcomputer unter Windows auf die Datei MyCA.DER.
Klicken Sie auf die Schaltfläche Zertifikat installieren.
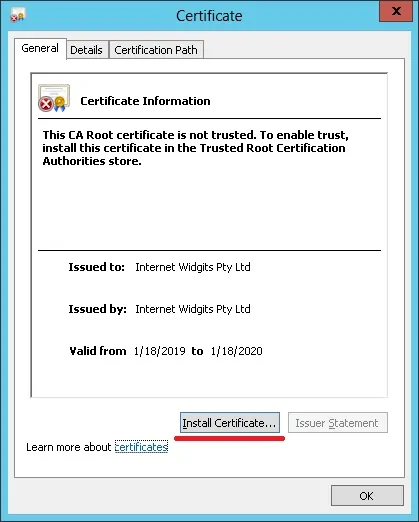
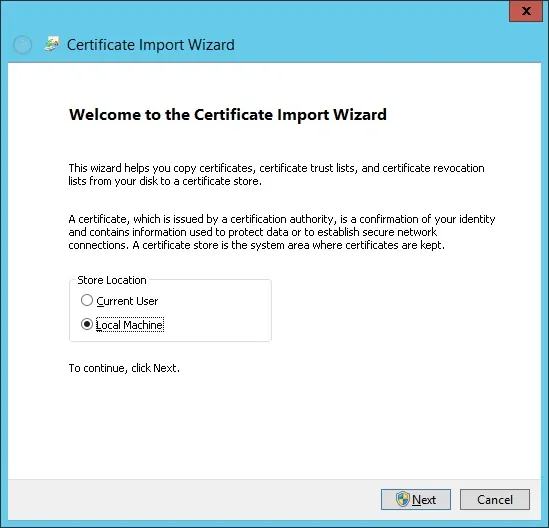
Wählen Sie die Option: Lokaler Computer.
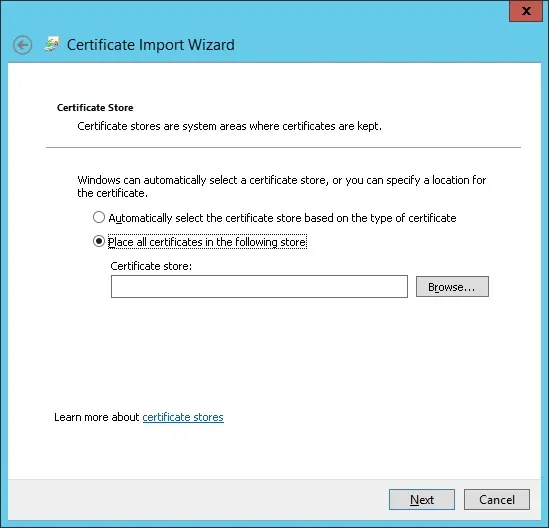
Wählen Sie die Option: Alle Zertifikate in folgendem Speicher ablegen.
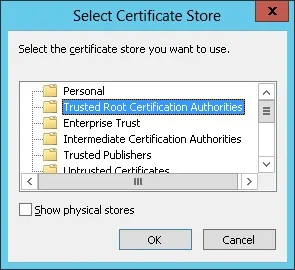
Wählen Sie den Ordner "Vertrauenswürdige Stammzertifizierungsstellen" aus.
Sie haben die Zertifikatinstallation abgeschlossen.
Konfigurieren Sie Squid für HTTPS
Hier ist die ursprüngliche Squid-Konfigurationsdatei, die vom Squid-Paket installiert wurde.
# vi /usr/local/squid/etc/squid.conf
acl localnet src 0.0.0.1-0.255.255.255
acl localnet src 10.0.0.0/8
acl localnet src 100.64.0.0/10
acl localnet src 169.254.0.0/16
acl localnet src 172.16.0.0/12
acl localnet src 192.168.0.0/16
acl localnet src fc00::/7
acl localnet src fe80::/10
acl SSL_ports port 443
acl Safe_ports port 80
acl Safe_ports port 21
acl Safe_ports port 443
acl Safe_ports port 70
acl Safe_ports port 210
acl Safe_ports port 1025-65535
acl Safe_ports port 280
acl Safe_ports port 488
acl Safe_ports port 591
acl Safe_ports port 777
acl CONNECT method CONNECT
http_access deny !Safe_ports
http_access deny CONNECT !SSL_ports
http_access allow localhost manager
http_access deny manager
http_access allow localnet
http_access allow localhost
http_access deny all
http_port 3128
coredump_dir /usr/local/squid/var/cache/squid
refresh_pattern ^ftp: 1440 20% 10080
refresh_pattern ^gopher: 1440 0% 1440
refresh_pattern -i (/cgi-bin/|\?) 0 0% 0
refresh_pattern . 0 20% 4320
Hier ist die neue Datei mit unserer Konfiguration.
# vi /usr/local/squid/etc/squid.conf
acl localnet src 192.168.0.0/24
acl step1 at_step SslBump1
ssl_bump peek step1
ssl_bump bump all
acl SSL_ports port 443
acl Safe_ports port 80 # http
acl Safe_ports port 21 # ftp
acl Safe_ports port 443 # https
acl Safe_ports port 70 # gopher
acl Safe_ports port 210 # wais
acl Safe_ports port 1025-65535 # unregistered ports
acl Safe_ports port 280 # http-mgmt
acl Safe_ports port 488 # gss-http
acl Safe_ports port 591 # filemaker
acl Safe_ports port 777 # multiling http
acl CONNECT method CONNECT
http_access deny !Safe_ports
http_access deny CONNECT !SSL_ports
http_access allow localhost manager
http_access deny manager
http_access allow localnet
http_access allow localhost
http_access deny all
http_port 3128 ssl-bump cert=/usr/local/squid/etc/ssl_cert/myCA.pem generate-host-certificates=on dynamic_cert_mem_cache_size=4MB
sslcrtd_program /usr/local/squid/libexec/security_file_certgen -s /usr/local/squid/var/logs/ssl_db -M 4MB
coredump_dir /usr/local/squid/var/cache/squid
cache_dir ufs /usr/local/squid/var/cache/squid 1000 16 256 # 1GB as Cache
refresh_pattern ^ftp: 1440 20% 10080
refresh_pattern ^gopher: 1440 0% 1440
refresh_pattern -i (/cgi-bin/|\?) 0 0% 0
refresh_pattern . 0 20% 4320
Meine Konfiguration ist einfach grundlegend.
Es wird dringend empfohlen, diese Konfigurationsdatei zu studieren, um Ihre Konfiguration zu verbessern.
Verwenden Sie den folgenden Befehl, um die erforderlichen Cache-Ordner zu erstellen.
# chown -R proxy:proxy /usr/local/squid -R
# /usr/local/squid/sbin/squid -z
Verwenden Sie den folgenden Befehl, um den Squid-Dienst zu starten.
# /usr/local/squid/sbin/squid -d 10
Wenn alles richtig funktioniert hat, sollten Sie die folgenden Meldungen auf dem Bildschirm sehen:
Created PID file (https://d1ny9casiyy5u5.cloudfront.net/usr/local/squid/var/run/squid.pid)
Set Current Directory to /usr/local/squid/var/cache/squid
Starting Squid Cache version 4.5 for x86_64-pc-linux-gnu...
Service Name: squid
Process ID 20605
Process Roles: worker
With 1024 file descriptors available
Initializing IP Cache...
DNS Socket created at [::], FD 5
DNS Socket created at 0.0.0.0, FD 9
Adding nameserver 127.0.0.53 from /etc/resolv.conf
Adding domain us-west-2.compute.internal from /etc/resolv.conf
helperOpenServers: Starting 5/32 'security_file_certgen' processes
Logfile: opening log daemon:/usr/local/squid/var/logs/access.log
Logfile Daemon: opening log /usr/local/squid/var/logs/access.log
Store logging disabled
Swap maxSize 0 + 262144 KB, estimated 20164 objects
Target number of buckets: 1008
Using 8192 Store buckets
Max Mem size: 262144 KB
Max Swap size: 0 KB
Using Least Load store dir selection
Set Current Directory to /usr/local/squid/var/cache/squid
Finished loading MIME types and icons.
HTCP Disabled.
Squid plugin modules loaded: 0
Adaptation support is off.
Accepting SSL bumped HTTP Socket connections at local=[::]:3128 remote=[::] FD 22 flags=9
2019/01/18 15:33:59 kid1| storeLateRelease: released 0 objects
Um die Installation zu testen, rufen Sie einen Computer in Ihrem internen Netzwerk auf und konfigurieren Sie den Browser so, dass die IP-Adresse des Squid-Servers und der TCP-Port 3128 als Proxy-Server verwendet werden.
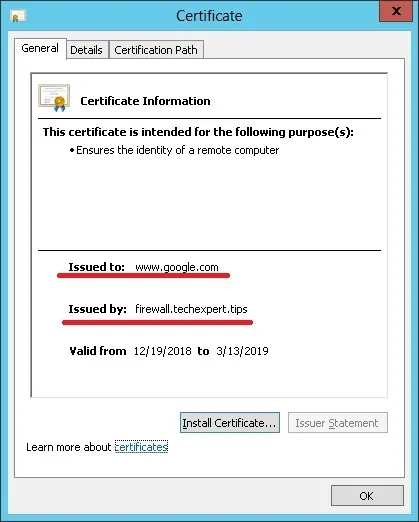
Versuchen Sie, auf eine HTTPS-Website zuzugreifen und Ihr Zertifikat zu überprüfen.
In unserem Beispiel greifen wir auf die Website von Google.com zu.
Der Squid-Proxy erstellt automatisch gefälschte HTTPS-Zertifikate für alle Clients.

Leave A Comment
You must be logged in to post a comment.