您想了解如何在Ubuntu Linux上使用HTTPS安装Squid吗? 在本教程中,我们将向您展示如何在Ubuntu Linux上安装和配置代理服务器Squid。
本教程在Ubuntu 18.04上进行了测试。
本教程在Squid 4.5上进行了测试。
硬件清单:
以下部分介绍了用于创建此Squid教程的设备列表。
上面列出的每一件硬件都可以在亚马逊网站上找到。
鱿鱼相关教程:
在此页面上,我们提供了与Squid相关的教程列表的快速访问。
在Ubuntu Linux上安装Squid
我们需要配置正确的日期和时间,因为我们将使用证书。
在Linux控制台上,使用以下命令设置正确的时区。
# dpkg-reconfigure tzdata
安装Ntpdate包并立即设置正确的日期和时间。
# apt-get install ntpdate
# ntpdate pool.ntp.br
在我们的示例中,Ntpdate命令用于使用巴西服务器pool.ntp.br设置正确的日期和时间
我们来安装NTP服务。
# timedatectl set-ntp 0
# apt-get install ntp
NTP是保持我们的服务器更新的服务。
使用命令日期检查Ubuntu Linux上配置的日期和时间。
# date
如果系统显示正确的日期和时间,则表示您已正确执行所有步骤。
使用以下命令安装所需的包。
# apt-get update
# apt-get install build-essential openssl libssl-dev pkg-config
下载,编译和安装Squid包。
# mkdir /downloads
# cd /downloads
# wget http://www.squid-cache.org/Versions/v4/squid-4.5.tar.gz
# tar -zxvf squid-4.5.tar.gz
# cd squid-4.5
# ./configure --with-default-user=proxy --with-openssl --enable-ssl-crtd
# make
# make install
配置Squid HTTPS / SSL环境
现在,您应该在系统上找到openssl.cnf文件的位置。
找到后,您需要编辑openssl.cnf文件。
# updatedb
# vi /etc/ssl/openssl.cnf
这是原始文件,在配置之前没有注释。
HOME = .
RANDFILE = $ENV::HOME/.rnd
oid_section = new_oids[ new_oids ]
tsa_policy1 = 1.2.3.4.1
tsa_policy2 = 1.2.3.4.5.6
tsa_policy3 = 1.2.3.4.5.7
[ ca ]
default_ca = CA_default # The default ca section
[ CA_default ]
dir = ./demoCA # Where everything is kept
certs = $dir/certs # Where the issued certs are kept
crl_dir = $dir/crl # Where the issued crl are kept
database = $dir/index.txt # database index file.
# several certs with same subject.
new_certs_dir = $dir/newcerts # default place for new certs.
certificate = $dir/cacert.pem # The CA certificate
serial = $dir/serial # The current serial number
crlnumber = $dir/crlnumber # the current crl number
# must be commented out to leave a V1 CRL
crl = $dir/crl.pem # The current CRL
private_key = $dir/private/cakey.pem# The private key
RANDFILE = $dir/private/.rand # private random number file
x509_extensions = usr_cert # The extensions to add to the cert
name_opt = ca_default # Subject Name options
cert_opt = ca_default # Certificate field options
default_days = 365 # how long to certify for
default_crl_days= 30 # how long before next CRL
default_md = default # use public key default MD
preserve = no # keep passed DN ordering
policy = policy_match
[ policy_match ]
countryName = match
stateOrProvinceName = match
organizationName = match
organizationalUnitName = optional
commonName = supplied
emailAddress = optional[ policy_anything ]
countryName = optional
stateOrProvinceName = optional
localityName = optional
organizationName = optional
organizationalUnitName = optional
commonName = supplied
emailAddress = optional
[ req ]
default_bits = 2048
default_keyfile = privkey.pem
distinguished_name = req_distinguished_name
attributes = req_attributes
x509_extensions = v3_ca # The extensions to add to the self signed cert
string_mask = utf8only
[ req_distinguished_name ]
countryName = Country Name (2 letter code)
countryName_default = AU
countryName_min = 2
countryName_max = 2
stateOrProvinceName = State or Province Name (full name)
stateOrProvinceName_default = Some-State
localityName = Locality Name (eg, city)
0.organizationName = Organization Name (eg, company)
0.organizationName_default = Internet Widgits Pty Ltd
organizationalUnitName = Organizational Unit Name (eg, section)
commonName = Common Name (e.g. server FQDN or YOUR name)
commonName_max = 64
emailAddress = Email Address
emailAddress_max = 64
[ req_attributes ]
challengePassword = A challenge password
challengePassword_min = 4
challengePassword_max = 20
unstructuredName = An optional company name[ usr_cert ]
basicConstraints=CA:FALSE
nsComment = "OpenSSL Generated Certificate"
subjectKeyIdentifier=hash
authorityKeyIdentifier=keyid,issuer
[ v3_req ]
basicConstraints = CA:FALSE
keyUsage = nonRepudiation, digitalSignature, keyEncipherment
[ v3_ca ]
subjectKeyIdentifier=hash
authorityKeyIdentifier=keyid:always,issuer
basicConstraints = critical,CA:true
[ crl_ext ]
authorityKeyIdentifier=keyid:always
[ proxy_cert_ext ]
basicConstraints=CA:FALSE
nsComment = "OpenSSL Generated Certificate"
subjectKeyIdentifier=hash
authorityKeyIdentifier=keyid,issuer
proxyCertInfo=critical,language:id-ppl-anyLanguage,pathlen:3,policy:foo
[ tsa ]
default_tsa = tsa_config1 # the default TSA section
[ tsa_config1 ]
dir = ./demoCA # TSA root directory
serial = $dir/tsaserial # The current serial number (mandatory)
crypto_device = builtin # OpenSSL engine to use for signing
signer_cert = $dir/tsacert.pem # The TSA signing certificate
# (optional)
certs = $dir/cacert.pem # Certificate chain to include in reply
# (optional)
signer_key = $dir/private/tsakey.pem # The TSA private key (optional)
signer_digest = sha256 # Signing digest to use. (Optional)
default_policy = tsa_policy1 # Policy if request did not specify it
# (optional)
other_policies = tsa_policy2, tsa_policy3 # acceptable policies (optional)
digests = sha1, sha256, sha384, sha512 # Acceptable message digests (mandatory)
accuracy = secs:1, millisecs:500, microsecs:100 # (optional)
clock_precision_digits = 0 # number of digits after dot. (optional)
ordering = yes # Is ordering defined for timestamps?
# (optional, default: no)
tsa_name = yes # Must the TSA name be included in the reply?
# (optional, default: no)
ess_cert_id_chain = no # Must the ESS cert id chain be included?
# (optional, default: no)
将KeyUsage配置添加到V3_CA区域。
[ v3_ca ]
keyUsage = cRLSign, keyCertSign
创建所需的SSL文件夹基础结构。
# mkdir /usr/local/squid/etc/ssl_cert -p
# chown proxy:proxy /usr/local/squid/etc/ssl_cert -R
# chmod 700 /usr/local/squid/etc/ssl_cert -R
# cd /usr/local/squid/etc/ssl_cert
创建自签名证书颁发机构。
# openssl req -new -newkey rsa:2048 -sha256 -days 365 -nodes -x509 -extensions v3_ca -keyout myCA.pem -out myCA.pem
......................................................................+++
......................................+++
writing new private key to 'myCA.pem'
-----
You are about to be asked to enter information that will be incorporated
into your certificate request.
What you are about to enter is what is called a Distinguished Name or a DN.
There are quite a few fields but you can leave some blank
For some fields there will be a default value,
If you enter '.', the field will be left blank.
-----
Country Name (2 letter code) [AU]:BR
State or Province Name (full name) [Some-State]:Rio de Janeiro
Locality Name (eg, city) []:
Organization Name (eg, company) [Internet Widgits Pty Ltd]:TECHEXPERT
Organizational Unit Name (eg, section) []:
Common Name (e.g. server FQDN or YOUR name) []: firewall.techexpert.tips
Email Address []:
使用DER格式导出自签名证书颁发机构证书。
# openssl x509 -in myCA.pem -outform DER -out myCA.der
重要! 您需要将MyCA.DER导入客户端计算机。
创建初始SSL数据库。
# /usr/local/squid/libexec/security_file_certgen -c -s /usr/local/squid/var/logs/ssl_db -M 4MB
# chown proxy:proxy /usr/local/squid/var/logs/ssl_db -R
导入证书颁发机构证书
您需要将MyCA.DER文件复制到运行Windows的计算机上。
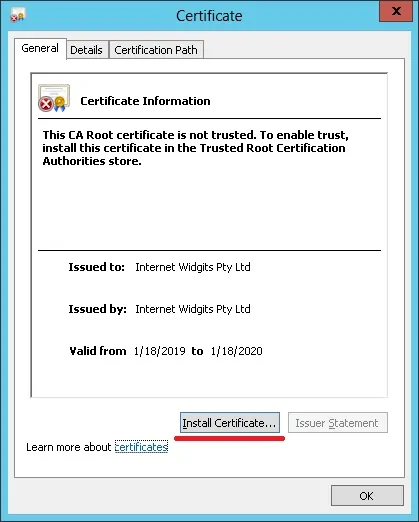
在运行Windows的客户端计算机上,双击MyCA.DER文件。
单击Install Certificat按钮。

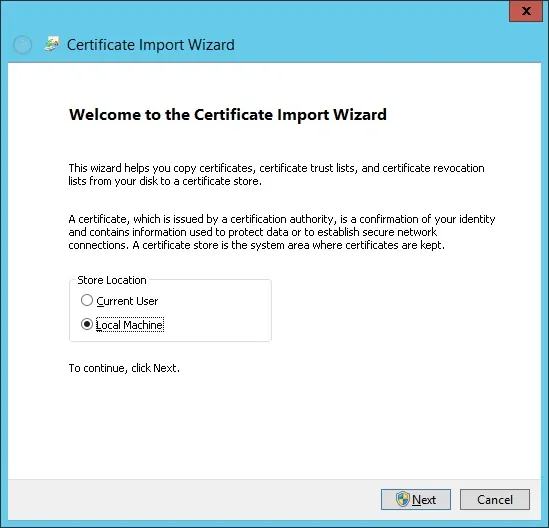
选择选项:本地计算机。

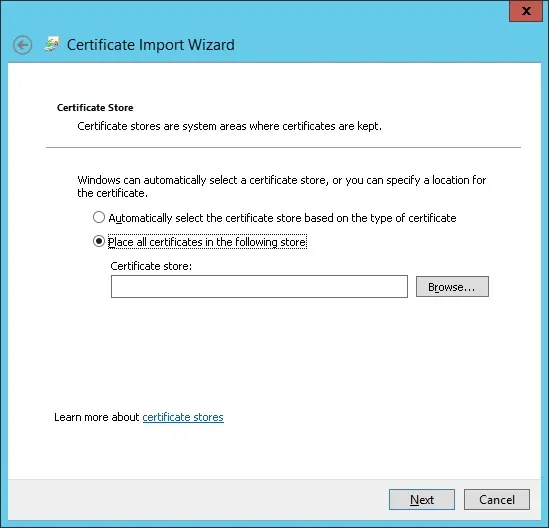
选择选项:将所有证书放在以下存储中。

选择名为“受信任的根证书颁发机构”的文件夹。

您已完成证书安装。
为HTTPS配置Squid
这是Squid Package安装的原始squid配置文件。
# vi /usr/local/squid/etc/squid.conf
acl localnet src 0.0.0.1-0.255.255.255
acl localnet src 10.0.0.0/8
acl localnet src 100.64.0.0/10
acl localnet src 169.254.0.0/16
acl localnet src 172.16.0.0/12
acl localnet src 192.168.0.0/16
acl localnet src fc00::/7
acl localnet src fe80::/10
acl SSL_ports port 443
acl Safe_ports port 80
acl Safe_ports port 21
acl Safe_ports port 443
acl Safe_ports port 70
acl Safe_ports port 210
acl Safe_ports port 1025-65535
acl Safe_ports port 280
acl Safe_ports port 488
acl Safe_ports port 591
acl Safe_ports port 777
acl CONNECT method CONNECT
http_access deny !Safe_ports
http_access deny CONNECT !SSL_ports
http_access allow localhost manager
http_access deny manager
http_access allow localnet
http_access allow localhost
http_access deny all
http_port 3128
coredump_dir /usr/local/squid/var/cache/squid
refresh_pattern ^ftp: 1440 20% 10080
refresh_pattern ^gopher: 1440 0% 1440
refresh_pattern -i (/cgi-bin/|\?) 0 0% 0
refresh_pattern . 0 20% 4320
这是我们配置的新文件。
# vi /usr/local/squid/etc/squid.conf
acl localnet src 192.168.0.0/24
acl step1 at_step SslBump1
ssl_bump peek step1
ssl_bump bump all
acl SSL_ports port 443
acl Safe_ports port 80 # http
acl Safe_ports port 21 # ftp
acl Safe_ports port 443 # https
acl Safe_ports port 70 # gopher
acl Safe_ports port 210 # wais
acl Safe_ports port 1025-65535 # unregistered ports
acl Safe_ports port 280 # http-mgmt
acl Safe_ports port 488 # gss-http
acl Safe_ports port 591 # filemaker
acl Safe_ports port 777 # multiling http
acl CONNECT method CONNECT
http_access deny !Safe_ports
http_access deny CONNECT !SSL_ports
http_access allow localhost manager
http_access deny manager
http_access allow localnet
http_access allow localhost
http_access deny all
http_port 3128 ssl-bump cert=/usr/local/squid/etc/ssl_cert/myCA.pem generate-host-certificates=on dynamic_cert_mem_cache_size=4MB
sslcrtd_program /usr/local/squid/libexec/security_file_certgen -s /usr/local/squid/var/logs/ssl_db -M 4MB
coredump_dir /usr/local/squid/var/cache/squid
cache_dir ufs /usr/local/squid/var/cache/squid 1000 16 256 # 1GB as Cache
refresh_pattern ^ftp: 1440 20% 10080
refresh_pattern ^gopher: 1440 0% 1440
refresh_pattern -i (/cgi-bin/|\?) 0 0% 0
refresh_pattern . 0 20% 4320
我的配置很基本。
强烈建议您研究此配置文件以改进配置。
使用以下命令创建必要的缓存文件夹。
# chown -R proxy:proxy /usr/local/squid -R
# /usr/local/squid/sbin/squid -z
使用以下命令启动Squid服务。
# /usr/local/squid/sbin/squid -d 10
如果一切正常,您应该在屏幕上看到以下消息:
Created PID file (https://d1ny9casiyy5u5.cloudfront.net/usr/local/squid/var/run/squid.pid)
Set Current Directory to /usr/local/squid/var/cache/squid
Starting Squid Cache version 4.5 for x86_64-pc-linux-gnu...
Service Name: squid
Process ID 20605
Process Roles: worker
With 1024 file descriptors available
Initializing IP Cache...
DNS Socket created at [::], FD 5
DNS Socket created at 0.0.0.0, FD 9
Adding nameserver 127.0.0.53 from /etc/resolv.conf
Adding domain us-west-2.compute.internal from /etc/resolv.conf
helperOpenServers: Starting 5/32 'security_file_certgen' processes
Logfile: opening log daemon:/usr/local/squid/var/logs/access.log
Logfile Daemon: opening log /usr/local/squid/var/logs/access.log
Store logging disabled
Swap maxSize 0 + 262144 KB, estimated 20164 objects
Target number of buckets: 1008
Using 8192 Store buckets
Max Mem size: 262144 KB
Max Swap size: 0 KB
Using Least Load store dir selection
Set Current Directory to /usr/local/squid/var/cache/squid
Finished loading MIME types and icons.
HTCP Disabled.
Squid plugin modules loaded: 0
Adaptation support is off.
Accepting SSL bumped HTTP Socket connections at local=[::]:3128 remote=[::] FD 22 flags=9
2019/01/18 15:33:59 kid1| storeLateRelease: released 0 objects
要测试安装,请转到位于内部网络上的计算机,并将其浏览器配置为使用Squid服务器的IP地址和TCP端口3128作为代理服务器。
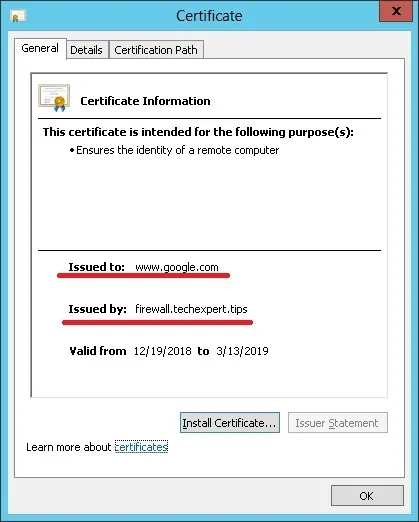
尝试访问HTTPS网站并验证您的证书。
在我们的示例中,我们正在访问Google.com网站。
Squid代理将自动为所有客户端创建虚假的HTTPS证书。


Leave A Comment
You must be logged in to post a comment.