Would you like to learn how to do the Antminer initial configuration? In this tutorial, we are going to show you how to do the initial IP address configuration of an Antminer from Bitmain.
This tutorial was tested on Antminer S7.
This tutorial was tested on Antminer S9.
This tutorial was tested on Antminer L3.
This tutorial was tested on Antminer D3.
Hardware List:
The following section presents the list of equipment used to create this Ubuntu Linux tutorial.
Every piece of hardware listed above can be found at Amazon website.
Antminer Playlist:
On this page, we offer quick access to a list of videos related to Bitmain Antminer.
Don't forget to subscribe to our youtube channel named FKIT.
Antminer Related Tutorial:
On this page, we offer quick access to a list of tutorials related to Antminer and Bitcoin.
Tutorial - Antpool Account
First, you need to create an account on the ANTPOOL Website.
On the Antpool dashboard, you need to access the Worker tab and create a worker account.
WORKER is the name used to identify your Antminer device.
You may have 1 account on the Antpool website with multiple workers.

Now, you need to access the Settings tab.
Set the wallet address where the daily payment should be sent.
Select the PPLNS payment type.

Congratulations! You have created the required account on Antpool.
Tutorial - Antminer Initial Configuration
First, you need to connect your Antminer device to a DHCP network and turn it on.
The Antminer device should get an IP address automatically from the DHCP server.
Now, you need to discover the IP address that your Antminer device got.
The easiest way to do it is to access the DHCP server and verify the IP address a device named Antminer.
In our example, the Antminer device got the IP address 10.21.222.24.
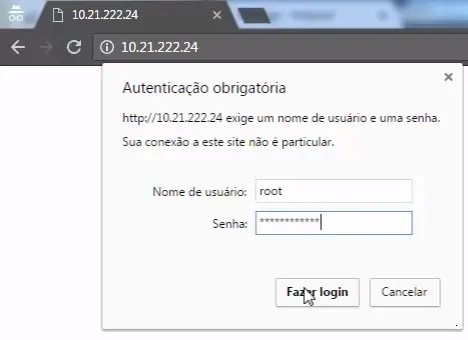
Open your browser and enter the IP address of the Antminer device to access the Web interface.
When presented with the login prompt enter the following information:
• Username: root
• Password: root

After a successful login, you will be sent to the Antminer Dashboard.
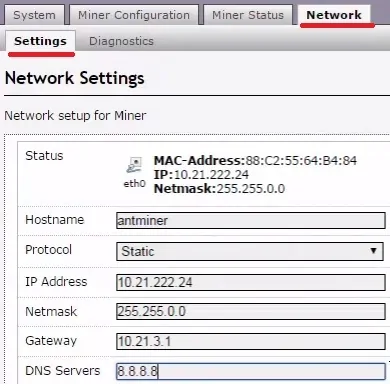
On the Web interface, access the Configuration menu and select the following option:
• Network > Settings
Change the IP address configuration to static.
Enter the desired IP address configuration.

Now, you need to configure the Antminer device to connect to the Antpool website.
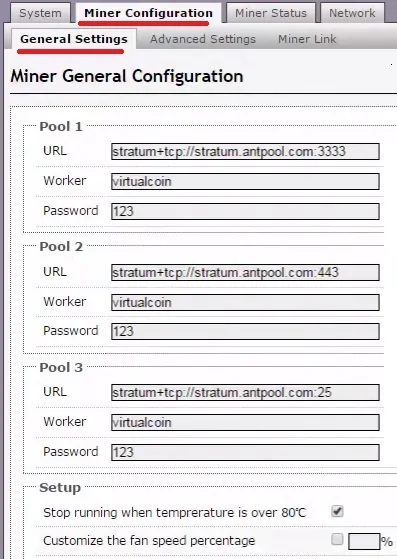
On the Web interface, access the Configuration menu and select the following option:
• Miner Configuration > General Settings
• Enter the pool address.
• Enter the worker username.
• Enter the worker password 123

The worker password can be anything: 123, abc or xyz.
The worker password does not matter.
After finishing the configuration, access the Miner Status tab to verify the status of your Antminer.
Access the following menu option to verify the status of your Antminer:
• Miner Status.

You can take a look on the temperature of your Antminer device.

Here you can also verify if your Antminer is in good conditions.
- O = OK
- X = Physical Problem

Congratulations, you have installed your Antminer device.

