Would you like to learn how to install the Windows SNMP Service? In this tutorial, we are going to show you how to install and configure an SNMP server on Windows server.
• Windows 2012 R2
• Windows 2008 R2
Hardware List:
The following section presents the list of equipment used to create this Windows tutorial.
Every piece of hardware listed above can be found at Amazon website.
Windows Playlist:
On this page, we offer quick access to a list of videos related to Windows installation.
Don't forget to subscribe to our youtube channel named FKIT.
Windows Related Tutorial:
On this page, we offer quick access to a list of tutorials related to Windows installation.
Tutorial - SNMP Installation on Windows
Open the Server Manager application.
Access the Manage menu and click on Add roles and features.

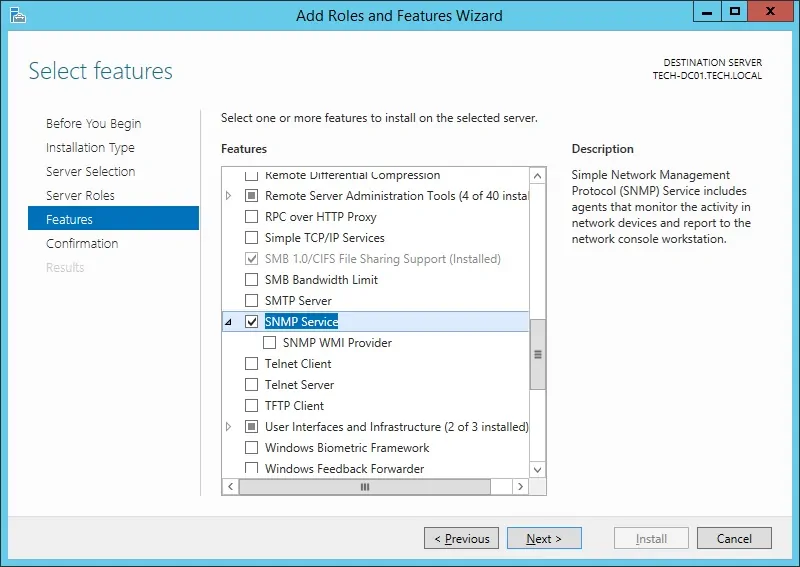
Access the features screen, select the SNMP service option and finish the installation.
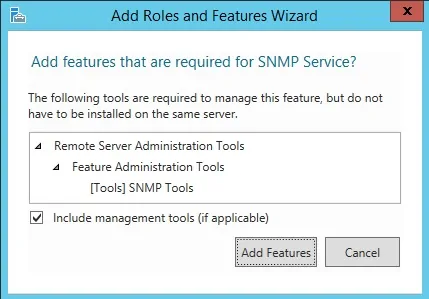
On the following screen, click on the Add features button.
The SNMP feature was installed on your computer but we still need to configure the SNMP service.
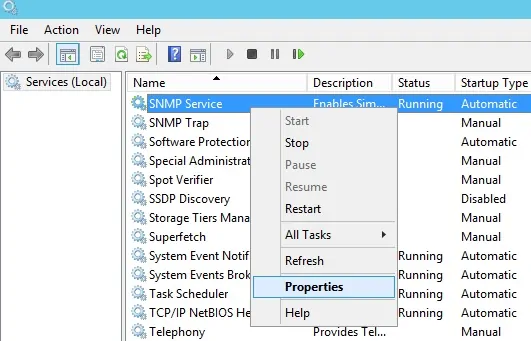
Open the Windows service management screen and access the SNMP service properties.
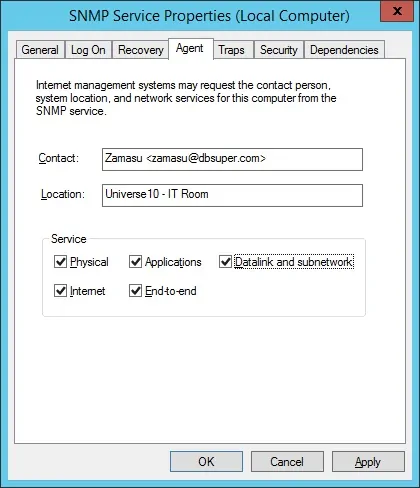
Access the Agent tab, select all the options and enter the device contact information.
Access the Security tab and select the Accept SNMP packets from any host option.
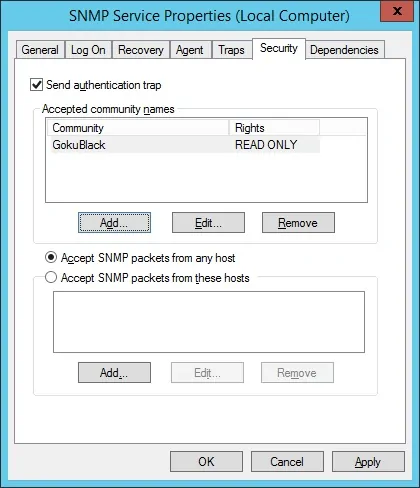
You need to create a Read-only SNMP community.
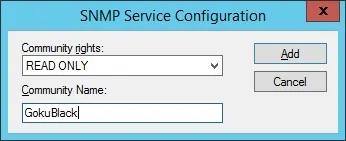
Here is a summary of our configuration example:
The GokuBlack Community has read-only permission on the Windows server.
The contact person responsible for this Windows computer was configured as Zamasu.
The location of the equipment was configured as the IT Room of Universe 10.
You have successfully installed the Windows SNMP service.
You have successfully configured the Windows SNMP service.
To test your SNMP configuration, use the following commands on a computer running Ubuntu Linux.
# apt-get install snmp
# snmpwalk -v2c -c GokuBlack 192.168.0.50
Here is a small sample of the SNMPWALK output.
iso.3.6.1.2.1.1.1.0 = STRING: "Hardware: Intel64 - Software: Windows Version 6.3
iso.3.6.1.2.1.1.2.0 = OID: iso.3.6.1.4.1.311.1.1.3.1.3
iso.3.6.1.2.1.1.3.0 = Timeticks: (614928) 1:42:29.28
iso.3.6.1.2.1.1.4.0 = STRING: "Zamasu <zamasu@dbsuper.com>"
iso.3.6.1.2.1.1.5.0 = STRING: "TECH-DC01.TECH.LOCAL"
iso.3.6.1.2.1.1.6.0 = STRING: "Universe10 - IT Room"
Congratulations! you have installed the SNMP service on a computer running Windows.
The Windows firewall should accept network packets on UDP port: 161
