您想学习如何在Ubuntu Linux上安装Magento吗?在本教程中,我们将向您展示如何在运行Ubuntu Linux的计算机上安装,配置和访问Magento CMS。
•Ubuntu Linux版本18.04
•Magento版本2.3.0
硬件清单:
以下部分介绍了用于创建此Magento教程的设备列表。
上面列出的每一件硬件都可以在亚马逊网站上找到。
Magento相关教程:
在此页面上,我们提供了与Magento相关的教程列表的快速访问。
教程 - Ubuntu Linux上的NTP
首先,我们将使用NTP配置系统以使用正确的日期和时间。
在Linux控制台上,使用以下命令设置正确的时区。
# dpkg-reconfigure tzdata
安装Ntpdate包并立即设置正确的日期和时间。
# apt-get update
# apt-get install ntpdate
# ntpdate pool.ntp.br
Ntpdate命令用于使用server:pool.ntp.br设置正确的日期和时间
我们来安装NTP服务。
# apt-get install ntp
NTP是保持我们的服务器更新的服务。
使用命令日期检查Ubuntu Linux上配置的日期和时间
.
# date
如果系统显示正确的日期和时间,则表示您已正确执行所有步骤。
教程 - 在Ubuntu Linux上安装MySQL
现在,我们可以继续安装数据库服务。
在Linux控制台上,使用以下命令安装所需的软件包。
# apt-get update
# apt-get install mysql-server mysql-client
完成安装后,使用以下命令访问MySQL数据库服务器。
# mysql -u root -p
使用以下SQL命令创建名为Magento的数据库。
CREATE DATABASE magento CHARACTER SET UTF8 COLLATE UTF8_BIN;
使用以下SQL命令创建名为magento的数据库用户。
CREATE USER 'magento'@'%' IDENTIFIED BY 'kamisama123';
为名为magento的数据库提供名为magento的sql用户权限。
GRANT ALL PRIVILEGES ON magento.* TO 'magento'@'%';
quit;
教程 - 在Linux上安装Apache
现在,我们需要安装Apache Web服务器和所有必需的软件。
在Linux控制台上,使用以下命令安装所需的软件包。
# apt-get install apache2 php7.2 php7.2-mysql libapache2-mod-php7.2 php7.2-cli
# apt-get install php7.2-mbstring php7.2-xml php7.2-zip php7.2-gd php7.2-xml
# apt-get install php7.2-bcmath php7.2-curl php7.2-intl php7.2-soap
启用Apache mod_rewrite并编辑apache2.conf文件。
# a2enmod rewrite
# vi /etc/apache2/apache2.conf
在配置之前,这是原始文件。
DefaultRuntimeDir $
PidFile $
Timeout 300
KeepAlive On
MaxKeepAliveRequests 100
KeepAliveTimeout 5
User $
Group $
HostnameLookups Off
ErrorLog $/error.log
LogLevel warn
IncludeOptional mods-enabled/*.load
IncludeOptional mods-enabled/*.conf
Include ports.conf
Options FollowSymLinks
AllowOverride None
Require all denied
AllowOverride None
Require all granted
Options Indexes FollowSymLinks
AllowOverride None
Require all granted
AccessFileName .htaccess
Require all denied
LogFormat "%v:%p %h %l %u %t "%r" %>s %O "%i" "%i"" vhost_combined
LogFormat "%h %l %u %t "%r" %>s %O "%i" "%i"" combined
LogFormat "%h %l %u %t "%r" %>s %O" common
LogFormat "%i -> %U" referer
LogFormat "%i" agent
IncludeOptional conf-enabled/*.conf
IncludeOptional sites-enabled/*.conf
在文件末尾添加以下行。
<Directory /var/www/html>
AllowOverride All
</Directory>
这是我们配置的新文件。
DefaultRuntimeDir $
PidFile $
Timeout 300
KeepAlive On
MaxKeepAliveRequests 100
KeepAliveTimeout 5
User $
Group $
HostnameLookups Off
ErrorLog $/error.log
LogLevel warn
IncludeOptional mods-enabled/*.load
IncludeOptional mods-enabled/*.conf
Include ports.conf
Options FollowSymLinks
AllowOverride None
Require all denied
AllowOverride None
Require all granted
Options Indexes FollowSymLinks
AllowOverride None
Require all granted
AccessFileName .htaccess
Require all denied
LogFormat "%v:%p %h %l %u %t "%r" %>s %O "%i" "%i"" vhost_combined
LogFormat "%h %l %u %t "%r" %>s %O "%i" "%i"" combined
LogFormat "%h %l %u %t "%r" %>s %O" common
LogFormat "%i -> %U" referer
LogFormat "%i" agent
IncludeOptional conf-enabled/*.conf
IncludeOptional sites-enabled/*.conf
AllowOverride All
现在,您应该在系统上找到php.ini文件的位置。
找到后,您需要编辑php.ini文件。
# updatedb
# locate php.ini
# vi /etc/php/7.2/apache2/php.ini
请记住,您的PHP版本和文件的位置可能与我的不同。
在配置之前,这是原始文件。
file_uploads = On
max_execution_time = 30
memory_limit = 128M
post_max_size = 8M
max_input_time = 60
; max_input_vars = 1000
output_buffering = 4096
这是我们配置的新文件。
file_uploads = On
max_execution_time = 300
memory_limit = 256M
post_max_size = 32M
max_input_time = 60
max_input_vars = 4440
output_buffering = off
您还应该手动重启apache并验证服务状态。
# service apache2 stop
# service apache2 start
# service apache2 status
以下是APache服务状态输出的示例。
● apache2.service - LSB: Apache2 web server
Loaded: loaded (/etc/init.d/apache2; bad; vendor preset: enabled)
Drop-In: /lib/systemd/system/apache2.service.d
└─apache2-systemd.conf
Active: active (running) since Mon 2018-04-23 00:02:09 -03; 1min 4s ago
教程 - 在Ubuntu上安装Magento
首先,让我们安装Composer软件。
使用以下命令下载并安装composer软件。
# mkdir /downloads/composer -p
# cd /downloads/composer
# php -r "copy('https://getcomposer.org/installer', 'composer-setup.php');"
# php composer-setup.php --install-dir=/usr/local/bin --filename=composer
创建一个名为Magento的系统用户,并使该用户成为Apache www-data组的成员。
# useradd magento
# usermod -g www-data magento
现在,我们需要在Ubuntu Linux上安装Magento CMS。
在Linux控制台上,使用以下命令下载Magento软件包。
# cd /downloads
# wget -O magento2-2.3.0.tar.gz https://codeload.github.com/magento/magento2/tar.gz/2.3.0
# tar -zxvf magento2-2.3.0.tar.gz
将所有Magento文件移动到Apache安装的根目录。
为所有移动的文件设置正确的文件权限。
# mv /downloads/magento2-2.3.0 /var/www/html/magento
# cd /var/www/html/magento
# composer install
# find var vendor pub/static pub/media app/etc -type f -exec chmod g+w \;
# find var vendor pub/static pub/media app/etc -type d -exec chmod g+ws \;
# chown magento.www-data /var/www/html/magento -R
# chmod u+x /var/www/html/magento/bin/magento
打开浏览器并输入您的Web服务器加/ magento的IP地址。
在我们的示例中,在浏览器中输入了以下URL:
•http://35.162.85.57/magento
应显示Magento Web安装界面。

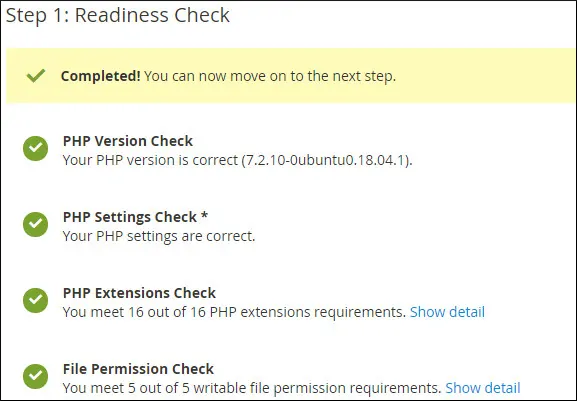
单击Start Readiness Check按钮并验证是否满足所有要求。

在我们的示例中,成功满足了所有要求。
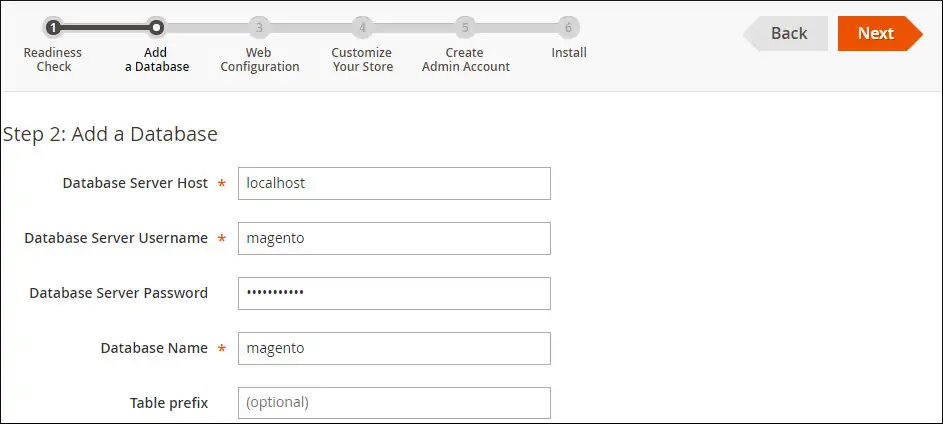
输入Magento数据库的MySQL连接信息。
输入您的网站网址,并记下您的管理网址。

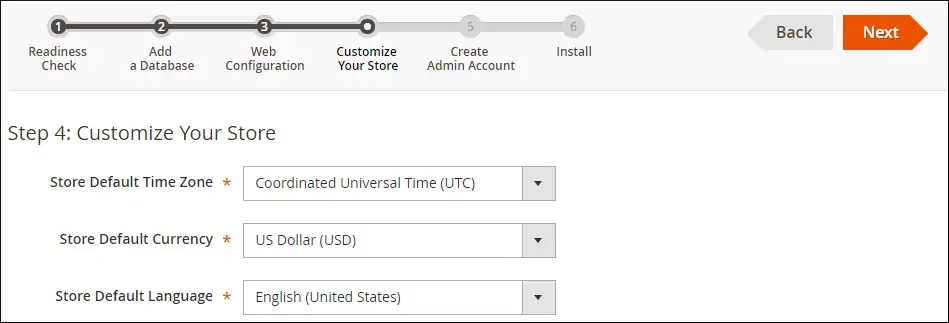
选择所需的语言,货币和时区。
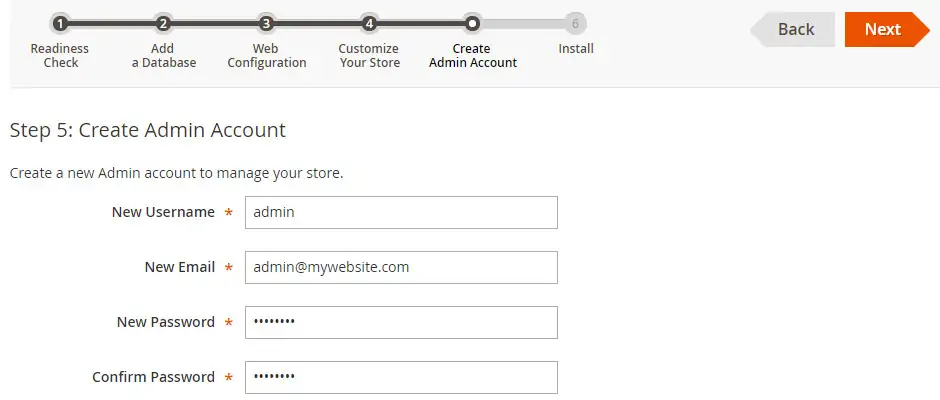
获得以下管理帐户信息。
•您的管理员用户名。
•您的管理员电子邮件帐户。
•您的管理员密码。
等待Magento安装完成。

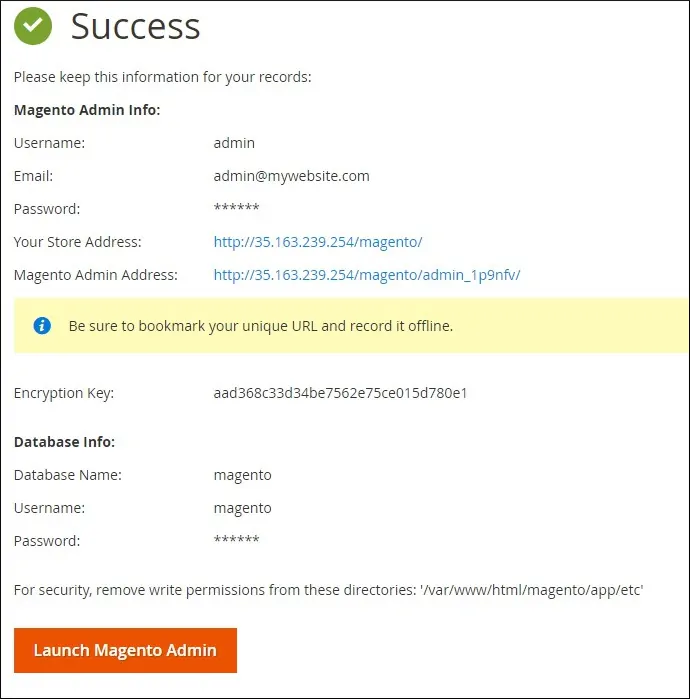
看看你的Magento安装摘要。
单击Launch Magento Admin按钮。
单击按钮后,您将被发送到Magento登录屏幕。

在Magento登录屏幕上,输入管理员用户名和密码。
成功登录后,您将被发送到Magento仪表板。

恭喜,您已成功在Ubuntu Linux上安装Magento。
完成安装后,您需要在Linux服务器上创建计划任务。
在Linux控制台上,使用以下命令创建所需的计划任务。
# cd /var/www/html/magento/bin/
# ./magento cron:install
Crontab has been generated and saved
