Would you like to learn how to do a Litecoin mining pool installation? In this tutorial, we are going to show you how to install a Litecoin mining pool using a computer running Ubuntu Linux and the Unified Node Open Mining Portal also know as UNOMP.
Hardware List:
The following section presents the list of equipment used to create this Litecoin tutorial.
Every piece of hardware listed above can be found at Amazon website.
Software List:
Here is a list of software that we used to create this Litecoin node installation tutorial.
We offer two ways to download this software.
Litecoin Playlist:
On this page, we offer quick access to a list of videos related to Litecoin.
Don't forget to subscribe to our youtube channel named VirtualCoin.
Litecoin Related Tutorial:
On this page, we offer quick access to a list of tutorials related to Litecoin.
Tutorial - Litecoin Node Installation
First, you need to have a fully functional Litecoin node installation.
On the Ubuntu Linux console, use the following commands to install the BerkleyDB package:
# add-apt-repository ppa:bitcoin/bitcoin
# apt-get update
# apt-get install libdb4.8-dev libdb4.8++-dev
You must use BerkleyDB version 4.8 for everything to work.
Use the following commands to install the required libraries and the required packages:
# apt-get install libboost-all-dev libzmq3-dev libminiupnpc-dev
# apt-get install curl git build-essential libtool autotools-dev
# apt-get install automake pkg-config bsdmainutils python3
# apt-get install software-properties-common libssl-dev libevent-dev
Create a directory to the node software and download the Litecoin package.
# mkdir /downloads
# cd /downloads
# git clone https://github.com/litecoin-project/litecoin.git
Compile and install the Litecoin node software.
# cd litecoin
# ./autogen.sh
# ./configure
# make
# cd src
# install -sv litecoind litecoin-cli /usr/local/bin/
Create a Litecoin configuration file and choose a username and a password.
# mkdir ~/.litecoin
# vi $HOME/.litecoin/litecoin.conf
rpcuser=virtualcoin2018
rpcpassword=kamisama123
In our example, we choose the username virtualcoin2018 and the password kamisama123.
Start the Litecoin node daemon using the following command:
# litecoind -daemon
Wait for the synchronization of the blockchain to end.
The blockchain synchronization might take days or weeks.
Use the following command to verify the status of the blockchain synchronization:
# tail -f ~/.litecoin/debug.log
Here is a list of useful commands to manage your Litecoin node.
# litecoin-cli getinfo
# litecoin-cli getblockchaininfo
# litecoin-cli getnetworkinfo
# litecoin-cli getwalletinfo
# litecoin-cli getpeerinfo
Tutorial - Litecoin Mining Pool
After finishing the Litecoin node installation, we can start the Litecoin mining pool installation.
Use the following command to get you Litecoind wallet address.
Take note of your Litecoin address.
# litecoin-cli getnewaddress
LbGyPoBVopHyVb621Au1i85F96iPbRQTca
Use the following command to install the required software:
# apt-get install npm nodejs nodejs-legacy redis-server
# curl https://raw.githubusercontent.com/creationix/nvm/v0.16.1/install.sh | sh
# source ~/.profile
Reboot the computer and restart the Litecoin node.
# reboot
# litecoind -daemon
After rebooting the computer, you need to finish the software installation.
# cd /downloads
# nvm install 0.10.25
# nvm use 0.10.25
# git clone https://github.com/UNOMP/unified-node-open-mining-portal.git unomp
# cd unomp
# npm update
Now, let's create the basic configuration files.
# cp config.json.example config.json
# cd pool_configs
# cp litecoin.json.example litecoin.json
# vi litecoin.json
Here is the original file, before our configuration:
Here is the new file with our configuration.
The changed directives were highlighted in bold.
My configuration is just basic.
It is highly recommended that you study this configuration file to improve your configuration.
Use the following command to start the Litecoin mining pool.
# cd /downloads/unomp/
# nvm use 0.10.25
# node init.js
Keep in mind that the pool service will work only if the Litecoin node service is running and the blockchain is synchronized.
If everything worked correctly, you should see the following messages on the screen:
New Relic
NewRelic Monitor New Relic initiated
POSIX Not Installed
POSIX Connection Limit (Safe to ignore) POSIX module not installed and resource (connection) limit was not raised
Run Workers
New Relic
POSIX Not Installed
Run Workers
Switching Setup Thread 1 Loading last proxy state from redis
Pool litecoin Thread 1 Share processing setup with redis (127.0.0.1:6379)
Pool litecoin Thread 1 started for litecoin [LTC]
The system should now open TCP ports 3008, 3032 and 3256 to Litecoin miners.
Use the following command to check if the TCP ports are open.
# netstat -nl | grep ":3"
tcp 0 0 0.0.0.0:3256 0.0.0.0:* LISTEN
tcp 0 0 0.0.0.0:3032 0.0.0.0:* LISTEN
tcp 0 0 0.0.0.0:3008 0.0.0.0:* LISTEN
The system will also start a web server on TCP port 80.
Use the following command to check if the TCP port 80 is open.
# netstat -nl | grep 80
tcp 0 0 0.0.0.0:80 0.0.0.0:* LISTEN
Time to test our mining pool.
Go to another Ubuntu Linux and install the CPUMiner software.
If you don't know how to install the Litecoin CPU miner, follow this link.
Use the following command to start mining Litecoin on the miner computer.
# minerd -o stratum+tcp://34.210.39.145:3008 -u Ldgz57AmvyDd12F1J1Fx6sAzsY2SL5cAwm -p x
If everything worked correctly, you should see confirmation messages on the screen.
Starting Stratum on stratum+tcp://34.210.39.145:3008
2 miner threads started, using 'scrypt' algorithm.
Binding thread 0 to cpu 0
Binding thread 1 to cpu 1
thread 0: 4104 hashes, 14.98 khash/s
thread 1: 4104 hashes, 14.83 khash/s
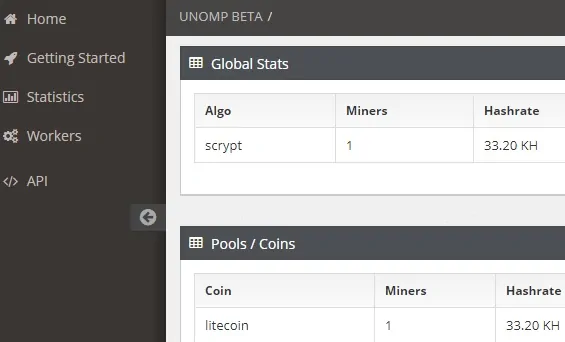
Open a browser application and enter the IP address of you Litecoin mining pool to access the web interface.
In our example, we did access the http://34.210.39.145/ website.

You are now the proud owner of a Litecoin mining pool.
FAQ - Litecoin Node Installation
If you are having problems to install a Litecoin node, you should take a look at our frequently asked questions page.
To add a question to the database, please post the question as a comment here, or as a comment on the youtube video listed on the top of this page.
