Would you like to learn how to install Nginx and deny access from a city? In this tutorial, we are going to configure the Nginx server to block the access from a city.
• Ubuntu 18
• Ubuntu 19
• Ubuntu 20
• Nginx 1.18.0
In our example, the Nginx server is hosting the website WWW.GAMEKING.TIPS.
Equipment list
The following section presents the list of equipment used to create this tutorial.
As an Amazon Associate, I earn from qualifying purchases.
Nginx - Related Tutorial:
On this page, we offer quick access to a list of tutorials related to Nginx.
Tutorial Nginx - GEOIP2 database installation
Access the MAXMIND website and create a new account.
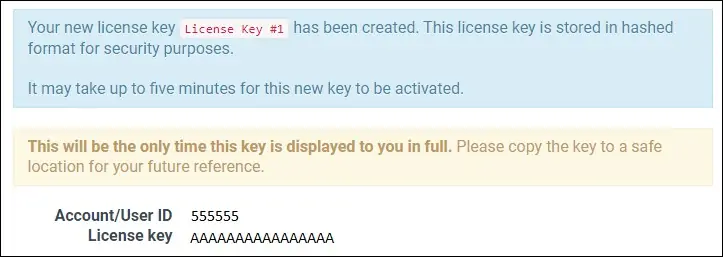
Access your account profile and create a new key.

Add the MAXMIND repository to your Ubuntu Linux.
Install the package named GEOIPUPDATE.
Edit the GEOIPUPDATE configuration file.
Insert your account ID and license key.
Here is the file, before our configuration.
Here is the file, after our configuration.
Update the database of GEOIP2.
Verify the GEOIP2 database installation.
Here is the command output.
You installed the GEOIP2 database for countries and cities.
Congratulations! You have finished the installation of GEOIPUPDATE.
Tutorial Nginx - Blocking access from a city
Install the Nginx server and the required module.
Edit the Nginx configuration file.
Add the following line to the configuration file.
In our example, we denied access from cities named BOARDMAN and NOVA IGUACU.
Here is the file, before our configuration.
Here is the file, after our configuration.
Edit the Nginx configuration file for the default website.
Add the following line to the configuration file.
Here is the file, before our configuration.
Here is the file, after our configuration.
Restart the Nginx service.
The Nginx server will deny access based on the city name of the source IP address.
Here is the command output.
Congratulations! You are able to configure Nginx to restrict access to your website based on the city name of the request.
Tutorial GEOIP2 - Database update
Create a scheduled task to update the GEOIP2 database.
Here is the file content.
Congratulations! You have configured the GEOIP2 database automatic update.
Tutorial Nginx - Include the city name in the log
Edit the Nginx configuration file.
Remove the following line from the configuration file.
Add the following lines to the configuration file.
As an example, here is our configuration file.
Restart the Nginx service.
The Nginx server will log the city name of the request in the log file.
Here is an example of the Nginx log.
Congratulations! You have configured the Nginx server to include the city name in the log files.
