Would you like to learn how to do a Zabbix TimescaleDB installation on Ubuntu Linux? In this tutorial, we are going to show you how to install, configure and access Zabbix 4.2 on a computer running Ubuntu Linux.
• Ubuntu version: 18.04
What is Timescaledb?
TimescaleDB is an open-source time-series database.
TimescaleDB databases are optimized for fast ingest and complex queries
Zabbix Playlist:
On this page, we offer quick access to a list of videos related to Zabbix installation.
Don't forget to subscribe to our youtube channel named FKIT.
Zabbix Related Tutorial:
On this page, we offer quick access to a list of tutorials related to Zabbix installation.
Tutorial - Zabbix TimeScaleDB Database Installation
Use the following commands to set the correct timezone.
# dpkg-reconfigure tzdata
Add the PostgreSQL APT repository to Ubuntu Linux.
# apt-get install software-properties-common
# apt-key adv --keyserver keyserver.ubuntu.com --recv-keys B97B0AFCAA1A47F044F244A07FCC7D46ACCC4CF8
# add-apt-repository "deb http://apt.postgresql.org/pub/repos/apt/ `lsb_release -c -s`-pgdg main"
Add the Timescaledb APT repository to Ubuntu Linux.
# add-apt-repository ppa:timescale/timescaledb-ppa
# apt-get update
Install PostgreSQL with TimescaleDB support.
# apt-get install timescaledb-postgresql-11
Use the following command to enable the TimescaleDB extension on PostgreSQL.
You should answer yes for all the questions.
# timescaledb-tune
Use the following command to restart the PostgreSQL service.
# service postgresql restart
You finished the TimescaleDB installation.
Tutorial - Zabbix TimescaleDB Configuration
Now, we can proceed to the Zabbix database configuration.
On the Linux console, use the following commands to create a Linux account to the Zabbix service.
# groupadd zabbix
# useradd -g zabbix -s /bin/bash zabbix
Use the following command to create a PostgreSQL user account named Zabbix.
# sudo -u postgres createuser --pwprompt zabbix
Create a PostgreSQL database named Zabbix and set the owner as the Zabbix user.
# cd /tmp
# sudo -u postgres createdb -O zabbix -E Unicode -T template0 zabbix
On the Linux console, use the following commands to download the Zabbix installation package.
# mkdir /downloads
# cd /downloads
# wget https://ufpr.dl.sourceforge.net/project/zabbix/ZABBIX%20Latest%20Stable/4.2.0/zabbix-4.2.0.tar.gz
Now, we need to import Zabbix database template inside PostgreSQL.
Extract the Zabbix installation package and import the database template inside PostgreSQL.
The system will request the password of the Zabbix PostgreSQL user every time you try to import a file.
# tar -zxvf zabbix-4.2.0.tar.gz
# cd zabbix-4.2.0/database/postgresql
# sudo -u zabbix psql zabbix < schema.sql
# sudo -u zabbix psql zabbix < images.sql
# sudo -u zabbix psql zabbix < data.sql
Use the following command to enable TimescaleDB on the Zabbix database.
# echo "CREATE EXTENSION IF NOT EXISTS timescaledb CASCADE;" | sudo -u postgres psql zabbix
Restart the PostgreSQL service.
# service postgresql restart
You have finished the Zabbix database installation.
You have imported the Zabbix database templates on the TimescaleDB Server.
Tutorial - Zabbix Apache Installation
Next, we need to install the Apache web server and all the required software.
On the Linux console, use the following commands to install the required packages.
# apt-get install apache2 php libapache2-mod-php php-cli
# apt-get install php-mysql php-mbstring php-gd php-xml
# apt-get install php-bcmath php-ldap php-pgsql
Now, you should find the location of the php.ini file on your system.
After finding, you need to edit the php.ini file.
# updatedb
# locate php.ini
# vi /etc/php/7.2/apache2/php.ini
Keep in mind that your PHP version and the location of the file may not be the same of mine.
Here is the original file, before our configuration.
max_execution_time = 30
memory_limit = 128M
post_max_size = 8M
max_input_time = 60
; date.timezone =
Here is the new file with our configuration.
max_execution_time = 300
memory_limit = 256M
post_max_size = 32M
max_input_time = 300
date.timezone = America/Sao_Paulo
Keep in mind that you have to set your PHP timezone.
In our example, we used the timezone America/Sao_Paulo
You should also restart apache manually and verify the service status.
# service apache2 restart
You have finished the Zabbix server installation.
Tutorial - Zabbix Installation on Ubuntu
Now, we need to install the Zabbix server on Ubuntu Linux.
On the Linux console, use the following commands to install the required packages.
# apt-get update
# apt-get install build-essential libmysqlclient-dev libssl-dev libsnmp-dev libevent-dev
# apt-get install libopenipmi-dev libcurl4-openssl-dev libxml2-dev libssh2-1-dev libpcre3-dev
# apt-get install libldap2-dev libiksemel-dev libcurl4-openssl-dev libgnutls28-dev
On the Linux console, use the following commands to access the Zabbix package folder.
# cd /downloads/zabbix-4.2.0
Compile and install the Zabbix server using the following commands:
# ./configure --enable-server --enable-agent --with-postgresql --with-openssl --with-net-snmp --with-openipmi --with-libcurl --with-libxml2 --with-ssh2 --with-ldap
# make
# make install
Now, you should find the location of the zabbix_server.conf file on your system.
After finding, you need to edit the zabbix_server.conf file.
# updatedb
# locate zabbix_server.conf
# vi /usr/local/etc/zabbix_server.conf
Here is the original file, before our configuration.
LogFile=/tmp/zabbix_server.log
DBName=zabbix
DBUser=zabbix
Timeout=4
LogSlowQueries=3000
Here is the new file with our configuration.
LogFile=/tmp/zabbix_server.log
DBHost=localhost
DBName=zabbix
DBUser=zabbix
DBPassword=kamisama123
Timeout=4
After finishing the configuration, use the following command to start the Zabbix server:
# /usr/local/sbin/zabbix_server
After finishing the configuration, use the following command to start the Zabbix Agent:
# /usr/local/sbin/zabbix_agentd
The Zabbix installation package comes with a service startup script.
If you want, copy the startup script using the commands below.
# cd /downloads/zabbix-4.2.0/
# cp misc/init.d/debian/* /etc/init.d/
You can now use the following commands to start the Zabbix server service.
# /etc/init.d/zabbix-server start
You can now use the following commands to start the Zabbix agent service.
# /etc/init.d/zabbix-agent start
Move all the Zabbix frontend files to the root directory of your Apache installation.
Set the correct file permission on all moved files.
# cd /downloads/zabbix-4.2.0/frontends
# mkdir /var/www/html/zabbix
# mv php/* /var/www/html/zabbix
# chown www-data.www-data /var/www/html/zabbix/* -R
Restart the Apache service.
# service apache2 restart
Open your browser and enter the IP address of your web server plus /zabbix.
In our example, the following URL was entered in the Browser:
• http://35.162.85.57/zabbix
The Zabbix web installation interface should be presented.
Click on the Next button.

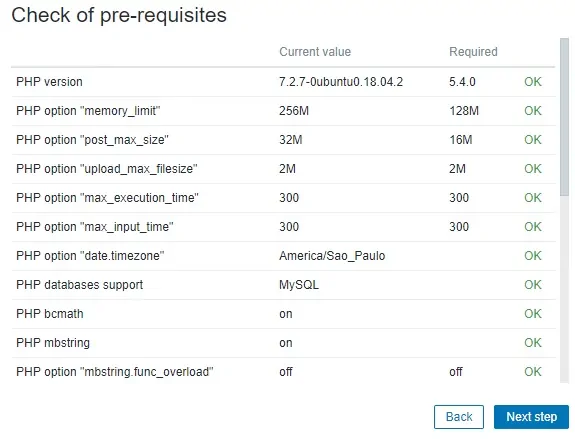
On the next screen, you will have to check if all the requirements were achieved.
Click on the Next button.

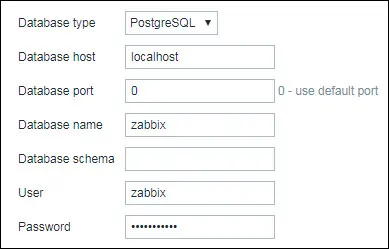
Enter the Database information required to connect to the Zabbix database.
• Host: localhost
• Database Username: zabbix
• Database Password: kamisama123

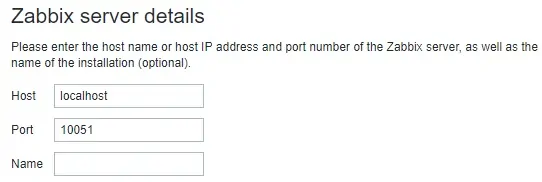
On the next screen, you just have to click on the Next button.

Take a look at the configuration summary and click on the Next button.

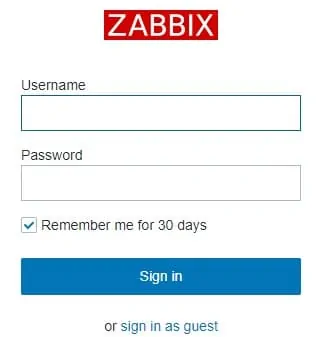
Finally, you will be presented with the Zabbix login screen.
• Zabbix default username: Admin
• Zabbix default Password: zabbix

After a successful login, you will be sent to the Zabbix Dashboard.

Congratulations, you have installed the Zabbix system on Ubuntu Linux.
Now, we need to enable the Zabbix server to monitor itself.
On the Zabbix dashboard, access the Configuration menu and select the Host option.

On the top right of the screen, select the option named: Zabbix servers
Locate the host named Zabbix server and click on the word DISABLED.
This will enable the Zabbix server to monitor itself.

The Zabbix server status will turn from DISABLED to ENABLED.

Congratulations! The Zabbix server installation was finished successfully.

Leave A Comment
You must be logged in to post a comment.