Would you like to learn how to configure the browser cache policy on the IIS server? In this tutorial, we are going to configure the IIS server to inform the user's browser to cache files for a specific amount of time.
• Windows 2012 R2
• Windows 2016
• Windows 2019
Equipment list
The following section presents the list of equipment used to create this tutorial.
As an Amazon Associate, I earn from qualifying purchases.
Windows Tutorial:
On this page, we offer quick access to a list of Windows tutorials.
Tutorial IIS - Configure the browser cache policy
Start the application named: IIS Manager.

On the IIS Manager application, select your website.
On the right part of the screen, access the option named: HTTP Response Headers.

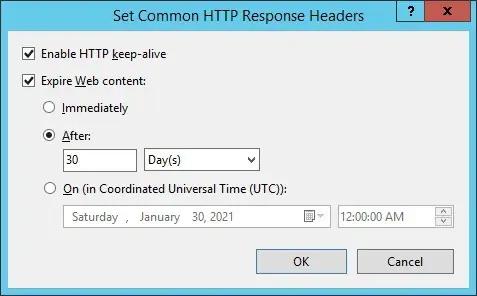
On the top right part of the screen, click on the Set common headers option.

To enable the cache of files on the user's browser, perform the following configuration:
• Expire the web content - Yes.
• After - Select the amount of time the user's browser should keep the file in cache.
Click on the OK button.

Optionally, use the command-line to configure the CACHE-CONTROL header.
In our example, we configured the CACHE-CONTROL header on the IIS server to inform the user's browser to perform the cache of content for 30 days.
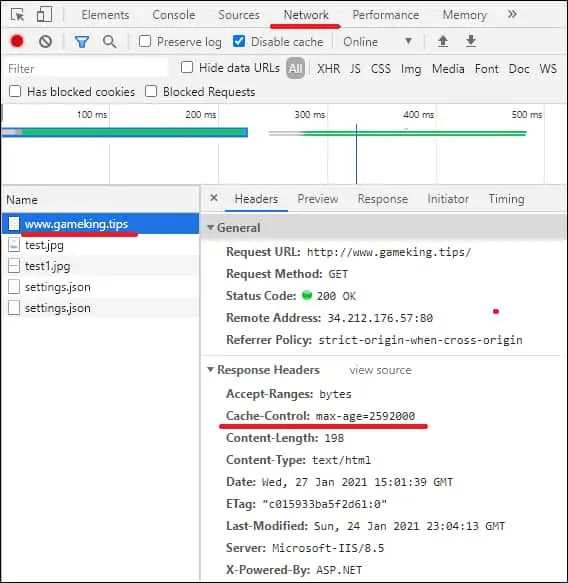
To test the installation, open the Chrome browser on a remote computer and access your website.
In our example, the following URL was entered in the Browser:
• http://www.gameking.tips
Use the page inspection feature of the Chrome browser to verify the Headers from your server.

The CACHE-CONTROL header displays the amount of cache time in seconds.
Optionally, you may use the CURL command of a Linux computer to test the header configuration.
Here is the command output.
Congratulations! You configured the IIS header named CACHE-CONTROL to allow the user to cache the content of your website.
