Would you like to learn how to use configure Zabbix SMS Notification Setup? In this tutorial, we are going to show you how to configure Zabbix to send SMS messages when an alert trigger is activated using a USB GSM Modem.
• Ubuntu version: 18.04
• Zabbix version: 3.4.12
• USB GSM Modem: DWM-221
This tutorial will work only if you are using a USB GSM Modem.
Be careful, some devices look like a USB modem, but are USB Routers like the DWR-910.
Hardware List:
The following section presents the list of equipment used to create this Zabbix.
Every piece of hardware listed above can be found at Amazon website.
Zabbix Playlist:
On this page, we offer quick access to a list of videos related to Zabbix.
Don't forget to subscribe to our youtube channel named FKIT.
Zabbix Related Tutorial:
On this page, we offer quick access to a list of tutorials related to Zabbix installation.
Tutorial - Send SMS from Command-line
First, we need to connect the USB GSM modem to the computer running Ubuntu Linux.
After connecting the USB GSM modem, you need to verify if the system detected the device.
Use the following command to verify if the system detected the USB GSM modem.
# lsusb
Bus 002 Device 002: ID 8087:8001 Intel Corp.
Bus 002 Device 001: ID 1d6b:0002 Linux Foundation 2.0 root hub
Bus 003 Device 005: ID 2001:a406 D-Link Corp. ***HERE***
The system detected that a USB device from Dlink was connected to the computer.
Now, we need to verify which type of device the Linux kernel assigned to the device.
Use the following command to verify the type of device assigned by the system.
# dmesg
[ 615.241221] usb 3-1: USB disconnect, device number 4
[ 643.023683] usb 3-1: new high-speed USB device number 5 using xhci_hcd
[ 643.173168] usb 3-1: New USB device found, idVendor=2001, idProduct=a406
[ 643.173169] usb 3-1: New USB device strings: Mfr=1, Product=2, SerialNumber=3
[ 643.173170] usb 3-1: Product: Mobile Connect
[ 643.173171] usb 3-1: Manufacturer: Mobile Connect
[ 643.173172] usb 3-1: SerialNumber: 0123456789ABCDEF
[ 643.173939] usb-storage 3-1:1.0: USB Mass Storage device detected
[ 643.174216] scsi host6: usb-storage 3-1:1.0
[ 644.188294] scsi 6:0:0:0: Direct-Access SD Storage 0000 PQ: 0 ANSI: 2
[ 644.188982] scsi 6:0:0:1: CD-ROM Mass Storage 0000 PQ: 0 ANSI: 2
[ 644.189313] sd 6:0:0:0: Attached scsi generic sg1 type 0
[ 644.190462] sd 6:0:0:0: [sdb] Unit Not Ready
[ 644.190465] sd 6:0:0:0: [sdb] Sense Key : Illegal Request [current][ 644.190467] sd 6:0:0:0: [sdb] Add. Sense: Invalid command operation code
[ 644.190785] sr 6:0:0:1: [sr0] scsi-1 drive
[ 644.190915] sr 6:0:0:1: Attached scsi CD-ROM sr0 ***
The system detected the USB GSM modem as a CDRom unity named sr0.
Use the following command to eject the CDRom unity sr0.
# eject sr0
After ejecting the fake CDRom drive, wait 10 seconds and use again the dmesg command.
# dmesg
[ 1270.366092] usb 3-1: New USB device found, idVendor=2001, idProduct=7e19
[ 1270.366094] usb 3-1: New USB device strings: Mfr=1, Product=2, SerialNumber=3
[ 1270.366096] usb 3-1: Product: Mobile Connect
[ 1270.366098] usb 3-1: Manufacturer: Mobile Connect
[ 1270.366099] usb 3-1: SerialNumber: 0123456789ABCDEF
[ 1270.367882] option 3-1:1.0: GSM modem (1-port) converter detected
[ 1270.368033] usb 3-1: GSM modem (1-port) converter now attached to ttyUSB0 ***HERE***
[ 1270.368183] option 3-1:1.1: GSM modem (1-port) converter detected
[ 1270.368299] usb 3-1: GSM modem (1-port) converter now attached to ttyUSB1 ***HERE***
[ 1270.368437] option 3-1:1.2: GSM modem (1-port) converter detected
[ 1270.368541] usb 3-1: GSM modem (1-port) converter now attached to ttyUSB2 ***HERE***
[ 1270.368681] option 3-1:1.3: GSM modem (1-port) converter detected
[ 1270.368787] usb 3-1: GSM modem (1-port) converter now attached to ttyUSB3 ***HERE***
Use the following commands to install the required software.
# apt-get update
# apt install wvdial
Use the wvdialconf command to detect the GSM communication.
# wvdialconf
Scanning your serial ports for a modem.
ttyS0<*1>: ATQ0 V1 E1 -- failed with 2400 baud, next try: 9600 baud
ttyS0<*1>: ATQ0 V1 E1 -- failed with 9600 baud, next try: 115200 baud
ttyS0<*1>: ATQ0 V1 E1 -- and failed too at 115200, giving up.
Modem Port Scan<*1>: S1 S2 S3 S4 S5 S6 S7 S8
Modem Port Scan<*1>: S9 S10 S11 S12 S13 S14 S15 S16
Modem Port Scan<*1>: S17 S18 S19 S20 S21 S22 S23 S24
Modem Port Scan<*1>: S25 S26 S27 S28 S29 S30 S31
ttyUSB0<*1>: ATQ0 V1 E1 -- failed with 2400 baud, next try: 9600 baud
ttyUSB0<*1>: ATQ0 V1 E1 -- failed with 9600 baud, next try: 9600 baud
ttyUSB0<*1>: ATQ0 V1 E1 -- and failed too at 115200, giving up.
ttyUSB1<*1>: ATQ0 V1 E1 -- OK
ttyUSB1<*1>: ATQ0 V1 E1 Z -- OK
ttyUSB1<*1>: ATQ0 V1 E1 S0=0 -- OK
ttyUSB1<*1>: ATQ0 V1 E1 S0=0 &C1 -- OK
ttyUSB1<*1>: ATQ0 V1 E1 S0=0 &C1 &D2 -- OK
ttyUSB1<*1>: ATQ0 V1 E1 S0=0 &C1 &D2 +FCLASS=0 -- OK
ttyUSB1<*1>: Modem Identifier: ATI -- Manufacturer:
ttyUSB1<*1>: Speed 9600: AT -- OK
ttyUSB1<*1>: Max speed is 9600; that should be safe.
ttyUSB1<*1>: ATQ0 V1 E1 S0=0 &C1 &D2 +FCLASS=0 -- OK
ttyUSB2<*1>: ATQ0 V1 E1 -- OK
ttyUSB2<*1>: ATQ0 V1 E1 Z -- OK
ttyUSB2<*1>: ATQ0 V1 E1 S0=0 -- OK
ttyUSB2<*1>: ATQ0 V1 E1 S0=0 &C1 -- OK
ttyUSB2<*1>: ATQ0 V1 E1 S0=0 &C1 &D2 -- OK
ttyUSB2<*1>: ATQ0 V1 E1 S0=0 &C1 &D2 +FCLASS=0 -- OK
ttyUSB2<*1>: Modem Identifier: ATI -- Manufacturer:
ttyUSB2<*1>: Speed 9600: AT -- OK
ttyUSB2<*1>: Max speed is 9600; that should be safe.
ttyUSB2<*1>: ATQ0 V1 E1 S0=0 &C1 &D2 +FCLASS=0 -- OK
ttyUSB3<*1>: ATQ0 V1 E1 -- failed with 2400 baud, next try: 9600 baud
ttyUSB3<*1>: ATQ0 V1 E1 -- failed with 9600 baud, next try: 9600 baud
ttyUSB3<*1>: ATQ0 V1 E1 -- and failed too at 115200, giving up.
Found a modem on /dev/ttyUSB1.
Modem configuration written to /etc/wvdial.conf.
ttyUSB1: Speed 9600; init "ATQ0 V1 E1 S0=0 &C1 &D2 +FCLASS=0" ***HERE***
ttyUSB2: Speed 9600; init "ATQ0 V1 E1 S0=0 &C1 &D2 +FCLASS=0" ***HERE***
Here is a quick summary of what the wvdialconf command detected:
• Port ttyUSB1 using the 9600 speed and the AT communication is OK
• Port ttyUSB2 using the 9600 speed and the AT communication is OK
Now, we know that one of the following interfaces may work to send SMS:
• Port ttyUSB1
• Port ttyUSB2
Use the following command to install the Gammu software.
# apt-get install gammu
Use the gammu-config command to configure the communication with the GSM modem.
# gammu-config
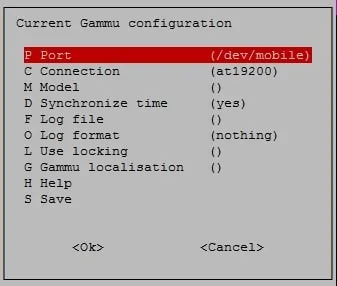
Here is the original Gammu configuration.
Here is the new Gammu configuration.
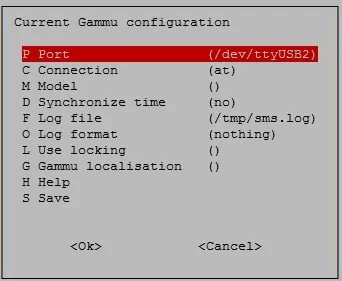
Click on the save option to finish your configuration.
In our example, we are using the following configuration:
• Port - /dev/ttyUSB2
• Connection - at
• Synchronize time - No
Use the following command to send an SMS message:
# echo "Dragon Ball super is Awsome!" | gammu --sendsms TEXT 5521999998877
If you want break, press Ctrl+C...
Sending SMS 1/1....waiting for network answer..OK, message reference=233
If the test was successful you are good to go.
If the test was unsuccessful, you need to use the gammu-config command and change the ttyUSB2 to another ttyUSB interface.
We were able to send SMS as the ROOT user.
Now we need to be able to send SMS as the Zabbix user.
Use the following command to add the Zabbix user to the Dialout group.
# usermod -a -G dialout zabbix
# groups zabbix
zabbix : zabbix dialout
Use the following commands to create a script to send SMS messages.
# mkdir /scripts
# touch /scripts/sms.sh
# vi /scripts/sms.sh
Here is the content of the sms.sh file.
#!/bin/bash
MODEM=/dev/ttyUSB2
NUMBER=$1
shift 1
TEXT=$*
echo -e -n "AT+CMGF=1 \015" > $MODEM
echo -e -n "AT+CMGS=\"$NUMBER\" \015" > $MODEM
echo -e -n "$TEXT \015" | cut -c1-150 | tr -d '\n' > $MODEM
echo -e -n "\032" > $MODEM
echo To: $NUMBER
echo Text: $TEXT
echo SMS sent.
In our example, we are configuring the USB modem as /dev/ttyUSB2.
Log in as the Zabbix user and try to send an SMS using the following commands:
# chmod 777 /scripts/sms.sh
# chown zabbix.dialout /scripts/sms.sh
# su zabbix
$ ./scripts/sms.sh 552199999999 Shingeki no Kyojin is a great manga!!!
If you were able to send an SMS message using the Zabbix user you can go to the next section of this tutorial.
Tutorial - Zabbix SMS Notification Setup
Open your browser and enter the IP address of your web server plus /zabbix.
In our example, the following URL was entered in the Browser:
• http://35.162.85.57/zabbix
On the login screen, use the default username and default password.
• Default Username: Admin
• Default Password: zabbix
After a successful login, you will be sent to the Zabbix Dashboard.
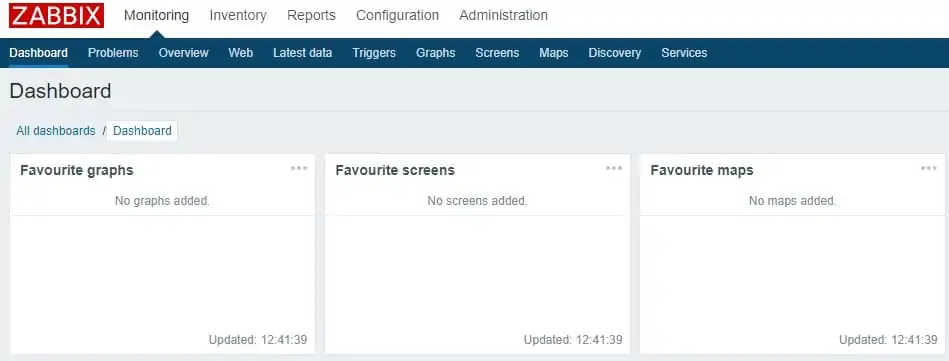
On the dashboard screen, access the Administration menu and select the Media Types option.

Locate and click on the option named SMS.

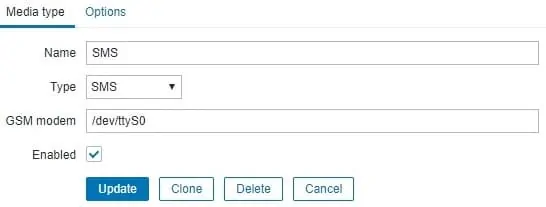
On the SMS properties screen, you need to enter the following configuration.
• GSM Modem - Enter the USB GSM modem interface.
Here is the original image, before our configuration.
Here is the new image with our configuration.
• GSM Modem - /dev/ttyUSB2
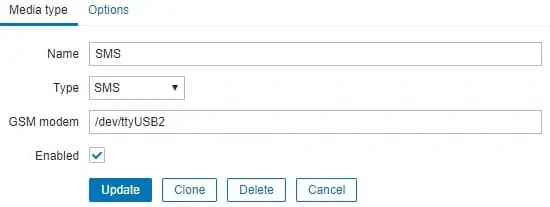
Click on the Update button.
On the dashboard screen, access the Configuration menu and select the Action option.

Locate and the option named: Report problems to Zabbix administrators
In order to enable this action, you need to click on the word Disabled in red.

It will turn on the word Enabled in green.

This will configure Zabbix to send SMS notifications to the users that are members of the Zabbix Administrator group.
By default, only the user Admin is a member of the Zabbix administrators group.
By default, the Admin user has no phone number associated to the account.
Now, we need to associate a phone number with the Admin account.
Login on the Zabbix web interface as the Admin user.
On the top right part of the screen, access the user profile settings.
On the user profile screen, access the Media tab and add a new SMS configuration.
Here is an image with our configuration.
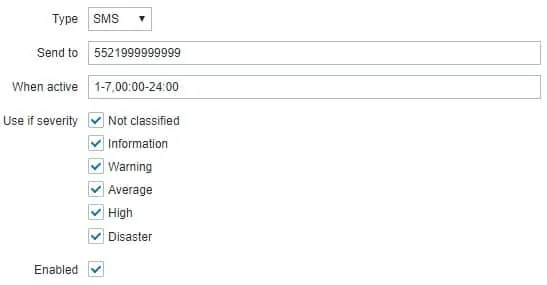
Here is the summary of the Admin user SMS configuration.

Congratulations! You have configured the Zabbix server SMS notification
Tutorial - Testing Zabbix Notification
Now, we are going to show you how to test your trigger notification configuration.
In our example, we are going to create a fake ICMP problem.
On the dashboard screen, access the Configuration menu and select the Host option.

On the top right of the screen, click on the Create host button.
On the Host configuration screen, you will have to enter the following information:
• Host Name - TEST
• Visible Hostname - TEST
• New group - TEST
• Agent Interface - 5.5.5.5
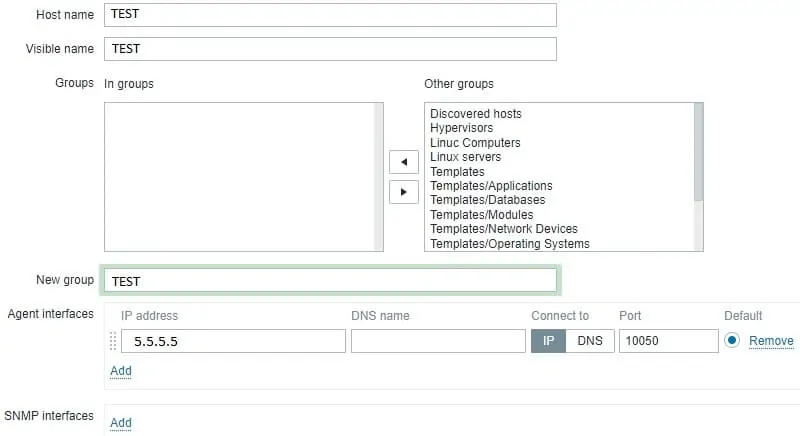
Access the Templates tab and add the following template.
• Template module ICMP Ping

After finishing the host configuration go back to the Zabbix dashboard initial screen and wait 5 minutes.
Wait for the ICMP problem trigger to activate.

Take a look at your phone messages.
Check if the Zabbix server sent you an SMS notification reporting this problem.
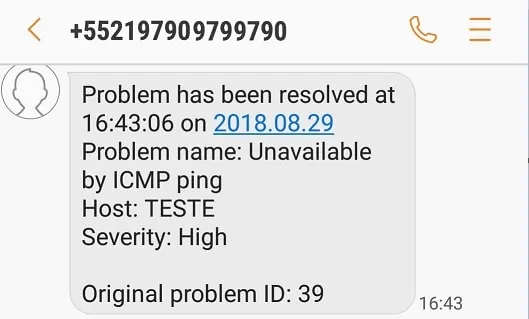
Congratulations! You have successfully tested your Zabbix SMS notification.
